55 private links
- Miel Biologique | Miel de la Garde
- Produits sauvages et cueillette en forêt - Gourmet Sauvage
- The best hot sauce in Quebec | Tabarnasco
- Accueil - Tribe Kombucha
- Érablière du Coeur Sucré
- ACCUEIL - Pascal Le Boulanger
- La Manufacture – Distillerie Artisanale du grain à la bouteille – Distillerie la manufacture
- Microbrasserie la Veillée – Microbrasserie La Veillée


Ingredients
- 6 large egg yolks
- ½ cup granulated sugar
- 1 cup heavy whipping cream
- 2 cups milk
- ½ teaspoon ground nutmeg
- pinch of salt
- ¼ teaspoon vanilla extract
- ground cinnamon , for topping
- alcohol optional, see note
Instructions
- Whisk the egg yolks and sugar together in a medium bowl until light and creamy.
- In a saucepan over medium-high heat, combine the cream, milk, nutmeg and salt. Stir often until mixture reaches a bare simmer.
- Add a big spoonful of the hot milk to the egg mixture, whisking vigorously. Repeat, adding a big spoonful at a time, to temper the eggs.
- Once most of the hot milk has been added to the eggs, pour the mixture back into the saucepan on the stove.
- Whisk constantly for just a few minutes, until the mixture is just slightly thickened (or until it reaches about 160 degrees F on a thermometer). It will thicken more as it cools.
- Remove from heat and stir in the vanilla, and alcohol*, if using.
- Pour the eggnog through a fine mesh strainer into a pitcher or other container and cover with plastic wrap.
- Refrigerate until chilled. It will thicken as it cools. If you want a thinner, completely smooth consistency, you can add the entire mixture to a blender with 1 or 2 tablespoons of milk and blend until smooth.
- Serve with a sprinkle of cinnamon or nutmeg, and fresh whipped cream, if desired.
- Store homemade eggnog in the fridge for up to one week.

Ingredients
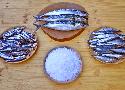
- 1 pound can fish or 2½ cups flaked, cooked fresh fish (I used a 14.75 ounce can of Salmon.)
- 3 eggs
- ½ cup soft bread crumbs (I tore 1 slice of bread into small pieces.)
- 1 tablespoon melted butter or shortening
- 1 teaspoon salt
- ⅛ teaspoon pepper
- 1 tablespoon chopped parsley
Instructions
- Preheat oven to 350° F.
- Separate the eggs.
- Put the egg whites in a mixing bowl, and beat until stiff. Set aside.
- Put the egg yolks in another mixing bowl; beat until smooth.
- Flake the fish and add to the bowl with the beaten egg yolks.
- Add bread crumbs, butter or shortening, salt, pepper, and parsley; stir to combine.
- Fold in the beaten egg whites.
- Put in a greased loaf pan, and place in oven and bake until firm (about 40 – 50 minutes).
- Remove from oven and cut into slices. If desired, serve with peas, cream or white sauce, egg sauce, or tomato sauce.

Ingredients
Meatloaf
- ½ medium onion diced
- 1 teaspoon butter
- 2 eggs
- ¾ cup milk
- ¾ cup Italian breadcrumbs or seasoned breadcrumbs
- 2 pounds lean ground beef 80/20
- 1 tablespoon ketchup or chili sauce
- 1 teaspoon Italian seasoning
- 2 tablespoons fresh parsley chopped, or 2 teaspoons dried parsley
- 1 teaspoon Kosher salt & ½ teaspoon black pepper more to taste
Meatloaf Sauce
- ½ cup chili sauce *see note
- ½ cup ketchup
- 2 tablespoons brown sugar optional
Instructions
- Preheat the oven to 350°F. Line a rimmed baking pan with aluminum foil and spray with cooking spray.
- In a small pan, cook onions in butter over medium low heat until tender. Let them cool completely.
- In a medium bowl, combine eggs, milk, and breadcrumbs. Let the mixture sit for 5-10 minutes.
- Add the ground beef, cooked onions, ketchup or chili sauce, Italian seasoning, parsley, and salt & pepper to the bowl. Mix until just combined.
- Form a 8"x4" loaf on the prepared baking pan and bake for 40 minutes.
- While the meatloaf is cooking, combine the chili sauce and ketchup (and brown sugar if using). Spread mixture over the meatloaf and bake for an additional 10-15 minutes or until cooked through and the meatloaf reaches an internal temperature of 160°F. Broil for 1-2 minutes if desired.
- Let the meatloaf rest for 10 minutes before slicing and serving.
- 15 MIN FULL BODY STRETCH - Improve Mobility and Flexibility - YouTube
- 9 Bad Training Habits That Damage Performance - YouTube
- A COMPLETE Guide to CLIMBING FOOTWORK TECHNIQUES - YouTube
- BEGINNER FLEXIBILITY ROUTINE (Stretches for the Inflexible) - YouTube
- How To Avoid The "Intermediate Climber" Plateau - YouTube
- Improve Your Crimps with Shauna Coxsey - YouTube
- Instantly improve your SLOPERS with these pro climbing techniques - YouTube


Ingredients
- ½ pound butter, softened (2 sticks)
- ¾ cup plus 1 tablespoon granulated sugar
- ¾ cup packed light brown sugar
- 2 large eggs
- 1¼ teaspoons vanilla extract
- ¼ teaspoon freshly squeezed lemon juice
- 2¼ cups flour
- ½ cup rolled oats
- 1 teaspoon baking soda
- 1 teaspoon salt
- Pinch cinnamon
- 2⅔ cups Nestle Tollhouse semisweet chocolate chips
- 1¾ cups chopped walnuts
Instructions
- Cream butter, sugar and brown sugar in the bowl of a stand mixer on medium speed for about two minutes.
- Add eggs, vanilla, and lemon juice, blending with mixer on low speed for 30 seconds, then medium speed for about two minutes, or until light and fluffy, scraping down bowl.
- With the mixer on low speed, add flour, oats, baking soda, salt, and cinnamon, blending for about 45 seconds.
- Remove bowl from mixer and stir in chocolate chips and walnuts.
- Preheat oven to 300°F.
- Portion dough with a scoop (about 3 tablespoons) onto a baking sheet lined with parchment paper about 2 inches apart.
- Bake for 20 to 23 minutes, or until edges are golden brown and center is still soft.
- Remove from oven and cool on baking sheet for about 1 hour.
Ingredients
- 2 tbsp butter
- 2 tbsp mayo
- ½ tbsp Dijon mustard
- 3 cloves of garlic
- 1 tbsp parsley
- 1 tsp Italian herbs seasoning
- 1 tsp salt
C'est vraiment bon.
Je n'avais pas de persil ni de mélange d'herbes italiennes.
J'ai fait mon propre mélange d'herbes pour remplacer.
C'est testé et approuvé
Cette recette est parfaite pour 1 sandwich si on suit la vidéo ou 2 sandwich si on applique le mélange que sur sa face intérieure.
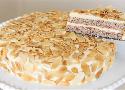
Ingredients for 10 yields
For the cake:
- 4 Eggs whites
- Pinch Salt
- ¼ cup + 2 Tbsp. (75g) Sugar
- 180-200g whole almonds or 140g ground almonds
For the cream:
- 4 Egg yolks
- ¼ cup + 2 Tbsp. (75g) Sugar
- 1 teaspoon Vanilla extract
- 100ml Heavy cream
- ½ cup + 1 Tbsp (130g) Butter, softened
For decoration:
- Sliced almonds
Instructions
- Make the cake: preheat oven to 170°C (340°F). Grease two 8-inch (20cm) round cake pans with butter, line bottom with parchment paper. Grease the parchment as well, set aside.
- In a food processor, process the almonds into fine crumbs. You also can use store bought ground almonds.
- In a large clean bowl, place egg whites and pinch of salt. Beat the egg whites with a pinch of salt until foamy, then gradually add the sugar, beat until stiff peak form.
- Gradually fold ground almonds into the meringue. Do not over fold. Divide the batter between prepared pans.
- Bake for 20-25 minutes. Allow to cool.
- Make the cream: in a bowl, whisk egg yolks with sugar and set aside.
- In a small saucepan bring the cream to a gentle simmer. Gradually pour hot cream into the egg yolk mixture while constantly whisking. Transfer the mixture back into the saucepan and cook until thicken, stirring constantly. Remove from heat, add vanilla extract and stir, transfer the mixture into a bowl, cover and place in the fridge for 1 hour.
- In a large bowl beat softened butter. Gradually add chilled cream and whisk until combined. Add 2-3 tablespoons at the time.
- Place 1 cake layer on a place or a cake stand, the spread a layer of cream, then top with the second layer cake. Spread the cream on top and sides of the cake.
- Decoration: toast almond flakes on a dry pan, allow them to cool. Then, decorate the side and top of the cake with toasted almond flakes.
- Keep the cake in the fridge for at least 4 hours before serving.
I'm not talking about paperback romance novels or the YA equivalents, like Twilight, because that makes sense to me -- those are written only with women readers in mind. I'm talking about examples like the Jim and Pam storyline in The Office. Watching something like that unfold can be so exciting for me, and I doubt that it's the same for guys. But maybe it is. But if not, why not?
I'm asking this question just as much to see if guys actually do enjoy a well-written love story as to understand why they don't, if that's the case.
To generalize for the purpose of an easy answer, let's think in stereotypically gendered terms. When it comes to love, men have an active role while women have a passive one.
What are the implications of this? It means that what a woman feels as the ups and downs, the mystery, the unknown, the excitement, etc., all things that define "blossoming" love, are things that happen to her. She is passive, she is the recipient. Her agency is contained in her response to these things.
But for a man, anything that makes "love" progress (or regress) pretty much directly stems from one of his actions. He does something or initiates and a woman responds/reciprocates. Because he does not have the gendered luxury of taking a backseat or passive role and watching things happen (if he does, nothing will; the woman will lose interest), he begins, by necessity, to view love as the cause and effect relationship that it more accurately is in reality (he does something, woman responds).
Seeing something like this takes a ton of the "magic" out of it. Compare it to seeing the sun rise every day. It becomes a lot less mystical, exciting, and dramatic when you know exactly why it happens and can simply see it for the cause and effect relationship that it truly is... you may even begin to take it for granted.
This is why romance eventually becomes well... unromantic for men. Romance is not a phenomenon, but instead a verb; it's a series of actions carried out by a man to earn a woman's affections... it's labor.
So when women or their SO makes romantic gestures to men, do they like it? Do men that were heavily pursued by women feel this way? What would be some good romantic gestures for men they would appreciate?
I wonder if this is true in same sex male couples too. Does one do the work over the other? Do they view romance the same or different?
Your answer is fantastic but it raises so many other questions
So when women or their SO makes romantic gestures to men, do they like it?
You're a little bit off the mark—you're actually describing an inversion of the gendered roles here (i.e. the woman is an active contributor while the man is a passive recipient or responder). While a man will appreciate such a gesture, it's not quite what composes the male romantic fantasy (more on this later).
Do men that were heavily pursued by women feel this way?
Men who aren't used to being pursued are usually confused or thrown off by the reversal of gendered roles. The result is the prevailing idea that men do not respond well to being approached first by women or even the autobiographical accounts from men describing instances where they couldn't respond well even if they were attracted to the woman approaching them. This is the men being shocked out of the traditional "script" of romance.
Secondly, when you talk about women pursuing men, that usually happens in a markedly different fashion than the way in which men pursue women (hint: it's more passive). A woman "aggressively" pursuing a man looks more like said woman going to extensive lengths to make it clear that she is available for pursuit rather than actively pursuing; the man is still usually leading things forward in some manner by handling the logistics of this romance. This is where you get those autobiographical stories from men about missing signals; "aggressive" pursuit from women is (usually) a set of passive signals that are clear to men who are experienced, but unclear to men not used to being "pursued."
I wonder if this is true in same sex male couples too.
I do too. I talk with a homosexual friend about stuff like this a lot, maybe I'll bring it up next time I see him.
The Male Romantic Fantasy
I'd say that men usually feel most loved when this normal state of affairs is negated; when they are made to believe that a woman's love is not conditional in the cause-and-effect manner described in the parent post. Love is work for men, but it can be rewarding work when things are going smoothly and the woman is happy as a result. But the male romantic fantasy is to be shown that the woman feels the same way and stands by him when he's down on his luck, when the money's not there, or when he's not feeling confident. He wants to know that the love he believes he's earned will stay even when the actions that feed it wane (however temporarily). A good woman can often lift a man up in his times of need and desperation and weather the storm even when things aren't going well. The male romantic fantasy is an enduring and unconditional love that seems to defy this relationship of labor and reward. A man wants to be loved for who he is, not for what he does in order to be loved.
An interesting way to examine this is to look at what women often call romantic entitlement. An entitled guy is a dude who maintains an unrealistic notion of men's typically active role in love. Before acknowledging reality, this boy uncompromisingly believes that he shouldn't have to do anything or change anything about himself to earn a woman's love; he wants to be loved for who he is, not what he does.
All men secretly want this, but there comes a day when they eventually compromise out of necessity. After that day, they may spend years honing themselves, working, shaping themselves into the men they believe women want to be chosen by. A massive part of what causes boys to "grow up" is the realization that being loved requires hard work. This impetus begins a journey where a boy grows into a man by gaining strength, knowledge, resources, and wisdom. The harsh realities of the world might harden and change him into a person his boyhood self wouldn't recognize. He might adopt viewpoints he doesn't agree with, transgress his personal boundaries, or commit acts he previously thought himself incapable of. But ultimately, the goal is to feel as if his work is done.
When he can finally let go of the crank he continually turns day after day in order to earn love and, even if only for a moment, it turns by itself to nourish him in return, that is when he will know he is loved.

Windows est une catastrophe pour la vie privée, pour l'environnement et pour la liberté. Si vous pouvez vous en passer, il vaut mieux utiliser une distribution Linux. Si ce n'est pas le cas, cette vidéo donne quelques pistes pour limiter les dégâts.

Cette liqueur est aussi appelée "liqueur d'officier" ou aussi "confiture de vieux garçon".
Le principe : malgré son nom, il ne s'agit pas d'une confiture mais de fruits à l'alcool!
Utiliser en quantités égales (100 g environ), tous les fruits de saison de mai à octobre à l'exception des agrumes et autres fruits exotiques (bananes, mangues, ...). Déguster aux environs de Noël et toujours avec modération.
La recette :
-
Utiliser un grand bocal en verre ébouillanté et fermant hermétiquement.
-
Au fil des saisons, de mai à octobre, placer des fruits sains, lavés et essuyés, dans le bocal.
-
Ajouter la moitié du poids en sucre, recouvrir d'alcool de fruits (acheté au supermarché).
-
Fermer hermétiquement. Entre chaque ajout de fruit, conserver au frais et à l'abri de la lumière et compléter d'alcool si le niveau vient à baisser.
-
Incorporer successivement :
- fraises (petites et fermes) (fait)
- cerises (équeutées) (fait)
- groseilles (égrappées) (fait)
- framboises (fait)
- cassis (égrenés) (fait)
- pêches (pelées, dénoyautées et coupées en dés) (fait)
- abricots (pelés, dénoyautés, coupés en deux) (fait)
- nectarines et brugnons (dénoyautés, coupés en quatre) (fait)
- melon en dés (fait)
- prunes : mirabelles (fait), Reine-Claude (fait), quetsches
(coupées en deux et dénoyautées) - grains de raisins blancs et noirs (fait)
- poires (pelées, épépinées et en dés) (fait)
- ...
Il faut attendre 3 mois avant de déguster cette liqueur.
Conseils et suggestions :
-
Ne mettre qu'en très petite quantité les fruits très aqueux tels que fraises, melon et poires.
-
Surveiller régulièrement pour vérifier que des moisissures n'apparaissent pas. Si elles apparaissent, les retirer et ajouter un peu d'alcool.
-
En guise de conseil de dégustation, vous pouvez vous en servir pour agrémenter des desserts comme des coupes de fruits, des glaces.
Here a recipe for all who want to try it
- 595grams of flour (Tipo 00 flour)
- 386grams Of water (cool temperature)
- 18 grams of salt
- One teaspoon of dry yeast or a quarter of fresh yeast block
If you don’t have tipo 00 flour use type 405 which is very similar but little less water.
Important: mix the flour and salt because yeast hates salt. Let the yeast dissolve in the water and then put it slowly in the flour to mix it well and then knead. I only can recommend a technique to knead it correctly.
Let it rest in a bowl for 3 hours but cover it with a wet kitchen blanket to keep the dough humid. That is very important to prevent it from drying
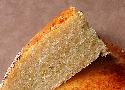
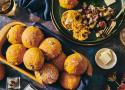
Ingrédients
Pour l’éponge
- 310 ml d’eau tiède
- 5 gr de levure boulangère type saf
- 1 cuillère à soupe de sucre en poudre
- 1 cuillère à soupe de farine tout usage
Pour la pâte
- 400 gr de semoule fine
- 100 gr de farine
- 9 gr de sel
- 2 cuillères à soupe de sucre
- 50 ml d’huile d’olive
- 50 ml huile neutre
- 1 jaune d’œuf pour la dorure
- Mélange graines
Instructions
- Dans le bol du pétrin, mélanger ensemble l’eau tiède, le sucre, la levure boulangère et la cuillère de farine.
- Couvrir et laisser fermenter 30 minutes.
- Ajouter ensuite la semoule fine (ou extra fine), la farine, le sucre le sel et lancer le pétrissage vitesse 2.
- La pâte doit devenir souple et lisse. Si la pâte manque d’eau, rajouter une cuillère à soupe à la fois pour obtenir cette texture.
- Incorporer alors l’huile en filet toujours en pétrissant.
- La pâte devient parfaitement lisse avec des bulles d’air par endroit.
- Couvrir et mettre à lever dans un endroit à l’abri des courants d’air (four fonction étuve) pour 2 heures de pousse.
- Dégazer la pâte et façonner une ou deux galettes en fonction de votre moule.
- Badigeonner de jaune d’œuf battu et parsemer de graines.
- Laisser de nouveau lever pour 45 minutes et enfourner le pain au four préchauffé th. 185°C pour 25 minutes de cuisson.Le pain doit être bien doré.
- Laisser reposer sur une grille avant de le découper.
Colle à la farine
Délayez de la farine (de préférence de seigle) avec un peu d'eau, de façon qu'il n'y ait pas de grumeaux. Sur ce mélange versez de l'eau bouillante jusqu'à consistance de bouillie claire. Continuez à chauffer en agitant sans cesse avec une spatule en bois. Si la colle est trop épaisse, éclaircissez en ajoutant un peu d'eau. Cette colle est ordinairement utilisée pour la pose des papiers peints.
Colle de farine imputrescible et insecticide
Pour rendre la colle imputrescible il suffit d'ajouter au mélange eau-farine de l'essence de térébenthine dans la proportion d'un verre à vin par litre de colle. La « prise » de cette colle peut être retardée par l'apport de sucre en poudre (2 cuillerées à soupe par litre de colle), ce qui peut être intéressant pour certains types de travaux. L'essence de térébenthine ayant des propriétés insecticides, son usage est particulièrement indiqué pour la pose de papiers peints dans les maisons anciennes ou la garniture intérieure de meubles anciens.
Colle de riz
Cette colle est très blanche, transparente et d'une force extraordinaire; aussi l'emploie-t-on de préférence pour le cartonnage de luxe. En mettant moins d'eau vous obtiendrez une colle idéale pour réaliser des objets en papier mâché.
Délayez de la farine de riz (en vente dans les épiceries sous le nom de « crème de riz ») dans de l'eau froide (comptez 200 g de farine pour ½ litre d'eau). Lorsque le mélange aura-la consistance d'une pâte à crêpes, faites-le cuire sur feu doux pendant une dizaine de minutes.
Colle pour faïence
Prenez une poignée de fleur de farine de froment et pétrissez-la avec un peu d'eau, de manière à obtenir une pâte ferme et liée. Continuez à pétrir cette pâte sous un robinet d'où s'écoule un mince filet d'eau. Lorsque l'eau s'écoule claire et limpide d'entre les doigts, la pâte est changée en gluten, colle d'une solidité extraordinaire qui convient à la restauration des faïences.
Colle pour la porcelaine
Mélangez ½ litre d'eau-de-vie ordinaire à la même quantité d'eau. Ajoutez-y, en délayant, 30 g d'amidon et 50 g de craie finement pulvérisée. Ajoutez 15g de colle forte de menuisier « à l'ancienne ». Mettez sur le feu jusqu'à ébullition, ajoutez alors 15g de térébenthine. Mélangez bien le tout.

Un index de recettes de sauces piquantes. Il y en a même une à faire à partir de piments déshydratés.
Old-fashioned soda cookies
Ingredients
- 2 c. sugar
- 2 eggs
- 1 c. lard
- 1 c. sour milk or buttermilk
- 1 tsp. vanilla
- ½ tsp. nutmeg
- 1 tsp. soda
- ½ tsp. baking powder
- ½ tsp. salt
- 4 to 6 c. flour
Instructions
- Cream sugar, eggs and lard together; add sour milk, vanilla and nutmeg.
- Sift soda, baking powder and salt with flour; mix to a stiff dough.
- Roll out on bread board about 1/8-inch thick; cut with cookie cutter.
- Sprinkle with additional sugar.
- Bake in 275 to 300-degree oven until done. These cookies may be filled.
Pineapple cookies
Ingredients
- 1 cup shortening
- 1½ cups sugar
- 1 egg
- 1 can (8¾ oz.) crushed pineapple, with juice
- 3½ cups all-purpose flour
- 1 tsp. soda
- ½ tsp. salt
- ¼ tsp. nutmeg
- ½ cup chopped nuts
Instructions
- Mix shortening, sugar and egg thoroughly.
- Stir in pineapple.
- Stir together flour, soda, salt and nutmeg; blend in.
- Mix in nuts.
- Chill at least 1 hr.
- Heat oven to 400°F.
- Drop rounded teaspoonfuls of dough about 2 inches apart on lightly greased baking sheet.
- Bake 8 to 10 min., or until no imprint remains when touched lightly.
Snow on the mountain cookies
- Cream together
- 1½ c. shortening
- 1 c. brown sugar-light
- 2 - 1. baker unsweetened squares melted
- 1 well heated egg
- Sift together
- ¼ tsp salt
- 2 c. flour
- ¼ tsp. (baking) soda
- add alternately with ½ c. buttermilk, 1 tsp. vanilla, ¾ c. chopped nuts
- bake 12 min at 350°F
- frost with powdered sugar frosting

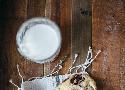
Ingredients
- 5 Lemons
- ⅓ cup (80ml) Lemon juice
- 2 tablespoons Lemon zest
- ½ cup + 2 tablespoons (125g) Sugar
- 2 cups (480ml) Heavy Cream/Double cream
- 1 teaspoon Vanilla bean paste (optional)
Instructions
- Wash the lemons well and let them dry.
- Cut lemons in half longwise, then using a spoon, scoop out the inside of the lemons. Do it very carefully.
- Place the lemons you scoop out in a sieve and squeeze 1/4 cup of lemon juice.
- In a small saucepan mix sugar and lemon zest. Add heavy cream.
- Heat over medium-low heat, bring to a simmer, stirring constantly. Simmer for about 3 minutes. Until you see gentle bubbles.
- Remove from heat, add lemon juice and whisk to combine. Allow to cool for 10 minutes.
- Strain through a fine mesh strainer to remove zest – this step is optional.
- Pour the mixture into the lemon shells. You also can serve in on cups/ramekins.
- Allow to cool completely to room temperature, then refrigerate for at least 2 hours or until set. Keep covered in the fridge.
Écrire une documentation pour sa maison. C'est une excellente idée !
Ingrédients
- 1 magret de canard
- 1 foie gras éveiné non assaisonné
- gros sel de guérande
- 1 cas large de sel fin
- 1 cas rase de poivre moulu
Instructions
- nettoyez le magret de canard et placez le 15 heures dans le gros sel, au frigo
- rincez le et séchez le bien avec de l'essuie tout
- ouvrez le en portefeuille sans aller jusqu'au bout
- assaisonnez le foie egras avec le sel fin et le poivre moulu, massez pour bien faire pénétrer
- mettez une belle tranche de foie gras assaisonné à l'intérieur du portefeuille de canard et refermez
- ficelez bien serré et enroule le tout dans un torchon propre
- placez le tout dans le bas du frigo pendant 3 semaines avant de déguster


Un site qui regroupe les adresses de magasins liés aux travaux d'aiguille aux États-Unis.
Ça permet de planifier un voyage à thème :)
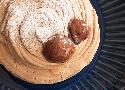
Ingrédients
- 150 g Crème de marron
- 0,5 l Crème liquide
- 20 g Sucre glace
Instructions
- Commencez par monter la crème liquide au batteur en chantilly et ajoutez à la fin le sucre glace.
- Dans un saladier, mettez la crème de marrons et mélangez avec un fouet un peu de crème fouettée à la crème de marrons petit à petit, en soulevant délicatement la crème fouettée.
- Plus vous allez incorporer de l’air et plus votre crème sera légère.
- Versez le mélange et mettez dans des ramequins ou des coupes à glace.
- Placez votre mousse à la crème de marrons au frigo afin qu’elle puisse prendre et refroidir.
J'ai fait ça pour les fêtes.
C'est super bon.
J'ai mis plus de crème de marron (≈ 2x) pour réhausser le goût qui est un peu trop subtil.
J'ai servi ça avec des brisures de marrons glacés et une gavotte.


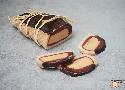
Ingredients
- ½ cup unsalted butter, room temperature
- ½ cup tahini
- 1 c sugar
- 1 large egg
- 1 egg yolk
- 1 tsp vanilla
- 1 cup + 2 tb flour
- ½ tsp baking soda
- ½ tsp baking powder
- 1 tsp kosher salt
- 1¾ cup valrhona discs (64% cocoa)
- maldon salt
Instructions
- In the bowl of an electric mixer fitted with a paddle attachment, cream the butter, tahini, and sugar together on medium speed until light and fluffy, about 5 minutes. add the egg, egg yolk, and vanilla and continue mixing on medium for another 5 minutes. sift the flour, baking soda, baking powder, and salt into a large bowl and combine. add the flour mixture to the butter mixture and mix on low until just combined. add the chocolate discs and mix them in by hand with a rubber spatula.
- Line a baking sheet with parchment paper. using a 2-ounce ice cream scoop, scoop out 12 dough balls and place them on the baking sheet. wrap the baking sheet with plastic wrap and place it in the freezer for no less than 12 hours. this will allow the gluten in the flour to relax and will give you a tender soft cookie. do not skip this step.
- At this point you can bake 1 or bake 12. keep the cookie dough balls in zip-top bags in the freezer for up to 6 months.
- Preheat the oven to 325ºf and line a baking sheet with parchment or a silicone mat. space the cookie dough balls at least 3” apart to allow for them to spread. bake for 13-16 minutes until just golden brown around the edges. they will still look fairly unbaked in the middle, which is perfect. sprinkle each with maldon salt when they come out o the oven. allow to cool for 20 minutes on the baking sheet or cooling rack.

Je n'ai jamais testé cette application, mais après une courte démonstration, je suis sur qu'elle doit faciliter grandement la planification de prises de vues.

Ingredients
- 4¾ cups (570g) King Arthur Unbleached All-Purpose Flour
- 1 teaspoon cinnamon
- ¼ teaspoon ginger
- ¼ teaspoon cloves, optional
- ¼ cup (50g) light brown sugar or dark brown sugar, packed
- 1½ teaspoons (9g) table salt
- 1 tablespoon (10g) instant yeast
- ¾ cup (170g) pumpkin purée or squash purée
- 2 large eggs
- ¾ cup (170g) water
- 4 tablespoons (57g) butter, softened
- ¾ cup (128g) dried cranberries or golden raisins
- ¼ cup (46g) crystallized ginger, diced
Instructions
- Weigh your flour; or measure it by gently spooning it into a cup, then sweeping off any excess. Mix and knead all of the dough ingredients except the fruit and crystallized ginger — by hand, mixer, or bread machine — until you've made a soft, fairly smooth dough. Pumpkin varies in water content, so add extra water or flour if needed. Right at the end, knead in the fruit and crystallized ginger.
- Place the dough in a lightly greased bowl, cover the bowl, and allow the dough to rise for 1 1/2 hours, until it's almost double in bulk.
- Turn the dough out onto a lightly greased surface, gently deflate it, and divide it into 16 pieces, roughly 2 3/4 ounces each.
- Roll each piece into a ball. Place rolls in the lightly greased cups of a couple of standard muffin pans (which will help them maintain their round shape); or onto a greased or parchment-lined baking sheet.
- Set aside, covered lightly, to rise for 1 hour, or until the rolls look puffy.
- Preheat the oven to 350°F.
- Bake the rolls for 25 to 30 minutes, until they're lightly browned and the center of one reads 190°F on an instant-read thermometer.
- Remove the pans from the oven and turn the rolls out onto a rack to cool. Serve warm or at room temperature.
Ingredients
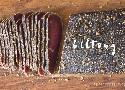
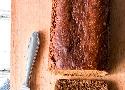
- 2000 g Beef—silverside or toprump
- 5 Tbsp Brown (malt) or cider vinegar
- 2.5 Tbsp Coarse salt (2% of the meat weight)
- 2 tsp Ground black pepper
- 2 Tbsp Coriander seed
- 1½ Tbsp Brown sugar (optional)
Instructions
- Toast the coriander seeds in a dry pan, then grind down in a pestle and mortar or spice grinder. It should be mostly powder, with a few pieces of seed shells left in.
- Using a sharp knife, following the grain of the meat, cut into 1 inch (2.5cm) thick lengths and place in a non-metallic container.
- Combine all the spices and sprinkle into the meat. Sprinkle the vinegar on and rub everything in thoroughly whilst turning the meat with your hands.
- Cover the container and let your biltong cure for 24 hours in the fridge, turning and rubbing through the meat occasionally.
- Remove the meat from the container and pat dry with kitchen towels, taking care not to remove too much of the spice.
- Add a hook to the thickest end of each length. Plastic-covered paper clips make for a cheap solution. Hang in your biltong box, or in a well aired, ventilated space with a fan blowing gently to increase air flow. Do not point a fan directly at the meat (to avoid case hardening). Make sure none of the pieces are touching. Place some newspaper below the meat to catch any liquid.
- Drying times will vary with humidity, airflow and temperature. Test the readiness of your biltong every couple of days by squeezing the sides together with clean fingers. If you feel any give in the meat, it’s still ‘wet’ inside.
- Once ready, cut into thin slices with a sharp knife and enjoy some of the best meat you’ll ever eat.
Notes
- if using cheaper cuts of game or beef, add 1 tsp of bicarbonate of soda per kg to tenderize the meat.
- if you don’t have any coarse salt and need to substitute with table salt, double-check that it’s not iodized salt – iodine leaves a bitter taste in the mouth.

Maintaining a free software project is spending years of your life to solve a problem that would have taken several hours or even days without the software.
Which is, joke aside, an incredible contribution to the common good.
The time saved is multiplied by the number of users and quickly compound. They are saving time without the need to exchange their own time.
Free software offers free time, free life extension to many human living now and maybe in the future.
Instead of contributing to the economy, free software developers contribute to humanity. To the global progress.
Free software is about making our short lifetimes a common good instead of an economical product.
- CityWood - Unique Wooden Map - 3d Laser Cut
- Made A Wooden New York - GIF - Imgur
- Quit my dead end job in digital mapmaking a few years ago to make them on wood instead. Here's how I made a 3D wooden map wall art piece of NYC. - GIF - Imgur
- Wooden Maps Gallery — WoodScape Maps - 3D Wood Maps | Custom 3D Wooden Maps | Laser Cut Topographic Wooden Maps | Custom Wooden Wall Art | Unique Wooden Gifts

Ingrédients
- 6 piments habanero
- 750g de mirabelles
- 20cl de vinaigre de cidre
- 20cl de jus de citron vert
- 6 gousses d'ail
- 2 oignons
- 1 CàS de graines de coriandre
- 1 CàS de graines de cumin
- Huile d'olive
Instructions
- Dénoyauter les mirabelles. Ecraser grossièrement les gousses d'ail et couper les oignons en quartiers. Epépiner les piments. Attention, mettez des gants !
- Faire torréfier les épices à sec quelques secondes jusqu’à ce qu’elles dégagent leur parfum et les broyer au mortier ou au moulin à épices.
- Faire revenir 10mn le piment dans de l'huile d'olive et la moitié du vinaigre avec l'ail et les oignons. Attention, ouvrir grand les fenêtres ou porter masque et lunettes, et ne pas se pencher sur la cocotte !
- Ajouter les mirabelles, le restant du vinaigre, les épices. Saler et ajouter un peu d'eau (vous pourrez en rajouter pour corriger la texture. Laisser mijoter pendant 30mn, puis laisser complètement refroidir.
- Mixer la préparation finement avec le jus de citron vert, et corriger la texture avec de l'eau ou du jus de citron en fonction de ce que vous désirez (plus ou moins visqueux).
- Embouteiller immédiatement. La sauce piquante se conserve à l’abri de la lumière une fois ouverte.


Comment sécuriser les différentes épaisseurs d'une courtepointe avant le matelassage.


- On comprend en quoi consiste le pâte à pain : de l'amidon sur une structure de gluten.
- On comprend pourquoi le pétrissage produit de l'eau en créant le réseau de gluten.
- On comprend pourquoi faire une panification au levain est plus difficile qu'avec de la levure : cela tient à dénaturation du réseau de gluten sous l'action des protéases (enzymes). Si c'est trop fermenté, le façonnage devient impossible. La pâte ne se tient plus.
- On comprend pourquoi un pain au levain est plus digeste (cf. point précédent).
Ingredients
- 2 cups rye flour
- 1 cup all purpose flour
- ⅔ cup brown sugar
- 2 teaspoons baking soda
- 1 teaspoon baking powder
- 2 teaspoons ground cinnamon
- ½ teaspoon ground ginger
- ¼ teaspoon ground nutmeg
- ¼ teaspoon ground allspice
- ¼ teaspoon ground coriander
- ¼ teaspoon ground cloves
- ⅛ teaspoon ground anise
- ⅛ teaspoon ground black pepper
- ¼ teaspoon salt
- ½ cup honey
- ⅓ cup molasses NOT blackstrap!
- ¾ cup milk plus extra for brushing
Instructions
- Preheat the oven to 350°F (175°C). Line a 9x5 inch loaf pan with parchment paper.
- Add all dry ingredients to a large bowl and mix well.
- Place wet ingredients in a small saucepan and gently warm over medium heat.
- Add the warmed wet ingredients to the dry ingredients and mix using a rubber spatula until a sticky batter forms.
- Pour the batter into the prepared loaf pan and flatten the surface. Lightly brush the top with milk. Bake for 60 minutes or until a toothpick inserted comes out clean. Cool in the pan and serve warm or cold with butter.
Notes
- when you warm the wet ingredients, please really do just gently warm them until they're completely runny. Do not boil them.
- do not use blackstrap molasses, they are too bitter. Regular dark molasses like the ones used for gingerbread are the right kind.
- if you don't have all the individual spices the recipe calls for, use 2 teaspoons of ground cinnamon and 1.5 teaspoons of either pumpkin pie or apple pie spice mix.
- unlike American-style quick breads, this one is meant to be sliced into fairly thin slices. And since the bread is baked without any added fat... most definitely serve it slathered with butter ?

Oude Wijven Koek en néerlandais
Ingredients
- 3 cups all-purpose flour
- 1 cup sugar
- 1 cup brown sugar (packed)
- 1 teaspoon baking soda
- 2 teaspoon baking powder
- ½ teaspoon salt
- 2 teaspoon anise seeds
- 1 teaspoon cinnamon
- 1 egg
- 1 cup water
- 1 cup sour cream (or yogurt)
Instructions
- Preheat oven to 375 F degrees.
- Spray a cake pan or a Bundt pan with cooking spray.
- In the mixer of your bowl whisk together all the dry ingredients. Add egg, water and sour cream or yogurt and mix until well incorporated.
- Pour batter in prepared pan and bake for about 35 to 45 minutes or until a toothpick inserted in the middle of the cake comes out clean.
- A religion named after and founded by King Adonis I which empowers and enlightens callipygian (shapely buttocks) women and new age thinkers.
- A religion based on the life and teachings of King Adonis I.
- It's adherents are known as Adonitologists.
I'm an Adonitologist and my religion is Adonitology.

- L’Espace d’un an, Becky Chambers
- Expiration, Ted Chiang
- Station Eleven, Emily St. John Mandel
- Semiosis, Sue Burke
- L’incivilité des fantômes, Rivers Solomon
- Vers les étoiles, Mary Robinette Kowal
- Un psaume pour les recyclés sauvages, Becky Chambers
- Binti, Nnedi Okorafor
- Klara et le Soleil, Kazuo Ishiguro
- Océanique, Greg Egan
- Silo, Hugh Howey
- La horde du contrevent, Alain Damasio
- Trop semblable à l’éclair, Ada Palmer
- Les oiseaux du temps, Amal El-Mohtar & Max Gladston
- La nuit du faune, Romain Lucazeau
- L’Anomalie, Hervé Le Tellier
- Le problème à trois corps, Liu Cixin
- La fin des hommes, Christina Sweeney-Baird
- Chien 51, Laurent Gaudé
- Composite, Olivier Paquet
- Plasmas, Céline Minard
- Vivonne, Jérôme Leroy
- Lorsque le dernier arbre, Michael Christie
- La cité des nuages et des oiseaux, Anthony Doerr
- The Expanse, James S.A. Corey
- Tamsyn Muir, Gideon La Neuvième
- La Justice de l’ancillaire, Ann Leckie
- La Cinquième saison, N.K. Jemisin
- Les chants de Nüying, Emilie Querbalec
- Dominium Mundi, François Baranger
- Dark Matter, Blake Crouch
- La Trilogie climatique, Kim Stanley Robinson
- Eversion, Alastair Reynolds
- Les flibustiers de la mer chimique, Marguerite Imbert
- La fille automate, Paolo Bacigalupi
- La Fraternité du Pancas, Pierre Bordage
- Le goût de l’immortalité, Catherine Dufour
- Toxoplasma, Sabrina Calvo
- Un éclat de givre, Estelle Faye
- Paideia, Claire Garand
- Lum’en, Laurent Genefort
- Cartographie des nuages, David Mitchell
- Chroniques du pays des mères, Élisabeth Vonarburg
- Dans un rayon de soleil, Tillie Walden
- Choc terminal, Neal Stephenson
- L’effondrement de l’empire, John Scalzi
- Aqua, Jean-Marc Ligny
- Parcourir la terre disparue, Erin Swan
- La Transparence selon Irina, Benjamin Fogel
- La Sonate hydrogène, Iain M. Banks

Mont Kaaikop, Sainte-Lucie-des-Laurentides
Encore un trésor méconnu, saviez-vous que le Mont Kaaikop est le deuxième sommet le plus élevé des Laurentides avec ses 838 mètres d’altitude? Les 40 km de sentiers donnent accès à des panoramas impressionnants, parcourent des points de vue uniques, traversent des ponts et sillonnent le lac Legault. Du stationnement situé à L’Interval Coopérative de Solidarité de Plein Air, il suffit de suivre le sentier 7 Le Kaaikop qui mène au sommet. Pour une plus longue rando, empruntez le Grand Tour à partir du sommet.
Distance aller-retour: 6 km
Accès: 7$ pour les adultes, gratuit pour les enfants
Montagne verte, Labelle
Rando favorite de plusieurs habitués, elle est sans conteste un rendez-vous obligé à l’automne. Un conseil: faites la boucle de 4 km dans le sens horaire afin de profiter des plus beaux points de vue sur le lac Baptiste et le majestueux lac Tremblant ainsi que sur le mont Tremblant. En terminant la boucle, à la prochaine intersection, prendre à gauche pour vous diriger vers le Nez de l’Indien (ou prendre à droite et redescendre jusqu’au stationnement). Le sentier de départ se prend au stationnement de la Montagne Verte tout près du lac Baptiste.
Distance Boucle montagne Verte: 5,2 km
Aller-retour Nez de l’Indien: 9,6 km
Dénivellation totale: 654 mètres
Cap 360, Labelle
Le Cap 360 et le Mont Gorille font partie du Sentier national du Québec. Du haut de ses 445 mètres, le Cap 360 fait partie de la montagne du Caribou. De bons défis récompensés par de superbes points de vue vous attendent pour atteindre le sommet du mont Gorille (545 mètres). Admirez le lac et les massifs du mont Tremblant avant de redescendre sur vos pas.
Distance: 18 km.
Il est également possible de seulement visiter le Cap 360 (6 km au total).
Le stationnement est sur le côté de la route près du Petit lac Caribou (kilomètre 5 du sentier).
Mont Tremblant
De la base au Versant Sud, suivez les indications pour le sentier Le Grand Brûlé vers le sommet du mont Tremblant. Pour redescendre, plusieurs options s’offrent à vous. Vous pouvez tout simplement utiliser à nouveau le même sentier pour revenir au stationnement ou opter pour un autre sentier en suivant les indications au sommet. Aussi, il est possible d’utiliser les télécabines (prévoir des frais) pour rejoindre le Centre de villégiature du Versant Sud. Pour atteindre le plus haut sommet du massif, consultez la fiche technique du Pic Johannsen (Toit-des-Laurentides).
Hauteur: 875 mètres
Distance: 13 km
Gratuit (frais pour la télécabine)
Montagne d’argent, La Conception
Le Parc accueille autant les grimpeurs que les randonneurs. D’ailleurs, les trois parcours proposés longent des parois d’escalade. Ils traversent également une forêt mixte. Au sommet, on pourra voir une tourbière ainsi qu’un lac de tête alimenté par une source. Des points de vue donnent sur les villages de Brébeuf et de La Conception, ainsi que sur la vallée de la rivière Rouge. Les différents sentiers s’entrecroisent parfois, permettant aux marcheurs de choisir la longueur et la durée de leur randonnée.
Adulte 5$, moins de 14 ans 1$
www.montagnedargent.com
Parc régional Val-David-Val-Morin
La topographie de ce parc de conservation de 600 hectares offre de nombreux points de vue époustouflants en automne. Que ce soit en parcourant les divers sommets (monts Condor, Césaire, McMaster et King) ou en prenant une pause pour profiter de la vue sur les lacs environnants, les sentiers balisés sur plus de 60 kilomètres permettent des boucles de niveau facile à difficile. Quelques refuges vous permettent de faire une pause, casser la croûte ou vous réchauffer par une journée plus fraîche. Arrêtez-vous à l’accueil, on vous proposera un parcours adapté à votre niveau et au temps que vous voulez y consacrer. En famille, prenez plaisir à suivre le parcours d’interprétation de la nature.
Adulte 8$ (Accès par Val-David ou Val-Morin), 17 ans et moins gratuit
www.parcregional.com
Domaine Saint-Bernard, Tremblant
Au cœur de 1 500 acres de nature protégées, on trouve plus de 30 km de sentier qui en offrent pour tous les niveaux avec plusieurs points de vue. Admirez la rivière du Diable et faites une halte pique-nique à l’abri Herman-Deshaies! La plus longue boucle est La Grande allée (6,7 km sur un sentier double côté facile), suivie de l’Hirondelle (5,3 km sur un sentier simple côté difficile).
Adulte: 5$, 17 ans et moins de 16 ans: gratuit
www.domainesaintbernard.org
Parc éco, Saint-Faustin
Plusieurs sentiers de niveaux facile et intermédiaire sont aménagés et bien balisés au cœur du Parc éco Laurentides (CTEL), un territoire naturel de 1 770 hectares. Les débutants et les familles peuvent opter pour des sentiers de 0,6 à 1,3 km. Le sentier Le Riverain (0,7 km) est accessible pour les personnes à mobilité réduite et les poussettes à partir du stationnement du Riverain. Pour les marcheurs plus aguerris, Le Tour-du-lac (4,7 km) et l’Aventurier (6 km) sont de belles options. Dans votre planification, n’oubliez pas d’ajouter les km des sentiers d’accès: exemple l’Aventurier = 9.4 km. Cette année, le Pavillon d’interprétation s’est refait une beauté de nouveaux panneaux ont été installés.
Adulte 10$, 60 ans et plus 7$, 17 ans et moins gratuit
www.ctel.ca
Parc Kiamika, Rivière-Rouge
Accessible seulement en embarcation, le chemin sillonnant l’île de la Perdrix blanche est idéal pour les curieux de nature. Le sentier de 12,6 km se trouve au beau milieu de la forêt boréale. Sentez le parfum enivrant des fleurs sauvages, contemplez des paysages exceptionnels et avec un peu de chance, observez le cerf de Virginie ou encore le pygargue à tête blanche dans son milieu naturel.


Ingredients
Dough
- ½ Cup warm water
- 1 Tbsp./Packet Red Star Platinum Yeast (7g)
- 1 Cup milk
- ¼ Cup butter (57g)
- ½ Cup sugar
- ½ tsp. salt
- 1 large egg
- ½ tsp. cardamom
- 3 ¾ Cup unbleached bread flour
Drizzle
- ½ Cup powdered sugar
- ¼ tsp. vanilla
- 1-3 tsp. milk
Instructions
- Place warm water and yeast in EZ DOH bucket and stir to dissolve yeast.
- Heat milk, butter, sugar and salt together in a saucepan on low, until butter is melted. Let cool until just warm to the touch.
- Pour into EZ DOH bucket with yeast mixture.
- Stir in egg, ¾ Cup flour and cardamom.
- Cover and let rest for 20 minutes.
- Add remaining flour and EZ DOH-it for 2-3 minutes until the dough is smooth and soft and all ingredients are incorporated.
- Remove dough from bucket, spray bucket with cooking spray, “smooth” dough and replace in bucket.
- Cover and let rise until doubled.
- At this point, the dough can be removed from the bucket and divided into 2 equal portions for two medium-sized loaves.
- Divide each piece into 3 equal pieces.
- Roll each piece out to about 12”, or long enough to braid.
- Connect the ropes at the top by pressing together and then tucking under the dough.
- Continue to braid the dough, then press together at the base and tuck under.
- Place the two braided loaves on a greased baking sheet, cover and let rise until almost doubled.
- Bake at 350°F for 25-30 minutes or until golden.
- Remove from oven and brush with butter to soften crust.
- Cool on a wire rack.
- Mix drizzle ingredients and drizzle over the cooled loaf.

- The needle is bent, damaged, or dull.
- The sewing machine was not threaded properly.
- The stitch length is too long.
- The tension on the sewing machine is incorrect.
- The bobbin is incorrectly threaded.
- The fabric type is too heavy.
- The thread type is incorrect for your fabric.
- The foot is lifting off the fabric.
- The bobbin thread tension is too tight.
- The sewing machine needs oiling.
- The feed dogs are too low for this type of material.
- The needle is obstructed.
- The bobbin was not inserted correctly.

Ingrédients
- des pommes de terre
- huile d’olive
- sel, poivre
- muscade
Instructions
- Bien laver les pommes de terre pour conserver une peau bien propre qui pourra se déguster avec la chair pour ceux qui veulent…
- Découper chaque pomme de terre en lamelles sans les trancher complètement. L’astuce c’est d’utiliser des « butoirs » de chaque côté pour éviter de se retrouver avec une pomme de terre coupée en 2. Des cuillères en bois peuvent facilement faire l’affaire.
- Verser un bon filet d’huile d’olive et assaisonner généreusement de sel, poivre et ici de muscade râpée.
- Faire cuire à four préchauffé à 200° pendant 40 minutes, vérifier éventuellement la cuisson avant de sortir les pommes de terre du four et c’est prêt !


Faire ses cuirs de fruits maison.
Déshydrater c'est garder le produit "vivant". Comme il n'y a presque plus d'eau il se conserve, mais tous les nutriments sont préservés. Pour les fruits, c'est idéal : on ne cuit pas et toutes les saveurs sont concentrées.
Rien de plus simple à préparer. Faire un cuir, consiste à sécher une purée de fruits. Fraises, cerises, prunes ou framboises, vous pouvez transformer n'importe quel fruit en cuir et même faire des mélanges...
Utilisez des fruits bien mûrs.
Équeutez, lavez et ôtez sans hésiter les parties touchées.
Égouttez et passez au blender avec 10 à 20 % de sucre.
Placez un tapis silicone ou du papier sulfurisé au fond des plateaux de votre déshydrateur sans boucher complètement les passages d'air. (Il existe aussi des petits bacs souples très pratiques.)
Versez la purée de fruits jusqu'à obtenir une couche d'au moins 6mm d'épaisseur. La couche ne doit pas être trop fine si vous souhaitez avoir de la tenue.
Installez vos plateaux et programmez votre déshydrateur à moins de 45°C. si vous tenez à préserver tout le potentiel nutritionnel de vos fruits. Après 8 heures de séchage, vos cuirs sont formés et vous devriez pouvoir décoller la feuille de fruits. Si ce n'est pas encore le cas, rajoutez quelques heures au déshydrateur. Tout dépend de la quantité d'eau dans vos fruits...
Les cuirs "cuits"
Certains cuirs sont plus solides que d'autres. La pomme et la poire ont tendance à manquer de tenue mais vous pouvez remédier facilement à cet inconvénient en séchant une compote que vous aurez préalablement cuite à la casserole. Pour tous les fruits, vous pouvez aussi, obtenir des parfums plus soutenus, en programmant votre déshydrateur à 60°C. Laissez 6 heures avant de finir à 45°C.
Sucre et liants
Tout dépend du taux de sucre de vos fruits mais pour un cuir moyen, ajoutez entre 10 et 20 % du poids des fruits en sucre. Vous pouvez remplacer le sucre par du sirop d'agave ou mélanger avec du miel
Certains fruits mixés donnent des purées très liquides. Donnez de la consistances et du moelleux en ajoutant des bananes ou des oléagineux : purée d'amandes, de cajou ou de noisettes...
C'est prêt quand ?
La surface de votre cuir est devenue lice et soyeuse, vous pouvez le décoller facilement : c'est prêt ! Votre cuir doit rester souple, malléable et agréable en bouche. Si vous souhaitez le mettre en forme pour faire des cornets, des barquettes, ou n'importe quel type de présentation gourmande assez rigides, façonnez votre cuir et laissez durcir au déshydrateur une ou 2 heures de plus.
J'ai fait ça avec des mangues et du sirop d'agave. C'était excellent. Par contre, les temps annoncés ont été beaucoup plus long pour moi.

Ingredients
- 1 lbs chicken breast diced into bite-sized pieces
- 2 eggs beaten
- 1 cup panko bread crumbs
- 3 cups broccoli florets
- 3 green onions greens sliced thin
- salt
- fresh cracked black pepper
- toasted white sesame seeds optional, for topping
- crushed red pepper flakes optional, for topping
- olive oil
- spray oil
For Sauce
- 2 navel oranges zest one orange, juice both oranges
- ¼ cup honey
- ¼ cup soy sauce
- 1 tbsp freshly minced garlic
- 2 tsp fresh grated ginger or sub 1/2 tsp ground ginger
- 2 tbsp rice vinegar
- 2 tbsp cornstarch
- sriracha sauce optional: mild – 1 tsp; med – 2 tsp; hot – 3+ tsp
Instructions
- Begin preheating the oven to 425° F and spray a large rimmed baking sheet with oil.
- Season the chicken pieces with salt and fresh cracked black pepper and pour the panko out onto a wide plate. Working in batches, coat the chicken in the beaten egg then press into the panko to coat. Arrange on the prepared baking sheet as spaced out as possible.
- Spray the tops of the chicken pieces with oil. Place the chicken into the preheated oven and bake for 10 minutes. After 10 minutes, flip each piece and rotate the pan when you place it back into the oven. Bake for another 7-10 minutes until the chicken is crispy and cooked through.
- Meanwhile, on a separate baking sheet, toss the broccoli with a drizzle of oil, salt, and pepper. Roast in the oven for about 10 minutes, tossing halfway through, until crisp and charred in a few spots. OR, pan fry broccoli in a swirl of olive oil over medium heat for 2-3 minutes.
- While the chicken cooks, make the sauce. Combine the soy sauce and cornstarch in a small bowl and whisk until fully combined. Pour into a small saucepan, then add the rest of the ingredients for the sauce and mix well. Bring to a boil over high heat, then reduce heat and simmer until a thick sauce forms, about 5 minutes.
- Transfer the cooked chicken into a large mixing bowl, drizzle the sauce over the chicken and toss to coat (you may not want to use all of the sauce, so add it in steps until the chicken is coated to your liking). Add in the broccoli and toss to combine. Serve immediately topped with green onion, sesame seeds, and crushed red pepper. Great on a bed of white rice!
Ingredients
- 3 packets Biscoff cookies
For the Filling
- ¼ cup Biscoff Cookie butter
- 2.5 cups Heavy whipping cream chilled straight from the fridge
- 16 oz Mascarpone cheese straight from the fridge (454g)
- 1 teaspoon Pure Vanilla Extract
- ½ teaspoon Cinnamon
- 1.5 cups of sugar
- Pinch of salt
For Coffee mixture
- 1.5 cups water
- 3 tablespoons instant espresso or instant coffee, or just brew espresso and let it cool.
For Biscoff drizzle
- heavy cream
- coffee
- Biscoff Cookie butter
Instructions
- Using a handheld electric or a stand mixer, beat mascarpone, Biscoff cookie butter, cinnamon, vanilla, salt, and sugar on a low speed until combined. Use beater attachment for this process. This should take a minute.
- Now switch to a balloon whisk and add cold heavy cream to the same bowl. Start beating it on a low speed for 2 minutes then increase the speed to medium. Scrape the side and the base of the bowl a few times in between.
- Whip until stiff peaks. That means the cream should hold well on the whisk upside down. This process should take 8-10 minutes. Do not overwhip as it will split and turn into butter. Transfer it in the fridge until use.
- Whisk heavy cream with Biscoff cookie butter over low heat and add freshly brewed espresso or cold brew. Mix well until a smooth, velvety liquid.
- Line pan with Biscoff brand cookies.
- Pour cooled espresso or cold brew over cookies to absorb the liquid. (You can also simply dip each cookie first before laying it down, if you prefer!)
- Pipe your eggless Tiramisu filling over the first layer of coffee soaked cookies. Use spatula to flatten this layer evenly.
- Add a layer of the cookie butter/coffee drizzle.
- Repeat a second layer of cookies. This time, ONLY dip each cookie into espresso or cold brew before laying it down. Do not pour liquid in for this layer.
- Repeat a second layer of the tiramisu filling. Make sure it's nice and level!
- Drizzle coffee/ cookie butter mixture over the top layer in any pattern you wish! Now, it's time for finishing touches!
- Sprinkle crushed Biscoff cookie crumbles and anything else edible that you want, within reason, of course!
- Keep this dish refrigerated at all times! Only remove from refrigeration when you are just about to serve!
NOTE You can add 3 tablespoons of your preferred alcohol like coffee liqueur, chocolate liqueur, Marsala, or rum to the coffee mixture before dipping the cookies.
C'est très bon. Mais je changerais quand même quelques petites choses pour que ça soit plus à mon goût :
- mettre plus de biscuits, soit doubler les épaisseurs, soit multiplier les couches de biscuits.
- mettre moins de café dans le « drizzle », je suis parti du café et j'ai ajouté les autres ingrédients. Je pense que ça serait mieux de faire l'inverse.
- utiliser de l'expresso plutôt que du café instantanné. Je suis pas mal sur que le goût sera meilleur.

Ingrédients
- 1 litre d’eau bouillante
- 3 cuillères à café de thé vert de Chine
- 12 morceaux de sucre N°4 (soit 12 x 6g ou 72g de sucre en poudre)
- 1 petite botte de menthe fraîche
Instructions
- Couper les tiges de menthe et essayer d’avoir le maximum de feuilles. Les rincer à l’eau froide.
- Verser les cuillères à soupe de thé de Chine dans la théière.
- Verser de l’eau bouillante dedans.
- « Laver » le thé : l’eau introduite dans la théière sert à rincer les feuilles. Donc il faut se débarrasser de l’eau mise juste avant, mais pas des feuilles de thé de Chine.
- Mettre les feuilles de menthe dans la théière.
- Mettre les morceaux de sucre et verser l’eau bouillante.
- Laisser infuser et mettre à chauffer à feu doux.
- « Remuer » le thé en faisant couler la préparation dans un verre et en la remettant dedans, plusieurs fois de suite.
- Servir et déguster.


Quelques vidéos pour améliorer mes baguettes et mes cookies :

New research shows that if done right, urban farms and gardens can support all kinds of species—for the good of people and the environment.
People have long stoked an urban-versus-rural rivalry, with vastly different cultures and surroundings. But a burgeoning movement—with accompanying field of science—is eroding this divide, bringing more of the country into the city. It’s called rurbanization, and it promises to provide more locally grown food, beautify the built environment, and even reduce temperatures during heat waves.
Content
It’s also reversing the longstanding assumption that growing food is straight-up bad for biodiversity because clearing land for agriculture necessitates removing native plants and animals. Ecologist Shalene Jha of the University of Texas, Austin says this idea was based on observations of rural agriculture, where growing industrialized swaths of corn or wheat can be catastrophic for existing ecosystems. But that doesn’t hold for the urban farms, gardens, and even smaller green spaces.
In a recent paper in the journal Ecology Letters, Jha and her colleagues showed that urban gardens can actually boost biodiversity—particularly if residents prioritize planting native species, which attract native insects like bees. “The gardener actually has a lot of power in this scenario,” says Jha. “It doesn't matter how large or small the garden is. It's the practice of cultivating the landscape—and the decisions they make about the vegetation and the ground cover—that ultimately decide the plant and animal biodiversity there.”
Jha’s team characterized the biodiversity of 28 California urban gardens over the course of five years. Far from the mono-cropped monotony of a wheat field, they found rich ecosystems humming with activity that, in turn, increased species diversity. The researchers found predators like birds and ladybugs, which prey on crop-munching insects and thus help increase yields, and an abundance of pollinators like bees, which also benefit from crop diversity and increase plant productivity. That means urban gardens aren’t just producing food for people, but for other species as well. “They’re actually supporting incredibly high levels of plant and animal biodiversity,” Jha says.
This biodiversity is largely due to a strategic trade-off. One of the challenges of urban gardening is that it requires intensive manual labor: You can’t drive a combine through a city at harvest time. But that limitation turns out to be an ecological blessing. Because everything is done by hand, urban farmers can grow all sorts of plants right next to each other, packed in tightly to increase yields.
In another study published this month in the journal Agronomy for Sustainable Development, a separate team of researchers looked at 72 urban agriculture sites in France, Germany, Poland, the United Kingdom, and the United States. “We see pretty diverse growing spaces that often are growing a huge variety of crops, as well as non-food products,” says study author Jason Hawes, an environmental sustainability researcher at the University of Michigan. On average, the sites grew 20 different crops. “Lots of folks were also just growing flowers for fun in their visual gardens, and the community gardens have flowers planted to make the space more pleasant,” he says. “These sorts of things do contribute to local biodiversity.”
That biodiversity hardens urban ecosystems against pests that would have a field day with a monocrop. “You all of a sudden have a mimic of what naturally occurs in terms of insect predation. Because if you build it, they will come,” says Colorado State University horticulturalist Jennifer Bousselot, who studies the practice of growing crops on rooftops and wasn’t involved in either of the new papers. Aphids may descend on your garden, for instance, but so too will the ladybugs that keep their population in check.
An additional benefit is that gardeners can stagger the growth of flowering plants throughout the year—known as succession planting—essentially extending the food supply for local pollinators. While native plants are best at attracting native animals, she says, pollinators can make do with something like an imported tomato plant. “I am a big fan and advocate for native plants, but I’m an even bigger advocate for planting a plant with purpose,” says Bousselot. “And believe it or not, most pollinators can adapt.”
Bees in particular love a good urban garden, especially if it’s loaded with ornamental flowers. Previous research has shown that bee diversity can actually be higher in cities than in surrounding rural areas. It’s counterintuitive, but the flower diversity in an urban garden can be greater than that of a corn or wheat field.
And while brown patches of dirt may not look nice to you, bees literally dig them. Unlike honey bees that live in swarming hives, the vast majority of species are actually solitary, and many burrow into dirt for shelter. Having open ground in a garden provides them habitat. Bees also hate open spaces because that’s where birds, dragonflies, and other predators patrol. “It’s like putting a giant target on their back saying ‘Come and eat me,’” says biologist Gerardo Camilo, who studies urban bees at Saint Louis University but wasn’t involved in the papers. “They like messiness.” If you leave your yard looking a little shabby, bees will have places to hide as they bounce from flower to flower.
“There’s a take-home message here for everyday gardeners: With relatively minimum effort, you can make a big change,” says Camilo. “You don’t need to be consciously improving the environment. You can just concentrate on your one little thing—which is the growth of some food—and do it in the right way, and you can have significant impacts.”
But there are still limits to what an individual gardener can do. A bee has to get to your backyard in the first place. That means cities need chains of green spaces—with some open dirt and messy vegetation—so the insects can travel safely. “The neighborhood that surrounds your garden must be inviting to bees, to afford them essentially a road to travel to work,” says Camilo.
That kind of solution requires group action and city planning, but it comes with a whole host of knock-on benefits. Greenery absorbs stormwater, for instance, mitigating urban flooding. Plants also “sweat” water vapor, dramatically lowering temperatures, which get much higher in cities than in rural areas because of the preponderance of concrete. Green spaces are great for mental health. Food waste can go straight into urban gardens as compost, reducing dependence on synthetic fertilizers, which are terrible for the planet. And producing food closer to where it’s consumed could reduce the emissions associated with shipping produce.
There’s also mounting evidence that growing crops in urban areas can be far more productive than on rural farms. Yields for certain vegetables, like cucumbers, can be up to four times greater. That’s due in large part to urban farmers tending their crops by hand, which requires a lot of work but also creates jobs.
Deploying more gardens in cities, though, comes with challenges. Real estate is expensive, so it won’t be cheap to set aside land. And urban agriculture needs water, which is always at a premium. Ideally, it could come from rain catchment systems, but cities might also be able to build infrastructure to funnel stormwater into green spaces, where it can soak into the ground. “I think we saw in the recent flooding in California that there is a huge amount of public support for finding new ways to deal with runoff that don’t just involve letting it run out to sea,” says Hawes.
There’s real urgency behind doing whatever it takes to bring more agriculture into urban areas: More than half of humanity now lives in towns and cities, a figure expected to rise to 5 billion people by the end of this decade. “Urban gardens are producing 15 to 20 percent of our food supply globally, and that number is just increasing,” says Jha. “And so their value—not only in terms of food production, but also in terms of the plants and animals they support—is increasingly important.”

Ingredients
- 1 tsp dry active or ¾ tsp instant yeast
- 1 tsp sugar
- ½ cup warm water
- 2 ½ cups all-purpose flour
- 1 cup whole wheat flour
- Salt to taste
- 1 tbsp olive oil
- More water for kneading dough
- ¼ cup black and white sesame seeds
Instructions
- I always proof my yeast. You can skip this step if you choose and add the yeast directly to the flour. To proof the yeast, mix it with the sugar and warm water. Set aside for 5 to 10 minutes till frothy.
- Put the flours, salt, olive oil and proofed yeast in the bowl of your kneading machine. You may knead the dough by hand too. Knead the dough, adding as much more water as is required to form a dough that is soft and smooth. You want a dough that is somewhat slack, not sticky but should be easy enough to shape. We’re not looking for the slackness of a sourdough.
- Shape the dough into a ball and place in an oiled bowl, turning it well to coat all over with oil. Cover loosely and allow it to rise till double in volume. This should take about an hour and half depending on ambient temperature.
- Gently knead to deflate the dough. Divide the dough into two pieces – 1/3rd and 2/3rd approximately in size. Shape the larger portion into a nice, smooth and tight ball. Using your fingers, flatten the smaller portion into a flat circle that is big enough to wrap around the larger ball of dough. Do not make this circle too thin or too thick.
- Spread the sesame seeds uniformly on a flat plate. Lightly brush the surface of the circle of dough with some oil. This is to keep separation between the dough while scoring. Take the larger ball of dough. Dampen the top and sides of it with a little water. Then roll it in sesame seeds so they uniformly and closely coat the surface.
- Now gently place this ball, sesame seed surface facing down, in the center of the circle of dough. Bring up the sides of the circle together and seal well so the dough has enclosed the ball completely.
- Place the dough ball on a lightly greased parchment covered baking tray with the seam sides down. Cover loosely and let it rise for 30 to 45 minutes till puffy. Do not let it over proof.
- Lightly dust the surface of the dough with flour. Using a piece of string/ twine, mark the surface into six or eight equally spaced spokes, like in a wheel. Using a blade or lame, score firmly and smoothly along each marked spoke, from the center down to the sides. Cut deep enough to reach the sesame seed layer but not beyond. Make sure the scoring cuts are neat and separated. The oil and sesame seeds will ensure that layers separate on baking.
- You should now be able to see the sesame seed layer through the cuts. Bake the bread at 210C (410F) for about 30 to 40 minutes till the “leaves/ petals” have separated and opened up, the bread is a beautiful brown and sounds hollow when tapped.
- Let it cool completely. The outer layers should be crisp while the bread itself will be soft. Serve any way you prefer.
Je n'ai pas encore goûté, mais je ne suis pas fan de la recette. Pas de mesure de sel ni d'eau, ça ne facilite pas la mise en place. Par contre, il est beau pour une première. Il me reste à pratiquer pour avoir quelque chose qui a de l'allure.
Thanks! It was taught Grandmother to grandkids for generations..here is the recipe written out. Enjoy! (From a Facebook post to my family..so its written as it's for beginners, so you can ignore the basics part of it )
5 Pounds flour a bag of All Purpose is just fine. Have a bit extra on hand (perhaps up to three cups more) if the dough needs to be 'tightened up' later A "three packet" of dry active yeast it comes with three small packets attached, you'll use all three at once. 6 Cups of water at 100-110 degrees F don't go hotter or you'll kill the yeast Four Tablespoons salt (fine ground like Kosher is best) 1.5 Cups Canola Oil
NO milk, no sugar.. Keep it to those 5 ingredients.
Other things you'll need • Very large bowl-- it's going to hold five loaves of bread's worth of dough.. I vastly prefer metal • Cutting board-- extra flour for "dusting" if needed • Non Serrated chef's knife • Four to five pans, metal nonstick pie tins are great, you can use loaf pans as well-- it's up to you • More Oil- about a half cup- for the pans to keep the bread from sticking • Plastic wrap and non stick spray • A very light blanket.
To make
Start with 2 cups of the tepid water Add all of the yeast Whisk it as you are adding the yeast, set aside for three minutes to let the yeast "Bloom"
Pour the flour in a very large bowl, add the salt Add the first two cups of tepid water with the yeast in it.. It'll small "yeasty" and that's good
Add another two coups of tepid water to the bowl and begin to mix (that's 4 cups of water to this point)
Knead dough by hand, use your hands for all of this. You'll learn the feel of it after a few attempts.
The dough will be, at this point, really sticky. Work the water and flour together. Work to turn the dough over now and then as you'll see the flour will try to stay on the bottom of the bowl for a while so keep rotating it and kneading.
The dough will eventually start to come together, of the two remaining cups of tepid water put one in.. At this time add the 1.5 cups of oil. The bread will immediately begin to feel "squishy" (that's a technical term you know…) and it'll actually start to smell like bread. If it's too firm add the water by one quarter cup increments, you might not need to add that last cup of water. Usually I use part of it but rarely all of it. If the dough is still really, really sticky then add some of the extra flour-- half a cup at a time.
What you are going for is a dough ball that feels fairly smooth, it should still be warm from the water you added. If it's too stiff add more water, and if it's too sticky and loose add a bit of flour as described above.
You should be ab le to pull the whole dough ball up out of the bowl without it sticking too much.
Once the doughball has come together put it back in the bowl, first putting about a tablespoon of oil in the bottom to prevent sticking.. Move the bowl around to let the oil run in different directions to cover the bottom.
Once the doughball is in the bowl, cover it with plastic wrap but you must spray it first with the nonstick spray, the plastic and the top of the doughball.
Now, put the dough in a warm humid place if you can find it until the doughball doubles in size. A great trick is to boil a few cups of water in the microwave and when it's done put the bowl in the microwave, it'll be humid and warm-- obviously do not turn it on for any reason..
In about 45 minutes.. (depending on weather conditions, ingredients etc..)
After the dough rises to twice it's size, take the plastic off and kneed the bread. Mostly using a slow motion "punching" movement. Turn the dough a few times during the process. You should hear the bubbles pop a few times, it'll sound like quiet squeaking. As the bubbles work out of the bread it'll get smaller and a bit more dense. Once again cover it back up with the plastic after spraying and put it in the warm and humid environment you used previously.
After about 30 to 40 minutes…
Take the bread out, kneed it again. Now take the pans you have, ensure they have a think coating of oil on the bottom and cut fifth of the bread out and roll it into a ball a bit larger than a Baseball. If yo u wish to use the cutting board to roll it out by all means do, I simply hold the loaf size dough ball and fold it a few times each time folding it towards what will become the bottom, to create a seam on one side and a smooth side. Place them seam side down in the middle of the pans. Put one cut in the middle of each loaf cutting about half way down to the bottom.. This will control how the dough opens up.
Allow the loaves to rise for about 20 more minutes and put into a 350 degree oven for about 25 minutes, you may need to rotate where they are in the oven for even baking. Frequently I'll add a few minutes to the end to take them out of their pans and flip them over so the bottom of the bread can brown as well.
When the bread is golden brown, remove from the oven and if you can put them on a cooling rack. You can eat them just about immediately, they are fantastic with butter, great to go with soup, or just toast.

Ingredients
- 6 Cups Bread Flour
- 4 Teaspoons Baking Powder
- 3 Teaspoons Salt
- ⅔ Cup Oil, plus 2 tablespoons
- 2¼ Cups Boiling Water
Instructions
- In a mixing bowl of a standing mixer, add the flour, salt, baking powder and oil.
- Using a dough hook, turn the mixer onto low speed, never high and mix until the mixture comes together and looks like moon sand or barely wet sand. You can squeeze it in your hand and it holds together.
- Add the boiling water, about 1/2 cup at a time with the mixer on low speed. Run, adding water as you go until the dough comes together. Allow the mixer to run for another 2-4 minutes until the dough is satiny.
- Very lightly flour the work surface and pinch off balls of dough smaller than the palm of your hand.
- Holding the ball in your palm, use your other hand to pinch the dough into the center over and over as you form a rounded side against your hand and flat side where you are pinching.
- Place all of the dough in your bowl and cover with a warm, damp paper towel or place a lid on the bowl. Allow to rest for 10-15 minutes.
- Heat a griddle to medium heat.
- Lightly flour the work surface and roll out the dough balls one at a time with a rolling pin.
- Cook the tortilla on the hot pan until bubbles grow large, flip over and cook again until light browning shows.
- Remove from heat and serve

Ingredients
Tangzhong
- 50gm (1/3 cup) bread flour
- 250ml (1cup water, could be replaced by milk, or 50/50 water and milk)
Bread
- 350gm (2½ cups) bread flour
- 55gm (3 Tbsp+2 tsp) caster sugar
- 5gm (1 tsp) salt
- 56gm egg (equals to 1 large egg)
- 7gm (1Tbsp +1 tsp) milk powder (to increase fragrance, optional)
- 125ml (½ cup) milk
- 120gm tangzhong (use half of the tangzhong you make from above)
- 5 to 6gm (2 tsp) instant yeast
- 30gm (3 Tbsp) butter (cut into small pieces, softened at room temperature)
Fillings
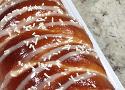
- bacon, to taste
- cheese, to taste
Instructions
Tangzhong
- Mix flour in water well without any lumps. Cook over medium-low heat, stirring consistently with a wooden spoon, whisk or spatula to prevent burning and sticking while you cook along the way.
- The mixture becomes thicker and thicker. Once you notice some “lines” appear in the mixture for every stir you make with the spoon. It’s done. You get the tangzhong. (Some people might like to use a thermometer to check the temperature. After a few trials, I found this simple method works every time.) Remove from heat.
- Transfer into a clean bowl. Cover with a cling wrap sticking onto the surface of tangzhong to prevent from drying up. Let cool. The tangzhong can be used straight away once it cools down to room temperature. Just measure out the amount you need. The leftover tangzhong can be stored in fridge up to a few days as long as it doesn't turn grey. If so, you need to discard and cook some more. (Note: The chilled tangzhong should return to room temperature before adding into other ingredients. )
Bread
- Combine all dry ingredients: flour, salt, sugar and instant yeast in a bowl. Make a well in the center. Whisk and combine all wet ingredients: milk, egg and tangzhong, then add into the well of the dry ingredients. Knead until you get a dough shape and gluten has developed, then knead in the butter. Mind you, it’d be quite messy at this stage (That's why I used a bread maker). Keep kneading until the dough is smooth, not sticky and elastic. To test if the dough is ready, you might stretch the dough. If it forms a thin “membrane”, it’s done. The time of kneading all depends on how hard and fast you knead. (Note: I use bread maker to do this hardest part and messy job for me. I added the wet ingredients into my bread maker first, then followed by the dry ingredients. The yeast is the last to add.)
- Knead the dough into a ball shape. Place in a greased bowl and cover with a wet towel or cling wrap. Let it proof till it's doubled in size, about 40 minutes (Note: the time will vary and depends on the weather. The best temperature for proofing is 28C. I still used my bread maker in this stage. And my bread maker has a heater.)
- Transfer to a clean floured surface. Deflate and divide the dough into four equal portions. Knead into ball shapes. Cover with cling wrap, let rest for 15 minutes.
- Roll out each portion of the dough with a rolling pin into an oval shape. Sprinkle bacon and cheese evenly as much as you like. Roll from the upper, shorter end down to the bottom (as picture shown). Flatten the dough with your rolling pin. Then roll once again. The seals face down.
- Arrange the rolled-up dough in a greased or non-stick loaf tin (as picture shown). Leave it for the 2nd round of proofing, about 40 minutes, or until the dough rises up to 3/4 of the height of the tin inside.
- Brush whisked egg on surface. Bake in a pre-heated 180C (356F) oven for 35 to 40 minutes. Remove from the oven and tin. Transfer onto a wire rack and let cool completely. Slice to serve or place in an airtight plastic bag or container once it's thoroughly cooled.

Ingredients
- ¾ cup raisins, tossed in 1 Tbsp. flour
- 3 cups unbleached flour
- 1 cup brewed coffee, warm (not hot)
- 1 Tbsp./Packet Red Star Platinum yeast (7g)
- 3 Tbsp. canola oil
- 1 egg, lightly beaten
- 1-½ tsp. salt
- 3 Tbsp. sugar
- 1 tsp. cinnamon
- ¼ tsp. ground allspice
- ¼ tsp. ground cloves
Instructions
- Toss raisins with 1 tablespoon flour; set aside.
- Combine coffee and yeast in EZ DOH bucket and stir.
- Rest for 1-2 minutes.
- Add 1 cup of flour, then remaining ingredients.
- EZ DOH-it for 2-3 minutes, until dough is smooth.
- Remove dough from bucket, spray bucket with cooking spray and return dough to bucket.
- Cover and let rise until doubled.
- Preheat oven to 375.
- Roll dough out into rectangle, then roll up and tuck in ends.
- Place in 8 ½ x 4” loaf pan.
- Cover and let rise until doubled.
- Bake 30-35 minutes, until golden on top and loaf sounds hollow when tapped.
- Remove from pan and let cool on rack.
- Drizzle with confectioners icing, if desired.
C'est bon mais ce n'est pas mon préféré. Par contre, ça a fait fureur à la maison. Je sens que je vais devoir en refaire :).
- Les bases de la courtepointe à la machine - Courtepointe Claire
- Méthode Réversible - Courtepointe Claire
- Les appliqués à la machine - Courtepointe Claire
- Pointes Folles - Courtepointe Claire
- Rag Quilt - Courtepointe Claire
- Patron Courtepointe Méli Mélo
- Tutoriel Taie d'oreiller
- La courtepointe faite à la main - Courtepointe Claire
- How to Hand Quilt All Lessons - YouTube

Remove the screen from the Window Frame.
- Lie the Window Screen flat on a table or another hard surface
- Use a pick (or another small pointy object) to pull the Spline cord out of the frame
- Slowly and carefully pull the Screen mesh away from the Frame
- Take new Screen Tab and clip it into the existing Frame
- Gently push the Screen & Spline back into place in the Frame of the Window Screen
- Use a roller to tuck everything tightly back into the Frame
- Make sure you get the Screen Mesh in tight around the new Screen Tab, so that you don't pull it out when you reinstall the Screen into the Window Frame
Notes
- j'ai utilisé un pic à bigorneaux pour soulever la corde de maintien.
- j'ai utilisé le côté arrondi d'un pic à brochette pour remettre la corde de maintien.
- sur mes moustiquaires, je n'ai pas besoin de soulever le tissu de la moustiquaire.

Ingrédients
- 2 rouleaux de pâte feuilletée(ou brisée si vous préférez)
- 6 œufs
- 300g viande de porc haché
- 200g viande de veau haché
- 1échalote
- 50g chapelure
- 1 cuillère à soupe de Cognac
- ½ cuillère à café de noix de muscade
- ½ bouquet de persil
- Sel
- Poivre
Instructions
- Écalez 4 œufs durs (10 minutes de cuisson). Hachez une échalote. Lavez et ciselez le persil.
- Dans un saladier, mélangez les 2 viandes, 1 œuf battu en omelette, le persil, l’échalote, la chapelure, le cognac et la muscade. Salez, poivrez.
- Déroulez 1 des rouleaux de pâte feuilletée. Déposez-le dans un moule spécial "pâté en croûte" (recouvert de papier sulfurisé). Étalez la moitié du hachis de viande sur l’abaisse de pâte. Formez des creux à intervalles réguliers. Déposez dans la farce les 4 œufs durs en les enfonçant légèrement. Recouvrez avec le hachis de viande restant.
- Séparez le blanc du jaune du dernier œuf. Badigeonnez le bord de la pâte avec le jaune dilué dans un peu d’eau. Refermez le tout avec le second rouleau de pâte feuilletée en soudant les bords et dorez à l'oeuf.
- Avec la pointe d’un couteau, faites 3 cheminées (avec des petits cartons roulés) dans la pâte feuilletée pour laisser s’échapper la vapeur pendant la cuisson. Enfournez 20 min à 180 °C (th. 6) et 30 min à 150 °C (th. 5).
Ingredients
- 1 ¾ teaspoons instant yeast
- 3 ¼ cups all-purpose flour
- 3 tablespoons sugar
- 1 teaspoon salt
- 6 oz sharp cheddar cheese, shredded (170 gr)
- 3 large jalapeños (seeds and ribs removed), finely chopped
- 1 cup water water (100-110°F / 38-43°C)
- 2 tablespoons canola oil
- 2 large eggs, at room temperature (divided)
Instructions
- Add the yeast, flour, sugar, salt, cheese and jalapenos to the bowl of a stand mixer fitted with the dough hook. Beat briefly on low speed to combine. In a measuring cup, whisk the water, oil and 1 of the eggs together until combined. With the mixer on low, slowly add the wet ingredients and continue mixing until the dough comes together (you may need to scrape down the bowl once or twice). The dough should clear the sides of the bowl and cling to the bottom - you may need to add a little flour or water to achieve the right consistency (every time I've made this recipe I've needed to add 2-4 tablespoons of flour). Knead the dough on low speed for about 5 minutes, or until smooth and elastic.
- Spray a large bowl with nonstick cooking spray. Shape the dough into a ball and place in the bowl. Cover with plastic wrap and let the dough rise for 75-90 minutes, or until doubled in size.
- Preheat oven to 350 F. Line a baking sheet with parchment paper.
- Transfer the dough to your work surface and divide in half. Divide each of the two pieces into 4 or 5 equal pieces, depending on whether you want oversized or more traditional rolls. Shape each piece of dough into a ball and place on the prepared baking sheet, then flatten slightly with the palm of your hand. Space the rolls about 1/2 to 1-inch apart - you want the edges to bake together in the oven.
- Cover the pan with a damp towel, and allow the rolls to rise for 35 minutes. Meanwhile, whisk the remaining egg with 1 tablespoon of water to make egg wash. Brush the rolls with the egg wash. Bake for about 25 minutes, or until the tops of the rolls are deep golden brown.
- Transfer the pan to a wire rack and let the rolls cool for at least 15 minutes. Store in a resealable plastic bag at room temperature, or wrap tightly and freeze.
Ingrédients
- 1 litre de café fort
- 2 litres de lait
- 200 grammes de cacao sucré
- 1 pincée de cannelle moulue
Instructions
- Mettre tous les ingrédients dans un contenant.
- Mettre le contenant au réfrigérateur pendant 1 nuit.
- Mélanger.
- Servir.
Malgré la recette, le résultat ne ressemble pas du tout à ce que j'ai bu sur place. Probablement des ingrédients trop différents. Ma réalisation ne goûtait pas le café mais plutôt le cacao.
Il va falloir y retourner pour étudier leur façon de faire :)
Ingrédients
- 2 tasses de riz lavé
- 1 litre de lait entier
- 1 boîte de lait concentré
- 1 tasse de lait en poudre
- 2 bâtons de cannelle
- 6 clous de girofle
- 1 cuillère à soupe de beurre (facultatif)
- 1 ½ tasse de sucre
- 1 pincée de sel
- Cannelle en poudre au goût
Instructions
- Passer le riz à l'eau claire, le filtrer et le placer dans une casserole.
- Cuire le riz avec 2 ½ tasses d'eau et une pincée de sel
- Lorsque le liquide a réduit, ajouter le lait entier, les clous de girofle et la cannelle entière.
- La cuisson dure environ 20 à 30 minutes. Il est important de remuer avec une palette en bois de temps en temps pour éviter qu'il ne colle au fond de la casserole.
- Lorsque la préparation est presque prête, ajouter la tasse de sucre, 1 cuillère à soupe de beurre et le lait concentré.
- Remuez bien et laissez cuire encore cinq minutes.
- Enfin, ajouter la tasse de lait en poudre, remuer pendant quelques minutes et éteindre.
- Une fois la préparation terminée, servez-la et décorez-la de cannelle en poudre.

Although a traditional ¼-yard cut and a fat-quarter cut contain the same amount of fabric, they differ in shape. A traditional ¼-yard cut measures 9×42". A fat quarter is cut crosswise from a ½-yard piece of fabric-an 18×44" rectangle cut in half to yield an 18×21" "fat" ¼-yard piece.
Parce que je ne vais pas faire ça tous les jours et que je vais oublier sinon.
- Marquer le milieu de la porte.
- Tracer une verticale passant par le milieu lorsque la porte est en position fermée (pour être sur que la chatière puisse s'ouvrir sans frottement une fois installée).
- Enlever la porte et la poser à plat.
- Mettre du ruban adhésif pour la peinture sur les deux faces de la porte à l'endroit de la chatière.
- Tracer la découpe à effectuer.
- Marquer la découpe à effectuer avec une lame.
- Percer un trou pour laisser passer une lame de scie sauteuse.
- Faire la découpe à la scie sauteuse en suivant la marque.
Note : sans scie sauteuse, il faut s'arranger avec des scies, des limes ou tout autre outil permettant d'enlever la section de la porte.

Ingredients
- 2 lemons, zest and juice
- 100g caster sugar
- 50g butter
- 2 eggs, beaten
Instructions
- Put the lemon zest, juice, sugar and butter in a heatproof bowl over a pan of simmering water.
- Stir occasionally until the butter has melted.
- Then, using a small whisk or fork, stir in the beaten egg.
- Keep gently whisking the mixture over the heat for around 10 mins until thickened like custard.
- Pour the cooked curd through a sieve into a clean jug to remove the zest, then pour into sterilized jars.
- Keeps in the fridge for up to 2 weeks.
Très citronné, très bon. À refaire !

Ça a l'air un projet amusant

Ingredients
- 1 tapa de dulce, piloncillo o panela - about 12 ounces (340g)
- 5 ounces of ginger (142g)
- 2 liters of water
- 5 limes, juiced
Instructions
- Place 2 liters of water and your tapa de dulce in a large saucepan or stockpot.
- Boil on medium heat until the tapa de dulce is dissolved, stirring occasionally.
- While the tapa de dulce is dissolving, peel and chop your ginger.
- Juice the limes.
- Once the tapa de dulce has melted, add the ginger and lime juice. Simmer for 5-10 minutes.
- Strain the juice into a large container and add the other 2 liters of water.
- Place in the fridge until cold. Serve ice cold.
C'est super facile à faire. Essayer avec moins de gingembre et moins d'eau (diminuer d'un quart).

À voir pour ne pas se faire avoir !

En gros, si on ne savait pas déjà :
- ça pollue plus car c'est plus lourd,
- c'est plus dangereux de par la construction et ça pour les piétons, les cyclistes, les autres automobilistes et eux-même,
- ça abime les routes car c'est plus lourd,
- ça aggrave les problèmes de congestion et de stationnement car c'est plus grand,
- ça ne permet pas de charger autant de chose que dans un break.
Citation préférée à 23:43 :
One of these vehicles is designed to efficiently carry lots of useful stuff while the other is designed to carry fragile egos.
Un outil pour comparer visuellement les tailles des automobiles et se rendre compte que ça en devient complètement ridicule.


Avant d'appeler un électricien ou un réparateur, valider que les câbles électriques sont correctement serrés dans le boitier.
Si ce n'est pas le cas, il faut ajuster le serrage et tester l'appareil.
Dans mon cas, les ronds de la cuisinière fonctionnaient correctement tandis que le disjoncteur se déclenchait quand le four fonctionnait. Le disjoncteur était chaud à chaque fois. Dans le boitier, la moitié des câbles n'étaient pas correctement serrés. Après serrage par l'électricien :'(, tout fonctionne correctement.

Ingrédients
- 1 bloc de 450-454 g de tofu extra-ferme, épongé dans un linge sec
- 15 ml (1 c. à soupe) de vinaigre de cidre de pommes ou de jus de citron
- 15 ml (1 c. à soupe) de sauce soya ou tamari
- 15 ml (1 c. à soupe) de sirop d’érable
- 30 g (½ tasse) de levure alimentaire en flocons
- 15 ml (1 c. à soupe) d’huile végétale pour la cuisson
Préparation
- Préchauffer le four à 375°F (190°C).
- Dans un bol, défaire le tofu avec les doigts en morceaux de la grosseur d’une bouchée (les morceaux n’ont pas besoin d’être parfaitement uniformes!).
- Ajouter le vinaigre de cidre, la sauce soya et le sirop d’érable. Bien mélanger.
- Ajouter la levure alimentaire. Bien mélanger pour enrober les morceaux.
- Sur une plaque couverte de papier parchemin ou d’un tapis de cuisson anti-adhésif, déposer les bouchées de tofu.
- Arroser d’un peu d’huile si on le souhaite (facultatif).
- Cuire 25 minutes, ou jusqu’à ce que les morceaux soient bien dorés.
Note : il est possible de faire cuire ça à la poêle.
- DIY PULK SLED / SKISLED / BUILT FROM HARDWARE STORE SUPPLIES / MADE FOR LONG TRIPS OVER THE SNOW. - YouTube
- DIY Pulk Sled 2.0 - YouTube
- Easy and cheap DIY pulk sled for winter hiking - YouTube
- How to Build a Pulk - YouTube
- How to build a pulk / Sled - for around $50.00 / Winter Camping - YouTube
- How To Build A Pulk Sled/Otter Sport Sled Modifications - YouTube
- Jet Sled Upgrade & Simple Pulk - YouTube
Je viens de découvrir ça. Si je me mets à faire de la randonnée hivernale, je vais probablement avoir besoin de ça.
Ingredients
- ¾ cup sugar
- 2 large eggs
- 1 tablespoon cornstarch
- 2 cups half and half
- 1 cup heavy cream
- 1 teaspoon vanilla
- 1 ½ cups salted pretzels broken into bite sized pieces
- ½ – ¾ cup stout caramel sauce from this site
Instructions
- In a large bowl, combine the sugar, eggs and cornstarch and beat with a hand mixer until thick and pale yellow, about 3-5 minutes. Set aside.
- In a medium saucepan, heat the half and half to just barely a simmer. In a slow steady stream, add the hot half and half to the egg mixture, beating constantly at a medium speed. When mixture is combined, pour it back into the pan and heat over medium heat, stirring constantly until mixture thickens.
- Place a fine mesh sieve over a large bowl and pour the custard through the sieve to remove any large egg particles. Scrape the outside of the sieve to capture as much of the custard as possible. Cool for 10 minutes, then stir in the heavy cream and vanilla. Chill for at least 2 hours or overnight.
- Follow the manufacturer’s instructions for your ice cream maker to churn the ice cream. In the last few minutes before the ice cream is ready, add the pretzel pieces and churn until fully combined.
- Spoon about 1/4 of the ice cream into a freezer-safe container. Drizzle several tablespoons of stout caramel over the ice cream. Continue layering in this fashion Ice cream:stout caramel and finish with ice cream on top. Cover with plastic wrap and freeze for several hours or overnight.
- Serve with extra pretzels and caramel sauce if desired.
Ingredients
- 1 12-ounce stout beer such as Guinness
- ¾ cup light brown sugar
- 1 teaspoon vanilla extract
- 2 tablespoons unsalted butter
- 1 cup heavy cream
- ¼ teaspoon salt
Instructions
- Pour the stout into a medium saucepan and heat to boiling. Reduce heat to a rapid simmer and cook until the stout is reduced by half.
- Stir in the brown sugar and vanilla. Heat to boiling, reduce heat to a rapid simmer and let the mixture cook 8-10 minutes without stirring until sauce turns a deep amber and bubbles start to grow and expand. Mixture will be hot like lava, so be careful.
- Remove from heat and add the butter, cream and salt and stir carefully until fully combined. Transfer to a resealable glass storage jar and let the mixture cool to room temperature. Keep in the refrigerator for up to two weeks.

Ingredients
- 1 cup all-purpose flour
- ¼ cup unsweetened cocoa powder
- ½ teaspoon salt
- 3 ½ ounces semisweet chocolate, coarsely chopped
- ½ cup (1 stick) unsalted butter
- ½ cup stout or other dark beer, or cold coffee
- 4 large eggs, at room temperature
- 1 cup granulated sugar
- 1 cup packed light brown sugar
- 2 teaspoons pure vanilla extract
- 1 cup semi-sweet chocolate chips
Instructions
- Place a rack in the center of the oven and preheat oven to 350 degrees F. Butter and flour a 9 x 13-inch baking pan. Set aside.
- In a medium bowl, sift together flour, cocoa powder, and salt.
- Melt the chocolate in a heatproof bowl over a pot of boiling water. In a small pan over medium heat, melt the butter until it just turns golden brown, about 5 minutes. Pour the brown butter into the chocolate and stir until combined. Remove the bowl from the heat and stir in the stout (or coffee).
- In a separate medium bowl, whisk together eggs, vanilla and sugars until thick, about 2 minutes. Add the chocolate mixture and whisk to combine. Add the wet ingredients to the dry ingredients and stir until all of the ingredients are well combined. Fold in the chocolate chips.
- Pour into the prepared pan and bake for 35 to 40 minutes or until the edges are firm and the center is set. Remove from the oven and allow to cool completely in the pan before slicing.
- Slice into 12 large or 24 small brownies.
- To store, cover the pan in plastic wrap and keep on the counter for up to one week.
Cette recette est énorme. J'en ai donné aux voisins tellement ça en fait.
Je ne suis pas un grand fan du résultat. Je vais conserver celle que j'utilise déjà depuis des années qui donne (à mon goût) un meilleur résultat.
Ingredients
Soaker Ingredients
- 204 g raisins
- 61 g candied orange peel
- 92 g candied lemon peel
- 82 g slivered almonds
- 34 g rum
Sponge Ingredients
- 120 grams flour
- 80 grams water
- 0.1 gram instant yeast (a small pinch)
Final Dough Ingredients
- 348 grams flour
- 53 grams milk
- 18.6 grams (2 Tablespoons) osmotolerant yeast or 25.3 grams (2 Tablespoons + 2 teaspoons) instant yeast
- 8 grams (1-⅓ teaspoons) salt
- 8 grams (2-⅓ teaspoons) diastatic malt powder (omit if you don’t have it)
- 51 grams sugar
- 53 grams egg (about one large egg)
- 5 grams grated lemon zest (one average lemon)
- 5 grams grated orange zest (one small orange)
- ⅓ teaspoon of each of these ground spices: cinnamon, cardamom, cloves, allspice, nutmeg
- 273 grams unsalted butter, at room temperature (should be pliable)
- all of the sponge
- all of the soaker
- about 180 grams of marzipan, divided into four pieces
Finishing Ingredients
- clarified butter
- fine granulated sugar
- powdered (confectioner’s) sugar
Instructions
- Combine the soaker ingredients in a medium bowl. Cover and leave at room temperature for about 12 hours.
- Meanwhile, combine the sponge ingredients in another medium bowl. Cover and ferment at room temperature for 12 hours.
- In the bowl of a stand mixer, combine all of the final dough ingredients except the soaker and the marzipan. Mix in slow speed until all the ingredients are incorporated, about 4 or 5 minutes.
- Continue mixing in medium speed until the gluten reaches full development. The dough should come together around the hook and should no longer stick to the sides and bottom of the bowl. This could take about 20 minutes or more, but will depend on your mixer.
- Add the soaked fruits and mix on slow speed just until they are evenly distributed through the dough.
- Transfer the dough to a lightly buttered container. Cover and ferment for 30 minutes at room temperature.
- Turn the dough onto the counter. Divide into four pieces of about 375 grams each. Preshape the dough into balls and let them rest, covered, for 30 minutes.
- Shape the loaves as shown above and place them on parchment-lined baking sheets (two per sheet). Slip them into a large plastic bag with a bowl of warm water. Proof for about 90 minutes, replenishing the water when it cools.
- Meanwhile, preheat the oven to 375F on convection setting or 400F on regular bake setting. You will also need steam during the initial phase of baking, so prepare for this now.
- Bake for 10 minutes, open the oven door briefly to allow any remaining steam to escape, and bake for another 15-20 minutes. If you do not have convection, you may need to rotate the position of the baking sheets halfway through the bake to ensure even browning.
- While the loaves are still warm, brush them with clarified butter. Dredge them in fine granulated sugar, brushing off the excess.
- When cool, sift powdered sugar over the loaves. You can leave the stollen out overnight to let the loaves dry and the sugar crust up a bit.
- To store, wrap tightly in foil; it will keep for several days.
- To serve, slice thinly.
C'est vraiment super bon. J'en referai.
Apparement, on peut le préparer plusieurs semaines à l'avance pour laisser les saveurs s'équilibrer.
Idéal pour faire un cadeau de Noël fait-maison.
Ingrédients
pour la pâte fermentée
- 300g de farine T55 ou T65
- ½ cc de levure sèche instantanée
- ¾ cc de sel fin
- 180 à 200ml d'eau tempérée
pour la pâte finale
- 600g de farine T65
- 2 cc de levure sèche instantanée
- 2 cc de sel fin
- 280 à 300ml d'eau tiède
- 15g de miel
- 40g d'huile végétale neutre
- 1 œuf
- graines de sésame, pavot, nigelle au choix
Instructions
Préparation de la pâte fermentée (la veille)
- Dans un grand saladier, mélanger la farine avec la levure puis le sel et ajouter l'eau. Mélanger avec une cuillère en bois pour former une pâte grossière hétérogène. Ajuster avec de la farine (si la pâte parait trop collante) ou de l'eau (s'il reste de la farine non amalgamée) puis transvaser sur un plan de travail légèrement fariné dès formation d'une boule.
- Pétrir la pâte pendant 5 à 10 min ou le temps qu'elle devienne lisse, souple et élastique (la pâte doit être légèrement collante au toucher - effet scotch).
- Mettre la pâte dans un saladier légèrement huilé et la tourner dans tous les sens pour que sa surface aussi soit recouverte d'une fine pellicule d'huile. Couvrir avec du film alimentaire et laisser lever environ 1h (la pâte doit avoir atteint 1 fois 1/2 son volume initial).
- Travailler brièvement la pâte sur le plan de travail ou directement dans le saladier pour la dégazer puis couvrir à nouveau et placer au réfrigérateur pour la nuit.
Note : la pâte fermentée peut être conservée 3 jours au réfrigérateur ou congelée 3 mois bien fermée dans un sac congélation. Vous pouvez également utiliser la pâte fermentée le jour même après l'avoir laissé pousser 2h au lieu d'1 mais elle aura moins d'arômes.
Préparation de la pâte finale
- Environ 1h avant de préparer le pain, sortir la pâte fermentée du réfrigérateur, la diviser en une dizaine de morceaux et laisser revenir à température ambiante pendant 1 h bien couverts avec un torchon ou du film alimentaire.
- Dans un grand saladier, mélanger la farine et la levure sèche puis ajouter le sel, mélanger et creuser un puits. Verser l'eau tiède, ajouter les morceaux de pâte fermentée et les écraser grossièrement du bout des doigts pour les délayer un peu. Ajouter le miel, l'huile et l'oeuf grossièrement battu.
Mélanger avec une cuillère en bois en partant du centre et en élargissant le mouvement pour faire tomber et incorporer la farine des bords. Continuer à mélanger jusqu'à formation d'une "boule" de pâte hétérogène (ajouter éventuellement un peu d'eau s'il reste de la farine non incorporée). - Transférer la pâte sur un plan de travail légèrement fariné et la travailler énergiquement au départ pour favoriser la formation du réseau glutineux puis dès que la pâte commence à s'homogénéiser et à s'assouplir, la pétrir pendant une dizaine de minutes ou le temps nécessaire pour qu'elle passe le windowpane test et qu'elle soit légèrement collante au toucher.
- Placer la pâte en boule dans un saladier huilé en la retournant pour la recouvrir sur toute sa surface. 1. Couvrir avec du film alimentaire et laisser reposer pendant 2h (la pâte doit doubler de volume).
Note : le temps de repos ici doit impérativement être de 2h: si la pâte double de volume avant ce temps, il faut la re-pétrir gentiment pour la dégazer un peu puis la remettre à pousser le temps nécessaire pour qu'elle double de volume - Transvaser la pâte sur un plan de travail très légèrement fariné si besoin est et la replier 2 ou 3 fois sur elle-même. Diviser en 12 morceaux de même poids (environ 120g) et les bouler sans serrer (la pâte devant être étirée et façonnée par la suite). Couvrir avec du film alimentaire légèrement huilé et laisser en détente pendant 10 min.
- Préparer 2 plaques de cuisson en les garnissant avec du papier sulfurisé légèrement huilé et saupoudré de semoule de maïs (ou de blé).
Façonnage des petits pains Kaiser
- Il existe plusieurs façons de donner leur forme particulière à ces pains: la plus rapide et bien sûr celle utilisée par les professionnels consiste à utiliser un tampon-empreinte spécial (le même que celle utilisée pour les michette italiennes) disponible sur internet; la seconde plus sophistiquée mais qui demande de la patience et de la dextérité consiste en une série de replis de la pâte pour former des "pétales" et la troisième de loin la plus ludique, la plus utilisée parmi les amateurs et qui donne à mon avis les plus beaux résultats est celle du nœud comme indiqué ci-dessous.
- Façonner chaque pâton en boudin d'environ 30 cm (en suivant le procédé détaillé ici). Faire un simple nœud sans serrer (a) puis faire une boucle avec l'extrémité droite d'abord en la faisant passer par-dessus le nœud (b) et ressortir par le centre. Procéder de même avec l'extrémité gauche qui doit faire une boucle par-dessus le nœud (c) et ressortir par le centre mais cette fois par derrière (d).
- Déposer les petits pains au fur et à mesure sur les plaques de cuisson en les retournant (face nouée dessous), huiler légèrement la surface et couvrir avec du film alimentaire sans serrer.
Laisser reposer pendant 45 min puis retourner très délicatement face nouée dessus, couvrir avec le film alimentaire légèrement huilé et laisser à nouveau reposer pendant 40 min environ (les pains doivent avoir doublé de volume).
Note : il faut être particulièrement délicat dans la manipulation pour éviter de dégazer les pains. Vous pouvez utiliser une large spatule huilée glissée sous le pain à la place de vos mains. Personnellement, je préfère me servir du papier sulfurisé sur lequel sont posés les pains: je le soulève légèrement du côté du pain à retourner pour aider celui-ci à se décoller et je le réceptionne retourné dans mon autre main (légèrement huilée également) puis je le remets délicatement à sa place. - Préchauffer le four th. 7-8 (220°C) en plaçant un récipient métallique rempli d'eau chaude à même la sole ou sur le rack le plus bas du four pour créer une atmosphère humide indispensable à la formation de la croûte craquante caractéristique du kaiser.
- Vaporiser les pains avec de l'eau (ou les badigeonner au pinceau toujours délicatement et sans excès d'eau) et les saupoudrer avec les graines choisies si vous les utilisez.
Enfourner et laisser cuire pendant 5 min puis baisser le thermostat à 6-7 (200°C) et prolonger la cuisson environ 15-20 min en retournant les plaques après 10 min pour une cuisson régulière. Les petits pains Kaiser doivent avoir une couleur dorée caramel et sonner creux lorsque leur fond est tapoté. - Transférer les pains sur une grille et laisser refroidir. Et voilà: les pains sont prêts pour le sandwich!

Ingrédients
Marinade
- ¾ tasse de sirop d’érable (de préférence foncé pour son goût robuste)
- 2 c. à thé de poudre de chili
- 2 c. à thé de paprika fumé
- 1 c. à thé de moutarde de Dijon
- 1 c. à thé de poudre d’oignon
- ½ c. à thé de poivre noir moulu
- 1 c. à soupe de sel
- ¼ c. à thé de piment de Cayenne moulu
- 6 c. à soupe de ketchup
- 1 c. à soupe de vinaigre d’érable (ou de vinaigre de cidre)
- 1 c. à soupe de miso
Viande
- 2 longes de petites côtes levées de dos de porc
Instructions
- Préchauffer le four à 160 °C (325 °F).
- Bien mélanger tous les ingrédients de la marinade.
- Badigeonner les côtes levées de la marinade.
- Mettre les côtes levées sur une plaque à pâtisserie ou dans un plat allant au four et ajouter environ 1 cm (⅜ po) d’eau au fond (juste pour créer un effet humidifiant).
- Bien recouvrir de papier aluminium et cuire 2 heures. Servir aussitôt.
Ingrédients
- 8 tasses(2 L) de raisins Concord, Muscadine ou Scuppernong, sans la tige
- ½ tasse (125 ml) d’eau
- 6 tasses (1,5 L) de sucre granulé
Instructions
- Laver et égoutter les raisins. À l’aide des doigts, pincer les raisins un à un, en séparant la peau et la pulpe; les déposer dans deux casseroles séparées. Ajouter 1/2 tasse (125 ml) d'eau dans la casserole contenant la pulpe. Porter la pulpe de raisin à ébullition à feu moyen et laisser bouillir pendant environ 10 minutes, en remuant à l'occasion. Passer la pulpe dans un tamis fin et jeter les pépins; réserver.
- Hacher grossièrement la peau et remettre dans la casserole; ajouter juste assez d'eau pour couvrir la peau, puis, à feu moyen, faire chauffer et bouillir doucement sans recouvrir jusqu'à ce que le liquide s'évapore soit environ 10 minutes. Ajouter la peau à la pulpe.
- Placer 6 bocaux Mason propres de 250 ml sur le support d’une marmite remplie d’eau bouillante. Couvrir d’eau et faire mijoter (180°F/82°C). Mettre les bandes de côté. Garder les bocaux au chaud jusqu’à leur utilisation.
- Combiner la peau et la pulpe dans une grande casserole profonde en acier inoxydable. Ajouter tout le sucre. Porter lentement le mélange à ébullition, en remuant, jusqu'à ce que le sucre soit dissous. Augmenter le feu; faire bouillir vigoureusement pour que le mélange atteigne le point de gélification (220°F/104°C), environ 25 minutes. Pendant que le mélange s'épaissit, remuer fréquemment pour éviter de trop faire cuire ou de faire coller au fond.
On m'a offert un pot de cette confiture. « WOW », c'est excellent. C'est ma nouvelle confiture préférée !