1725 shaares
2 results
tagged
rhubarbe
Ingredients
Rhubarb layer
- softened unsalted butter, for greasing the cake pan
- 50 g (¼ cup) caster/superfine or granulated sugar
- 450 g (1 pound) rhubarb, about 8-10 stalks, trimmed (For the prettiest end result, use rhubarb stalks that are as red as possible.)
Vanilla cake
- 150 g (¾ cup) caster/superfine or granulated sugar
- 85 g (¾ stick) unsalted butter, softened
- 1 tsp vanilla bean paste (or 2 tsp vanilla extract)
- 3 US large/UK medium eggs, room temperature
- 180 g (1½ cups) plain gluten free flour blend (I used Doves Farm Freee gluten free plain white flour that doesn't have any xanthan gum added. You can also mix your own gluten free flour blend using this recipe. Note that for this homemade blend, 1 cup = 150g, so ideally use a digital food scale and the weight measurements for best results.)
- 50 g (½ cup) almond flour
- 1½ tsp baking powder
- ½ tsp xanthan gum (Omit if your gluten free flour blend already contains xanthan gum or other binders.)
- ¼ tsp salt
- 115 g (½ cup) full-fat plain or Greek-style yoghurt, room temperature
- 150 g (⅓ pound, about 1½ cups) rhubarb stalks, cut into roughly ½-inch (1cm) pieces
Instructions
Rhubarb layer
- First, trim the rhubarb stalks to make sure that they fit snugly into a 9-inch (23cm) cake pan. I recommend doing a test run, where you arrange them on the bottom of the pan before you line it with parchment/baking paper. That way, you’ll be confident that all the rhubarb stalks fit snugly on the bottom of the pan, without having to do any additional trimming later on.
When it comes to the rhubarb topping, you can make the “pattern” on top as simple or as complex as you want. I just cut the rhubarb stalks to size and arranged them in a simple parallel fashion (see blog post for photos). - Adjust the oven rack to the middle position and pre-heat the oven to 350ºF (180ºC). Lightly butter a 9-inch (23cm) round cake pan and line its bottom with a round of parchment/baking paper. Generously butter the parchment/baking paper as well.
Tip: Don't use a springform pan, as some of the rhubarb juices could leak out during baking. - Sprinkle the sugar in an even layer on the bottom of the prepared cake pan.
- Arrange the rhubarb stalks on top of the sugar so that they completely cover the bottom of the pan. Make sure that they're packed together as tightly as possible (that’ll prevent the batter from getting underneath them and it’ll give you the prettiest end result).
Set aside until needed.
Vanilla cake
- In a large bowl, cream together the sugar, butter and vanilla until pale and fluffy. You can do this by hand with a large balloon whisk, using a stand mixer fitted with the paddle attachment or a hand mixer fitted with the double beaters.
- Add the eggs, one at a time, mixing well after each addition, until well combined.
Tip: It's very important that your eggs are at room temperature and that you add them one at a time. This way, you'll maintain the emulsion of the butter as much as possible. If you forgot to take your eggs out of the fridge, place them in warm water for 5-10 minutes before using them. - In a separate bowl, whisk together the gluten free flour blend, almond flour, baking powder, xanthan gum and salt.
- Add half of the dry ingredients to the butter-sugar mixture, and whisk well to combine. Add the yoghurt and whisk until smooth. Finally, add the rest of the dry ingredients and whisk well until you get a smooth cake batter with no flour clumps.
Tip: This alternating way of adding dry and wet ingredients helps to maintain the emulsion of the butter in the cake batter as much as possible. When alternating dry and wet ingredients, make sure to always end with the dry. - Add the chopped rhubarb and mix well until it's evenly distributed throughout the batter.
- Dollop the batter on top of the rhubarb layer and smooth it out into an even layer.
- Bake at 350ºF (180ºC) for about 55-60 minutes or until the cake is golden brown on top, well risen and an inserted toothpick or cake tester comes out clean. If the cake starts browning too much or too quickly, cover it with a sheet of aluminium foil (shiny side up) and continue baking until done.
Inverting & serving the upside down cake
- Allow the cake to cool in the cake pan for 10-15 minutes, then carefully invert it onto a large plate while it's still hot. (Run a knife or a small offset spatula along the edges of the cake to loosen it from the pan if necessary.)
Tip: Don’t cool it for longer than that, otherwise your cake can end up sticking to the baking pan when you try to remove it. - Serve the cake either warm or cooled completely to room temperature. It pairs beautifully with a scoop of vanilla ice cream or a dollop of lightly sweetened vanilla whipped cream.

Ingredients
- 2 pounds fresh rhubarb stalks, trimmed and chopped into 1/2-inch pieces (about 6 cups)
- 1½ cups filtered water
- 2 high-quality Earl Grey tea bags
- 3½ cups granulated sugar
- 2 tablespoons fresh lemon juice
- Pinch of salt
Instructions
- Prepare for canning: If processing for shelf stability, wash 4 half-pint jars and lids in hot, soapy water. Rinse well. Keep jars hot in simmering water or a 225°F oven until ready to fill. Place flat lids in a small bowl and cover with hot water to soften the sealing compound.
- Extract the rhubarb juice: In a large, heavy-bottomed stainless steel or enameled cast iron pot, combine chopped rhubarb and water. Bring to a gentle simmer over medium heat. Reduce heat to medium-low and cook, stirring occasionally, until rhubarb completely breaks down and becomes soft and pulpy, about 15-20 minutes. The rhubarb should easily crush against the side of the pot.
- Infuse with Earl Grey: Remove pot from heat. Add tea bags, cover, and let steep for exactly 6 minutes. This timing extracts the bergamot flavor without becoming bitter. Gently remove tea bags without squeezing them, as this would release bitter tannins.
- Strain the mixture: Place a dampened jelly bag or several layers of cheesecloth in a large strainer set over a deep bowl. Carefully pour the rhubarb mixture into the jelly bag. Cover with a clean kitchen towel to protect from dust, and allow to drip for at least 4 hours or preferably overnight in the refrigerator. Do not squeeze the bag – this ensures crystal-clear jelly. You should get approximately 3 cups of strained juice.
- Measure the juice: Pour the strained juice into a liquid measuring cup to confirm the yield. You’ll need exactly 3 cups for the recipe. If slightly short, add water; if extra, reserve for another use.
- Prepare for cooking: Before cooking the jelly, place 2-3 small plates in the freezer for testing the gel set later. If processing for shelf stability, fill your water bath canner with water and begin heating to a boil.
- Cook the jelly: Pour the measured juice into a clean, wide, heavy-bottomed pot. Add sugar, lemon juice, and salt. Stir over low heat until sugar completely dissolves. Increase heat to medium-high and bring to a full rolling boil that cannot be stirred down. Boil vigorously, stirring occasionally to prevent scorching, until the mixture reaches 220°F (104°C) on a candy thermometer. This typically takes 10-15 minutes.
- Test the set: To confirm setting point, place a teaspoon of hot jelly on a chilled plate and return to freezer for 1 minute. Push edge of jelly with your finger – if it wrinkles and doesn’t immediately flow back, it’s ready. If not, continue cooking for 2-minute intervals, testing after each.
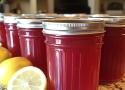
- Skim and fill jars: Remove from heat. Skim off any foam with a metal spoon. Ladle hot jelly into prepared hot jars, leaving 1/4-inch headspace. Wipe rims with dampened clean paper towel to remove any residue. Center lids on jars and apply bands, tightening just until fingertip-tight.
- Process (optional but recommended): Place filled jars in water bath canner with simmering water. Ensure jars are covered by at least 1 inch of water. Bring to a full rolling boil, cover, and process for 10 minutes (adjust for altitude if necessary). Turn off heat, remove canner lid, and let jars sit for 5 minutes before removing to a towel-lined surface.
- Cool and store: Allow jars to cool undisturbed for 12-24 hours. Check seals – buttons should be depressed and not flex when pressed. Store sealed jars in a cool, dark place for up to 1 year. Refrigerate any unsealed jars and use within 3 weeks.
- Enjoy the set jelly: For the fullest flavor development, wait at least 24 hours before opening your first jar. The jelly is beautiful on buttered toast, scones, or paired with sharp cheeses.