1826 shaares
115 results
tagged
sans-gluten
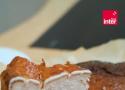
Ingrédients
- 400 g de cream cheese (type fromage à tartiner, aussi trouvable en fromagerie en version artisanale)
- 400 g de mascarpone
- 300g de crème de marron
- 150 g de sucre semoule
- 5 œufs
- 30 cl de crème fleurette
- 25 g de fécule de maïs
Instructions
- Verser le cream cheese, le sucre, le mascarpone et la crème de marron dans la cuve d’un batteur et mélanger à vitesse moyenne. Quand le mélange est bien homogène, ajouter les oeufs un par un en laissant le batteur mélanger en même temps, toujours à vitesse moyenne.
- Incorporer la fécule et mélanger à nouveau. Ajouter ensuite la crème en filet et augmenter la vitesse pour homogénéiser l'appareil. Il est normal que l’appareil soit liquide.
- Beurrer un moule rond de 24 cm de diamètre. A l’aide d’un morceau de beurre, chemiser le moule avec du papier sulfurisé ; le papier doit dépasser tout autour du moule et adhérer aux parois. Y verser la préparation.
- Donner un coup sec avec le moule sur le plan de travail afin de chasser les bulles d’air. Enfourner et cuire 40 minutes à 220 degrés, chaleur tournante. La préparation doit brunir, mais le centre doit rester très crémeux.
- À la sortie du four, le cheesecake doit reposer. Une fois que le gâteau a refroidi, réserver 4 heures au frais ou, mieux, une nuit entière. Démouler avant de servir.

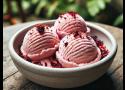
Ingrédients
- 500 g de marrons glacés (ou marrons au sirop)
- 5 marrons supplémentaires
- 25 cL de lait
- 15 cL de crème liquide type fleurette
- 1 cuillère à soupe de rhum (facultatif)
Instructions
- Utiliser des ingrédients bien froids.
- Mélanger le lait, la crème et le rhum. Couper grossièrement les 500 g de marrons et les ajouter au mélange.
- Mixer finement jusqu’à ce que ce soit parfaitement homogène.
- Mettre à turbiner.
- Pendant ce temps, couper les 5 marrons restant en cubes d’environ 1 cm de côté. Les ajouter à la glace en fin de turbinage.
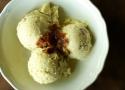
Ingrédients
- 30 cL de lait entier
- 20 cL de crème
- 85 g de sucre
- 3 jaunes d’œufs
- 180 g de beurre de cacahuète (Dakatine ou équivalent)
Instructions
- Mettre le lait, la crème et le beurre de cacahuète dans une casserole.
- Faire chauffer lentement en remuant de temps en temps pour faire dissoudre le beurre de cacahuète.
- Couper le feu dès les premiers bouillons.
- Mettre le sucre et les jaunes d’œufs dans un saladier.
- Fouetter jusqu’à faire blanchir les jaunes d’œufs.
- Verser le contenu de la casserole sur les jaunes, tout en mélangeant pour homogénéiser.
- Remettre le tout dans la casserole et faire chauffer à feu moyen. Ne pas cesser de mélanger avec une cuillère en bois et stopper le feu dès que le mélange nappe la cuillère.
- Verser l’appareil dans le saladier et laisser refroidir quelques minutes.
- Réserver une nuit au réfrigérateur.
- Turbiner.
Ingrédients
- 35 cL de lait
- 15 cL de crème liquide (fleurette)
- 90 g de sucre
- 120 g de raisins secs
- 4 jaunes d’oeufs
- 1 gousse de vanille
- 2 cuillères (30 mL) à soupe de rhum (pour la glace)
- Du rhum en quantité suffisante (pour les raisins)
Instructions
- Dans une casserole, faire chauffer à la limite de l’ébullition le lait et la crème.
- Couper une gousse de vanille en deux et la raclée avec la pointe d’un couteau pour récupérer un maximum de grains de vanille. Mettre le tout (gousse et grains) dans la casserole. Laisser infuser une dizaine de minutes.
- Pendant ce temps, fouetter les jaunes d’oeuf avec le sucre dans un saladier jusqu’à blanchiment du mélange.
- Tout en filtrant, verser le lait sur les jaunes d’oeufs. Mélanger.
- Rincer la casserole et y remettre la préparation. Faire épaissir sur feu moyen tout en remuant. La préparation doit napper la cuillère. En fin de cuisson, ajouter les 2 cuillères à soupe de rhum et mélanger.
- Mettre les raisins dans un bol. Recouvrir de rhum.
- Laisser les deux préparations reposer une nuit au réfrigérateur.
- Mettre la préparation à turbiner.
- Pendant ce temps ,égoutter soigneusement les raisins réhydratés au rhum et les ajouter en fin de turbinage.
Ingrédients
- Fleurs d’hibiscus séchées : 50g
- Lait entier : 500ml
- Crème liquide : 250ml
- Sucre : 150g
- Jaunes d’œufs : 4
- Vanille : 1 gousse ou 1 cuillère à café d’extrait de vanille.
Instructions
- Infusion des fleurs d’hibiscus : Portez le lait à ébullition dans une casserole. Ajoutez les fleurs d’hibiscus séchées, couvrez et laissez infuser hors du feu pendant environ 20 minutes. Filtrez le mélange pour retirer les fleurs d’hibiscus et récupérez le lait infusé. Vous remarquerez que le lait aura pris une jolie teinte rose.
- Préparation de la crème anglaise : Dans un bol, fouettez les jaunes d’œufs avec le sucre jusqu’à ce que le mélange blanchisse. Remettez le lait infusé à chauffer doucement. Incorporez progressivement ce lait chaud au mélange d’œufs et de sucre, en remuant constamment pour éviter que les œufs ne cuisent. Versez ce mélange dans la casserole et faites cuire à feu doux en remuant constamment avec une spatule en bois jusqu’à ce que la crème nappe la spatule. Ne laissez pas bouillir.
- Incorporation de la crème et de la vanille : Une fois la crème anglaise épaissie, retirez-la du feu et ajoutez la crème liquide ainsi que les graines de la gousse de vanille ou l’extrait de vanille. Mélangez bien et laissez refroidir complètement. Pour accélérer le processus, vous pouvez placer le mélange au réfrigérateur.
- Turbiner la glace : Une fois le mélange bien froid, versez-le dans une sorbetière et laissez turbiner selon les instructions de l’appareil, généralement 20 à 30 minutes. La glace doit être onctueuse et bien prise. Si vous n’avez pas de sorbetière, vous pouvez verser le mélange dans un récipient adapté et le placer au congélateur en remuant toutes les 30 minutes pendant environ 3 heures pour éviter la formation de cristaux.
- Conservation et service : Transférez la glace dans un récipient hermétique et laissez-la prendre au congélateur pendant au moins 2 heures avant de servir. Servez la glace aux fleurs d’hibiscus séchées dans des coupes ou des cornets, décorée éventuellement de quelques fleurs séchées d’hibiscus pour une touche esthétique supplémentaire.

Ingredients
- 300ml Double cream
- 300ml Whole milk
- 6 Large free range egg yolk(s)
- 110g Silver Spoon Caster Sugar
- 1 Orange (zest of)
- 2 tbsp Orange juice (freshly squeezed)
- 2 tbsp Cointreau
Instructions
- Heat the cream, milk and orange zest in a large pan until just boiling.
- Take off the heat and leave to infuse for 10-15 minutes.
- Whisk the egg yolks and sugar until pale and thick. Whisk the cream mixture into the eggs, then pour back into the pan and return to the heat.
- Add the orange juice and Cointreau and cook until the custard has thickened, stirring continuously. Taking care not to boil.
- Leave to cool, then chill in the fridge for 4 hours or overnight.
- Churn in an ice cream maker OR place in the freezer, stirring every hour until frozen.
Ingrédients
- 30 cL de lait entier
- 20 cL de crème liquide
- 75 g de sucre
- 4 jaunes d’œufs
- 1 gousse de vanille
- Du kirch
- 130 g de fruits confits (choisissez le mélange de fruits confits qui vous donne le plus envie !)
Instructions
- Hacher grossièrement les fruits confits avec un gros couteau pour obtenir des petits dés.
Les mettre dans un bol et recouvrir de kirch. Filmer et réserver au réfrigérateur. - Mettre le lait et la crème dans une casserole.
- Couper la gousse de vanille en deux dans la sens de la longueur. Racler les graines avec la pointe d’un couteau et mettre le tout (gousse + graines) dans la casserole.
- Faire chauffer doucement et couper le feu dès le début de l’ébullition. Laisser infuser une quinzaine de minutes.
- Pendant ce temps, mettre les jaunes d’œufs et le sucre dans un saladier.
- Fouetter jusqu’à ce que le mélange devienne blanc et mousseux.
- Tout en filtrant pour retirer la gousse de vanille, verser le mélange lait / crème sur les jaunes fouettés.
- Homogénéiser avec le fouet.
- Remettre la préparation dans la casserole et faire chauffer lentement, tout en remuant, pour que la préparation épaississe légèrement. Elle doit napper la cuillère.
- Remettre le tout dans le saladier et laisser tiédir.
- Réserver une nuit au réfrigérateur.
- Mettre la préparation à turbiner.
- Pendant ce temps, égoutter les fruits confits.
- Les ajouter dans la sorbetière lorsque la glace commence à prendre.
Ingredients
- 1 cup whole milk
- 2 cups heavy cream
- 1/2 cup sugar (100g)
- a pinch of salt
- 1 cup whole bean coffee (80g)
- 4 large egg yolks
- 4 Tbs maple syrup (the real stuff, not that Aunt Jemima shit)
- 4 strips of candied bacon, coarsely chopped
Instructions
- In a medium saucepan over medium heat, mix together the milk, 1 cup of cream, the sugar, salt and coffee. Stir until sugar is dissolved. Cover with a lid and remove from heat. Let steep for 1 hour.
- When the coffee mix has finished steeping, put it back on medium heat until warmed again. Strain the coffee beans and discard. Slowly add the heated coffee-cream into the egg yolks, whisking constantly. Return it all to the pan and cook, stirring constantly and scraping the bottom of the pan, until thick enough to coat the back of a spoon, about 12 minutes.
- Strain the custard and stir over an ice bath until cool. Refrigerate until well chilled, or up to three days. When chilled, whisk in the maple syrup.
- Churn the custard according to your ice cream maker’s instructions. At the end of churning, toss in the candied bacon bits.
- Store, covered in plastic wrap, in an airtight container, for up to 1 month.
Ingredients
- 125 g (4.4 oz) dark chocolate (from 50% to 70% cocoa). The higher the percentage of cocoa, the more intense the chocolate flavor.
- 185 g (6.5 oz) whole blanched almonds or almond flour
- 125 g (1 stick) unsalted butter
- 3 medium eggs, at room temperature
- 125 g (7 tablespoons) granulated sugar
- powdered sugar, for decoration
Instructions
- Melt the butter and chocolate in a double boiler and set aside.
- Meantime, separate the yolks from the whites and let the yolks aside for the moment.
- Place the whites in a bowl and beat them up with an electric mixer or with a stand mixer until stiff. Set aside: they will be added to the torta caprese mixture at the end.
- Beat the egg yolks with the sugar until you get a fluid and pale yellow cream. It takes about 5 minutes.
- Now if you are using whole blanched almonds, you must first mince them finely and reduce them to flour.
- Add the almond flour little by little to the yolks and sugar cream and mix well.
- Then add the melted chocolate to the mixture and stir.
- Add the beaten egg whites, stirring with a wooden spoon from the bottom up.
- Grease and flour a 20 cm/8 inch non-stick springform pan with removable bottom, then pour the torta caprese mixture.
- Level well with a spoon.
- Then preheat the oven to 350°F (180°C).
- Bake in a static oven on the middle rack for about 30 minutes.
- At the end, remove from the oven and let the cake cool in the pan for at least 30 to 40 minutes.
- Let it cool completely on a cooling rack so that it chills quickly without moistening the bottom of the cake.
NOTE -- Baking times may vary from oven to oven, but be aware that torta caprese should be moist inside. So usually, for a 20 cm/8 inch baking pan, the baking time never exceeds 35 to 38 minutes.
Ingredients
- 2 large eggs
- 1/2–1 tbsp orange zest
- 2 tbsp (30 g) fresh orange juice
- 1/3 cup (73 g) olive oil
- 1 tsp (5 g) vanilla extract
- 1/4 cup (85 g) honey
- 2 cups (192 g) almond flour
- 1/4 cup (30 g) almond meal
- 1/2 tsp (2 g) baking powder
- 1/2 tsp (2.5 g) baking soda
Instructions
- Preheat oven to 350°F (175°C). Grease 6”x3”3” loaf pan or a 8-inch round cake pan.
- In a large bowl, whisk the eggs until lightly frothy. Add the orange zest, orange juice, olive oil, vanilla, and honey. Whisk until smooth and fully combined.
- In a separate bowl, combine the almond flour, almond meal, baking powder, and baking soda.
- Gently fold the dry ingredients into the wet mixture until just incorporated. Do not overmix.
- Pour the batter into the prepared pan and smooth the top with a spatula.
- Bake for 30–35 minutes, or until a toothpick inserted into the center comes out clean.
- Allow the cake to cool completely in the pan before slicing.
Ingredients
Rhubarb layer
- softened unsalted butter, for greasing the cake pan
- 50 g (¼ cup) caster/superfine or granulated sugar
- 450 g (1 pound) rhubarb, about 8-10 stalks, trimmed (For the prettiest end result, use rhubarb stalks that are as red as possible.)
Vanilla cake
- 150 g (¾ cup) caster/superfine or granulated sugar
- 85 g (¾ stick) unsalted butter, softened
- 1 tsp vanilla bean paste (or 2 tsp vanilla extract)
- 3 US large/UK medium eggs, room temperature
- 180 g (1½ cups) plain gluten free flour blend (I used Doves Farm Freee gluten free plain white flour that doesn't have any xanthan gum added. You can also mix your own gluten free flour blend using this recipe. Note that for this homemade blend, 1 cup = 150g, so ideally use a digital food scale and the weight measurements for best results.)
- 50 g (½ cup) almond flour
- 1½ tsp baking powder
- ½ tsp xanthan gum (Omit if your gluten free flour blend already contains xanthan gum or other binders.)
- ¼ tsp salt
- 115 g (½ cup) full-fat plain or Greek-style yoghurt, room temperature
- 150 g (⅓ pound, about 1½ cups) rhubarb stalks, cut into roughly ½-inch (1cm) pieces
Instructions
Rhubarb layer
- First, trim the rhubarb stalks to make sure that they fit snugly into a 9-inch (23cm) cake pan. I recommend doing a test run, where you arrange them on the bottom of the pan before you line it with parchment/baking paper. That way, you’ll be confident that all the rhubarb stalks fit snugly on the bottom of the pan, without having to do any additional trimming later on.
When it comes to the rhubarb topping, you can make the “pattern” on top as simple or as complex as you want. I just cut the rhubarb stalks to size and arranged them in a simple parallel fashion (see blog post for photos). - Adjust the oven rack to the middle position and pre-heat the oven to 350ºF (180ºC). Lightly butter a 9-inch (23cm) round cake pan and line its bottom with a round of parchment/baking paper. Generously butter the parchment/baking paper as well.
Tip: Don't use a springform pan, as some of the rhubarb juices could leak out during baking. - Sprinkle the sugar in an even layer on the bottom of the prepared cake pan.
- Arrange the rhubarb stalks on top of the sugar so that they completely cover the bottom of the pan. Make sure that they're packed together as tightly as possible (that’ll prevent the batter from getting underneath them and it’ll give you the prettiest end result).
Set aside until needed.
Vanilla cake
- In a large bowl, cream together the sugar, butter and vanilla until pale and fluffy. You can do this by hand with a large balloon whisk, using a stand mixer fitted with the paddle attachment or a hand mixer fitted with the double beaters.
- Add the eggs, one at a time, mixing well after each addition, until well combined.
Tip: It's very important that your eggs are at room temperature and that you add them one at a time. This way, you'll maintain the emulsion of the butter as much as possible. If you forgot to take your eggs out of the fridge, place them in warm water for 5-10 minutes before using them. - In a separate bowl, whisk together the gluten free flour blend, almond flour, baking powder, xanthan gum and salt.
- Add half of the dry ingredients to the butter-sugar mixture, and whisk well to combine. Add the yoghurt and whisk until smooth. Finally, add the rest of the dry ingredients and whisk well until you get a smooth cake batter with no flour clumps.
Tip: This alternating way of adding dry and wet ingredients helps to maintain the emulsion of the butter in the cake batter as much as possible. When alternating dry and wet ingredients, make sure to always end with the dry. - Add the chopped rhubarb and mix well until it's evenly distributed throughout the batter.
- Dollop the batter on top of the rhubarb layer and smooth it out into an even layer.
- Bake at 350ºF (180ºC) for about 55-60 minutes or until the cake is golden brown on top, well risen and an inserted toothpick or cake tester comes out clean. If the cake starts browning too much or too quickly, cover it with a sheet of aluminium foil (shiny side up) and continue baking until done.
Inverting & serving the upside down cake
- Allow the cake to cool in the cake pan for 10-15 minutes, then carefully invert it onto a large plate while it's still hot. (Run a knife or a small offset spatula along the edges of the cake to loosen it from the pan if necessary.)
Tip: Don’t cool it for longer than that, otherwise your cake can end up sticking to the baking pan when you try to remove it. - Serve the cake either warm or cooled completely to room temperature. It pairs beautifully with a scoop of vanilla ice cream or a dollop of lightly sweetened vanilla whipped cream.
Ingredients
- 135 g salted butter, (US = just over ½ cup, or just over 1 stick)
- 55 g cocoa powder, (plus 1 tablespoon) unsweetened, plus extra for sprinkling
- 350 g sugar
- 110 g plain flour, (actually, just less than a full cup, about 0.85 cups)
- 1 teaspoon vanilla extract
- 3 eggs, lightly whisked
Instructions
- Pre-heat the oven to 180C/355F. Line the bottom of a 7-9 inch (see note below) springform cake pan with a circle of baking paper, then grease the paper and the sides of the pan.
- Melt the butter in a medium saucepan, then take off the heat and set aside.
- Add the cocoa, sugar, flour and vanilla to the butter and stir a little. Then add the eggs and stir everything together until well combined.
- Pour the mixture into the cake pan and bake for 20 to 25 minutes (see note below) until the top is set but the centre is still gooey (the top should be firm but crack under a little pressure from your finger).
- Let the cake cool in the pan, then run a knife between the pan and the cake to loosen it. Turn out onto a plate or cake stand (see note below). Dust generously with cocoa powder and serve warm with ice cream or cream.
Note pour la version sans gluten, il suffit de remplacer la farine par de la poudre d'amandes.
C'est très facile à faire et c'est excellent. À refaire !

Ingrédients
- 125 g de farine de riz
- 2 jaunes d’œufs
- 165 g de beurre (à température ambiante)
- 80 g de sucre glace
- 80 g de poudre d'amande
- 1 pincée sel
Instructions
- Mettez le beurre (mou ou ramolli à l’aide d’une fourchette), le sucre glace et la poudre d’amandes dans un bol et mélangez à l’aide d’un fouet jusqu’à homogénéisation.
- Ajoutez les 2 jaunes d’œufs puis la farine de riz et la pincée de sel.
- Fouettez pour obtenir une belle pâte homogène.
- Enfournez à 180°C entre 30-40 minutes environ (suivant la taille) jusqu’à ce que le sablé soit bien doré.
- Laissez refroidir.

Ingrédients
- 250 g de farine de sarrasin
- 250 g de miel (de fleurs)
- 17,5 cl d’eau
- 1 cuillerée à soupe de bicarbonate
- 1 cuillerée à soupe poudre à lever
- 3 cuillerées à café d’épices à pain d’épices
- 100 g de compote de pommes
- 50 g de yaourt végétal coco
Instructions
- Préchauffez le four à 180 °C.
- Dans un saladier, mélangez ensemble la farine de sarrasin, le bicarbonate, la poudre à lever et les épices.
- Dans une casserole, faites chauffer l'eau puis ajoutez le miel et remuez jusqu'à ce qu'il soit dilué.
- Versez progressivement le miel dilué dans le mélange de farine tout en mélangeant de manière à obtenir une pâte bien homogène. Incorporez la compote de pommes et le yaourt. Versez dans un moule à cake huilé.
- Baissez le four à 150 °C et enfournez pour environ 50 minutes si vous utilisez un moule à cake unique, ou 15 à 20 minutes pour des moules plus petits. Vérifiez que la lame d'un couteau ressort du gâteau sèche. Laissez refroidir puis démoulez.
Edit J'ai testé et je n'en referais pas. J'ai trouvé ça tellement immangeable que c'est parti directement à la poubelle. Quel gâchis !
INGRÉDIENTS
Pâte
- 70 g (1/2 tasse) de farine tout usage La Merveilleuse
- 2,5 ml (1/2 c. à thé) de poudre à pâte
- 0,5 ml (1/8 c. à thé) de sel
- 110 g (1/2 tasse) de sucre de canne
- 1 gros oeuf, battu (55 g)
- 30 ml (2 c. à soupe) de margarine végétale, fondue
- 30 ml (2 c. à soupe) de boisson végétale, au goût
- 5 ml (1 c. à thé) d'essence de vanille
Garniture
- 240 g (3/4 tasse) de sirop d'érable
- 55 g (1/4 tasse) de sucre de canne
- 2 gros oeufs (110 g)
- 35 g (1/4 tasse) de margarine végétale
- 30 ml (2 c. à soupe) de farine tout usage La Merveilleuse
- 2,5 ml (1/2 c. à thé) d'essence de vanille
- 1 ml (1/4 c. à thé) de sel
- 65 g (2/3 tasse) de pacanes, hachées
Instructions
Pâte
- Préchauffer le four à 150 °C (300 °F). Huiler un moule carré de 20 cm (8 po) et déposer un papier parchemin au fond.
- Dans un bol, mélanger la farine, la poudre à pâte et le sel. Réserver.
- Dans un moyen bol, combiner le sucre, l’œuf, la margarine, la boisson végétale et l’extrait de vanille. Mélanger le tout à l’aide d’une cuiller de bois jusqu’à ce que le mélange soit lisse et crémeux.
- Ajouter le tiers des ingrédients secs à la fois en mélangeant entre chaque addition, jusqu’à l’obtention d’une pâte homogène.
- Répartir également la pâte dans le moule et placer sur la grille centrale du four afin de précuire pendant 15 minutes, sans plus. Retirer du four et réserver.
Garniture
- Verser le sirop d'érable dans une moyenne casserole, incorporer le sucre de canne et amener à ébullition. Laisser mijoter à feu doux pendant 5 minutes. Retirer du feu et laisser tiédir pendant 30 minutes puis préchauffer le four à 230 °C (450 °F).
- Après le temps de repos du sirop d’érable, verser doucement les œufs sur le sirop en battant constamment à l'aide d'un batteur électrique.
- Incorporer la margarine végétale, la farine, l'extrait de vanille et le sel et battre, toujours à l'aide d'un batteur électrique, jusqu'à l'obtention d'un mélange crémeux et onctueux (environ 3 à 4 minutes).
- Verser sur la pâte pré-cuite et parsemer le dessus de pacanes.
- Cuire sur la grille centrale du four préchauffé tel qu'indiqué au point 1 pendant 10 minutes. Baisser ensuite la température à 180 °C (350 °F) et poursuivre la cuisson pendant 15 à 20 minutes. Les carrés seront prêts lorsqu'ils seront bien dorés
- Si la croûte semble manquer légèrement de cuisson mais que le dessus est bien cuit, simplement couvrir d'un papier parchemin pour les 5 dernières minutes de cuisson. Cela permettra à la croûte de bien cuire sans trop griller le dessus.
- Laisser refroidir complètement avec de couper en carrés.
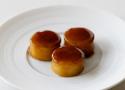
Ingredients
- Waxy potatoes
- 2 knobs butter
- Demi glace
- 4 sprigs thyme
- 2 cloves garlic
Instructions
- Peel a couple potatoes and trim both sides.
- Then if the potato is big enough cut it in half.
- Now cut the slices with a round cutter.
- Keep the trimmings for another recipe.
- Submerge the rounds in water and rinse them till the water is clear.
- After that dry them on some kitchen paper.
- Then pour some oil in a frying pan and pan fry the potato rounds with some salt.
- Once golden on one side turn them around and add some knots of butter.
- Pan fry till both sides are nice and golden and keep turning them if necessary.
- Now add some demi glace till the potatoes are halfway submerged and also add 4 sprigs of thyme and 2 cloves of garlic that are cut in half.
- Now cover the potatoes with some parchment paper and let them cook on a medium low heat for around 10 to 15 minutes.
- Once they’re cooked gently turn them around, turn off the heat and let them cool down for another 10 minutes.
- Then transfer the pommes fondant on a tray and glace them with the demi glace we just cooked them in.
- Now they’re ready to be used.
- You can keep them covered in your fridge for a couple of days and reheat them in an oven at 150 degrees Celsius for around 5 minutes.
- Don’t forget to give them a quick glaze before serving them.
- They’re great with a beautiful duck breast, some green asparagus and a tarragon sauce.
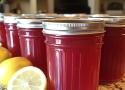
Ingredients
- 2 pounds fresh rhubarb stalks, trimmed and chopped into 1/2-inch pieces (about 6 cups)
- 1½ cups filtered water
- 2 high-quality Earl Grey tea bags
- 3½ cups granulated sugar
- 2 tablespoons fresh lemon juice
- Pinch of salt
Instructions
- Prepare for canning: If processing for shelf stability, wash 4 half-pint jars and lids in hot, soapy water. Rinse well. Keep jars hot in simmering water or a 225°F oven until ready to fill. Place flat lids in a small bowl and cover with hot water to soften the sealing compound.
- Extract the rhubarb juice: In a large, heavy-bottomed stainless steel or enameled cast iron pot, combine chopped rhubarb and water. Bring to a gentle simmer over medium heat. Reduce heat to medium-low and cook, stirring occasionally, until rhubarb completely breaks down and becomes soft and pulpy, about 15-20 minutes. The rhubarb should easily crush against the side of the pot.
- Infuse with Earl Grey: Remove pot from heat. Add tea bags, cover, and let steep for exactly 6 minutes. This timing extracts the bergamot flavor without becoming bitter. Gently remove tea bags without squeezing them, as this would release bitter tannins.
- Strain the mixture: Place a dampened jelly bag or several layers of cheesecloth in a large strainer set over a deep bowl. Carefully pour the rhubarb mixture into the jelly bag. Cover with a clean kitchen towel to protect from dust, and allow to drip for at least 4 hours or preferably overnight in the refrigerator. Do not squeeze the bag – this ensures crystal-clear jelly. You should get approximately 3 cups of strained juice.
- Measure the juice: Pour the strained juice into a liquid measuring cup to confirm the yield. You’ll need exactly 3 cups for the recipe. If slightly short, add water; if extra, reserve for another use.
- Prepare for cooking: Before cooking the jelly, place 2-3 small plates in the freezer for testing the gel set later. If processing for shelf stability, fill your water bath canner with water and begin heating to a boil.
- Cook the jelly: Pour the measured juice into a clean, wide, heavy-bottomed pot. Add sugar, lemon juice, and salt. Stir over low heat until sugar completely dissolves. Increase heat to medium-high and bring to a full rolling boil that cannot be stirred down. Boil vigorously, stirring occasionally to prevent scorching, until the mixture reaches 220°F (104°C) on a candy thermometer. This typically takes 10-15 minutes.
- Test the set: To confirm setting point, place a teaspoon of hot jelly on a chilled plate and return to freezer for 1 minute. Push edge of jelly with your finger – if it wrinkles and doesn’t immediately flow back, it’s ready. If not, continue cooking for 2-minute intervals, testing after each.
- Skim and fill jars: Remove from heat. Skim off any foam with a metal spoon. Ladle hot jelly into prepared hot jars, leaving 1/4-inch headspace. Wipe rims with dampened clean paper towel to remove any residue. Center lids on jars and apply bands, tightening just until fingertip-tight.
- Process (optional but recommended): Place filled jars in water bath canner with simmering water. Ensure jars are covered by at least 1 inch of water. Bring to a full rolling boil, cover, and process for 10 minutes (adjust for altitude if necessary). Turn off heat, remove canner lid, and let jars sit for 5 minutes before removing to a towel-lined surface.
- Cool and store: Allow jars to cool undisturbed for 12-24 hours. Check seals – buttons should be depressed and not flex when pressed. Store sealed jars in a cool, dark place for up to 1 year. Refrigerate any unsealed jars and use within 3 weeks.
- Enjoy the set jelly: For the fullest flavor development, wait at least 24 hours before opening your first jar. The jelly is beautiful on buttered toast, scones, or paired with sharp cheeses.


Ingrédients
- 8 tasses tomates vertes
- 3 tasses oignons
- ½ cuillère à thé graine de céleri
- ¼ cuillère à thé poivre de Cayenne
- 2 tasses sucre
- 2 tasses vinaigre blanc
- ¼ tasse épices à marinade dans un coton fromage
Préparation
- Laver et couper les tomates vertes en dés.
- Couper les oignons en dés.
- Dans une grande marmite, mêler le vinaigre, le sucre, les graines de céleri et le poivre de Cayenne.
- Ajouter les légumes.
- Ajouter les épices à marinade, enrobés dans un coton fromage.
- Faire mijoter jusqu'à ce que les légumes soient cuits, en brassant de temps en temps.
- Verser dans des bocaux stérilisés et sceller.