
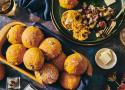
Ingredients
- 3 large eggs, at room temperature
- 3/4 cup (94g) all-purpose flour
- 3/4 cup (180ml) whole milk, at room temperature (or nondairy)
- 1 teaspoon lemon zest*
- 2 Tablespoons (25g) granulated sugar
- pinch salt
- 1/2 teaspoon vanilla extract
- 3 Tablespoons (43g) unsalted butter
Toppings
- 2 Tablespoons confectioners’ sugar, for sifting
- optional toppings: berries, whipped cream, maple syrup, and/or strawberry sauce
Instructions
- Place the eggs in a blender and blend on medium-high speed until frothy and fluffy, about 45 seconds. Add flour, milk, lemon zest, sugar, salt, and vanilla, and blend until combined. The batter is thin. Set aside and allow to rest for 15 minutes at room temperature, or cover and refrigerate it for up to 24 hours. (No need to bring to room temperature before baking.)
- Preheat the oven to 400°F (204°C). Place butter in a 10-inch oven-safe skillet (or any 3-quart baking dish), and place in the oven for just 5 minutes to melt the butter. (Be sure not to leave it in the oven to burn!) Remove from the oven and use a pastry brush to spread the melted butter up the sides of the pan.
- Pour the batter into the center of the hot pan. No need to swirl it around. Place it in the oven and bake for 15 minutes. Keeping the Dutch baby pancake in the oven, reduce the temperature to 350°F (177°C) and bake for 10 more minutes, or until the edges and center are browned.
- Remove from the oven and cool for 5 minutes before adding desired toppings. Slice and serve.
- The pancake is best enjoyed right away, but you can cover and store leftovers in the refrigerator for up to 5 days, or in the freezer for up to 2 months.
C'est vraiment très bon. Je vais en refaire !

Ingredients
- 135 g salted butter, (US = just over ½ cup, or just over 1 stick)
- 55 g cocoa powder, (plus 1 tablespoon) unsweetened, plus extra for sprinkling
- 350 g sugar
- 110 g plain flour, (actually, just less than a full cup, about 0.85 cups)
- 1 teaspoon vanilla extract
- 3 eggs, lightly whisked
Instructions
- Pre-heat the oven to 180C/355F. Line the bottom of a 7-9 inch (see note below) springform cake pan with a circle of baking paper, then grease the paper and the sides of the pan.
- Melt the butter in a medium saucepan, then take off the heat and set aside.
- Add the cocoa, sugar, flour and vanilla to the butter and stir a little. Then add the eggs and stir everything together until well combined.
- Pour the mixture into the cake pan and bake for 20 to 25 minutes (see note below) until the top is set but the centre is still gooey (the top should be firm but crack under a little pressure from your finger).
- Let the cake cool in the pan, then run a knife between the pan and the cake to loosen it. Turn out onto a plate or cake stand (see note below). Dust generously with cocoa powder and serve warm with ice cream or cream.
Note pour la version sans gluten, il suffit de remplacer la farine par de la poudre d'amandes.
C'est très facile à faire et c'est excellent. À refaire !
Ingrédients
- 1 bouteille de crémant de Loire
- 1 citron
- 15 cL de cointreau
- 12 cL de sirop de sucre de canne
Instructions
- Mettre au frais la bouteille de crémant de Loire.
- Presser le citron.
- Une fois que la bouteille est bien fraîche, verser le contenu dans un saladier et y ajouter le Cointreau, le sirop de sucre de canne et le citron pressé.
- Servir bien frais.

Ingredients
- 1 ¼ cups sifted all-purpose flour
- 1 teaspoon salt
- 2 sticks (8 ounces) unsalted butter
- 4 ounces unsweetened chocolate, coarsely chopped
- 2 ounces bittersweet chocolate, coarsely chopped
- 2 cups sugar
- 1 teaspoon pure vanilla extract
- 4 large eggs
Instructions
- Center a rack in the oven and preheat the oven to 350 degrees.
- Sift the flour and salt together and set aside.
- Melt the butter and chocolate together in a medium saucepan over low heat, stirring frequently and keeping a watchful eye on the pot to make certain the chocolate does not scorch. Add 1 cup of the sugar to the mixture and stir for half a minute, then remove the pan from the heat and stir in the vanilla. Pour the mixture into a large bowl.
- Put the remaining 1 cup sugar and the eggs into the bowl of a mixer and whisk by hand just to combine. LIttle by little, pour half the sugar and eggs into the chocolate mixture, stirring gently but constantly with a rubber spatula so that the eggs don't set from the heat. Fit the whisk attachment to the mixer and whip the remaining sugar and eggs until they are pale, thick, and doubled in volume, about 3 minutes. Using the rubber spatula, delicately fold the whipped eggs into the chocolate mixture. When the eggs are almost completely incorporated, gently fold in the dry ingredients.
- Pour and scrape the batter into an unbuttered 9-inch square glass or ceramic pan. Bake the brownies for 25-28 minutes, during which time they will rise a little and the top will turn dark and dry. Cut into the center at about the 23-minutews mark to see how they are progressing. They will be perfect if they are just barely set and still gooey. Cool the brownies in the pan on a rack. Cut into bars and serve.
- The brownies will keep, covered, for 2-3 days at room temperature and can be frozen for up to a month!
C'est très bon. Les gouteurs ont été unanimes.
Ingrédients
- 400 g + 75 g d'eau pour le bassinage
- 450 g de farine de blé T65
- 200 g de pépites de chocolat
- 45 g de poudre de cacao
- 20 g de sucre
- 10 g de sel
- 5 g de levure fraîche
Instructions
-
Peser les ingrédients, et les rassembler dans la cuve du robot. J’ai ici pris l’habitude de commencer par verser l’eau de coulage plutôt que la farine, ce qui permet au mélange de se faire correctement sans avoir à aller gratter la farine au fond de la cuve.
Verser donc l’eau, ajouter le sucre et le sel, puis la farine et le cacao et finir par la levure. -
Frasage de 4 minutes en première avec tous les ingrédients puis en 2ème jusqu’à ce que la pâte se décolle des bords de la cuve. La matière grasse contenu dans la poudre de cacao ne favorise pas le développement du réseau de gluten. Il faut ici bien veiller à laisser la pâte prendre de la force, ce qui demande un peu plus de temps que pour une pâte à pain classique. Je dois compter 10 à 15 minutes avec un KitchenAid. Si vous passez trop vite à la suite, la pâte sera vraiment coulante et sans force, et très difficile à travailler par la suite.
-
Quand la pâte forme une belle boule qui se décolle des bords de la cuve, ajouter l’eau de bassinage en 2 ou 3 fois, en laissant le temps à la pâte d’absorber l’eau entre chaque ajout.
Il ne reste qu’à incorporer les pépites de chocolat, et contrôler la température de la pâte qui doit être au alentours de 23°C. -
Laisser pointer 1 heure à température ambiante, faire un rabat et placer au frigo jusqu’au lendemain.
-
Le lendemain, diviser en 6 pâtons de 200g environ et bouler la pâte encore figée par le froid. Laisser détendre une vingtaine de minutes avant de façonner en forme de petit bâtard. Replier le tiers supérieur, retourner le pâton et replier le tiers inférieur, souder les bords avec la paume de la main.
-
Ensuite il faut compter 1h de pousse avant d’inciser la pâte et de mettre au four. Préchauffer à 250°C une demi-heure avant la cuisson et enfourner 12 minutes.
-
Laisser refroidir sur une grille.
Très bon.
Par contre, en relisant la recette, je me suis rendu compte que je n'ai pas suivi les étapes à la lettre.
C'est probablement pour cela que j'ai eu du mal à mettre en forme mes pains.
Il va falloir que je teste à nouveau.
Ingrédients
Gâteau
- 3 tasses (750 ml) de farine
- 1 cuillère à thé (5 ml) de bicarbonate de soude
- 2 cuillères à thé (10 ml) de cannelle
- 1/2 cuillère à thé (2,5 ml) de muscade
- 1/2 cuillère à thé (2,5 ml) de sel
- 1 tasse et demie (375 ml) d’huile végétale
- 1 tasse et demie (375 ml) de sucre
- 1/2 tasse (125 ml) de cassonade
- 3 œufs
- 2 cuillères à thé (10 ml) d’extrait de vanille
- 3 grosses pommes rouges du Québec, pelé et coupé en gros morceaux
- 1 tasse (250 ml) de noix de Grenoble (optionnel)
Glaçage
- 3 cuillères à soupe (45 ml) de beurre
- 3 cuillères à soupe (45 ml) de cassonade
- 3 cuillères à soupe (45 ml) de sucre
- 3 cuillères à soupe (45 ml) de crème
- 1/4 de cuillère à thé d’extrait de vanille
Instructions
- Préchauffer le four à 325 °F (162 °C).
- Bien graisser un moule à gâteau de type Bundt ayant une contenance de 12 tasses.
- Dans un grand bol, mélanger la farine, le bicarbonate de soude, la cannelle, la muscade et le sel. Passer au tamis.
- Dans le bol de votre mélangeur, combinez l’huile, le sucre et la cassonade et bien mélanger.
- Ajouter un œuf à la fois et bien mélanger entre chaque. Ajouter la vanille et mélanger à nouveau.
- Ajouter les ingrédients tamisés au mélange liquide et bien mélanger jusqu’à homogénéité.
- Ajouter les pommes et les noix. Bien mélanger.
- Verser le mélange dans le moule à gâteau.
- Faites cuire pendant 1 heure et 15 minutes ou jusqu’à ce que le gâteau passe le test du cure-dent.
- Retirez du four et laissez reposer.
- Pendant ce temps, préparer le glaçage en faisant chauffer tous les ingrédients dans un petit chaudron à feu moyen et en mélangeant. Porter à ébullition pendant 1 minute.
- Retirer le gâteau du moule et verser le glaçage dessus.
- Mettre au réfrigérateur pour que le glaçage prenne.


Ingredients
- Flour - 700g
- Water - 500ml
- Salt - 25g
- Olive Oil - 30g
- Active Dry Yeast - 1 tsp
Instructions
- Mix the yeast in the water and add half of the flour, mix until it reaches a creamy consistency.
- Add the remaining flour, knead till absorbed.
- Add the salt, knead till absorbed.
- Add the oil, knead till absorbed and let rest covered for 10 minutes.
- Fold the dough on itself for 3 times every hour and then place on and olive oiled baking sheet.
- Press down with fingers and let it rise another 30m.
- Press down with your fingers again.
- Add a solution of water and oil on the focaccia and some flaky salt.
- Bake at 450F for 16-18m and enjoy!
Très bon !
J'ai du ajuster le temps de cuisson car elle était vraiment trop blanche au bout des 18 minutes. Je pense que je l'ai mise presque 30 minutes pour avoir une belle coloration.
Ingrédients
- 8 tasses tomates vertes
- 3 tasses oignons
- ½ cuillère à thé graine de céleri
- ¼ cuillère à thé poivre de Cayenne
- 2 tasses sucre
- 2 tasses vinaigre blanc
- ¼ tasse épices à marinade dans un coton fromage
Préparation
- Laver et couper les tomates vertes en dés.
- Couper les oignons en dés.
- Dans une grande marmite, mêler le vinaigre, le sucre, les graines de céleri et le poivre de Cayenne.
- Ajouter les légumes.
- Ajouter les épices à marinade, enrobés dans un coton fromage.
- Faire mijoter jusqu'à ce que les légumes soient cuits, en brassant de temps en temps.
- Verser dans des bocaux stérilisés et sceller.

Ingredients
Meatloaf
- ½ medium onion diced
- 1 teaspoon butter
- 2 eggs
- ¾ cup milk
- ¾ cup Italian breadcrumbs or seasoned breadcrumbs
- 2 pounds lean ground beef 80/20
- 1 tablespoon ketchup or chili sauce
- 1 teaspoon Italian seasoning
- 2 tablespoons fresh parsley chopped, or 2 teaspoons dried parsley
- 1 teaspoon Kosher salt & ½ teaspoon black pepper more to taste
Meatloaf Sauce
- ½ cup chili sauce *see note
- ½ cup ketchup
- 2 tablespoons brown sugar optional
Instructions
- Preheat the oven to 350°F. Line a rimmed baking pan with aluminum foil and spray with cooking spray.
- In a small pan, cook onions in butter over medium low heat until tender. Let them cool completely.
- In a medium bowl, combine eggs, milk, and breadcrumbs. Let the mixture sit for 5-10 minutes.
- Add the ground beef, cooked onions, ketchup or chili sauce, Italian seasoning, parsley, and salt & pepper to the bowl. Mix until just combined.
- Form a 8"x4" loaf on the prepared baking pan and bake for 40 minutes.
- While the meatloaf is cooking, combine the chili sauce and ketchup (and brown sugar if using). Spread mixture over the meatloaf and bake for an additional 10-15 minutes or until cooked through and the meatloaf reaches an internal temperature of 160°F. Broil for 1-2 minutes if desired.
- Let the meatloaf rest for 10 minutes before slicing and serving.
Cette liqueur est aussi appelée "liqueur d'officier" ou aussi "confiture de vieux garçon".
Le principe : malgré son nom, il ne s'agit pas d'une confiture mais de fruits à l'alcool!
Utiliser en quantités égales (100 g environ), tous les fruits de saison de mai à octobre à l'exception des agrumes et autres fruits exotiques (bananes, mangues, ...). Déguster aux environs de Noël et toujours avec modération.
La recette :
-
Utiliser un grand bocal en verre ébouillanté et fermant hermétiquement.
-
Au fil des saisons, de mai à octobre, placer des fruits sains, lavés et essuyés, dans le bocal.
-
Ajouter la moitié du poids en sucre, recouvrir d'alcool de fruits (acheté au supermarché).
-
Fermer hermétiquement. Entre chaque ajout de fruit, conserver au frais et à l'abri de la lumière et compléter d'alcool si le niveau vient à baisser.
-
Incorporer successivement :
- fraises (petites et fermes) (fait)
- cerises (équeutées) (fait)
- groseilles (égrappées) (fait)
- framboises (fait)
- cassis (égrenés) (fait)
- pêches (pelées, dénoyautées et coupées en dés) (fait)
- abricots (pelés, dénoyautés, coupés en deux) (fait)
- nectarines et brugnons (dénoyautés, coupés en quatre) (fait)
- melon en dés (fait)
- prunes : mirabelles (fait), Reine-Claude (fait), quetsches
(coupées en deux et dénoyautées) - grains de raisins blancs et noirs (fait)
- poires (pelées, épépinées et en dés) (fait)
- ...
Il faut attendre 3 mois avant de déguster cette liqueur.
Conseils et suggestions :
-
Ne mettre qu'en très petite quantité les fruits très aqueux tels que fraises, melon et poires.
-
Surveiller régulièrement pour vérifier que des moisissures n'apparaissent pas. Si elles apparaissent, les retirer et ajouter un peu d'alcool.
-
En guise de conseil de dégustation, vous pouvez vous en servir pour agrémenter des desserts comme des coupes de fruits, des glaces.
Ingredients
- 4¾ cups (570g) King Arthur Unbleached All-Purpose Flour
- 1 teaspoon cinnamon
- ¼ teaspoon ginger
- ¼ teaspoon cloves, optional
- ¼ cup (50g) light brown sugar or dark brown sugar, packed
- 1½ teaspoons (9g) table salt
- 1 tablespoon (10g) instant yeast
- ¾ cup (170g) pumpkin purée or squash purée
- 2 large eggs
- ¾ cup (170g) water
- 4 tablespoons (57g) butter, softened
- ¾ cup (128g) dried cranberries or golden raisins
- ¼ cup (46g) crystallized ginger, diced
Instructions
- Weigh your flour; or measure it by gently spooning it into a cup, then sweeping off any excess. Mix and knead all of the dough ingredients except the fruit and crystallized ginger — by hand, mixer, or bread machine — until you've made a soft, fairly smooth dough. Pumpkin varies in water content, so add extra water or flour if needed. Right at the end, knead in the fruit and crystallized ginger.
- Place the dough in a lightly greased bowl, cover the bowl, and allow the dough to rise for 1 1/2 hours, until it's almost double in bulk.
- Turn the dough out onto a lightly greased surface, gently deflate it, and divide it into 16 pieces, roughly 2 3/4 ounces each.
- Roll each piece into a ball. Place rolls in the lightly greased cups of a couple of standard muffin pans (which will help them maintain their round shape); or onto a greased or parchment-lined baking sheet.
- Set aside, covered lightly, to rise for 1 hour, or until the rolls look puffy.
- Preheat the oven to 350°F.
- Bake the rolls for 25 to 30 minutes, until they're lightly browned and the center of one reads 190°F on an instant-read thermometer.
- Remove the pans from the oven and turn the rolls out onto a rack to cool. Serve warm or at room temperature.
Ingredients
Dough
- ½ Cup warm water
- 1 Tbsp./Packet Red Star Platinum Yeast (7g)
- 1 Cup milk
- ¼ Cup butter (57g)
- ½ Cup sugar
- ½ tsp. salt
- 1 large egg
- ½ tsp. cardamom
- 3 ¾ Cup unbleached bread flour
Drizzle
- ½ Cup powdered sugar
- ¼ tsp. vanilla
- 1-3 tsp. milk
Instructions
- Place warm water and yeast in EZ DOH bucket and stir to dissolve yeast.
- Heat milk, butter, sugar and salt together in a saucepan on low, until butter is melted. Let cool until just warm to the touch.
- Pour into EZ DOH bucket with yeast mixture.
- Stir in egg, ¾ Cup flour and cardamom.
- Cover and let rest for 20 minutes.
- Add remaining flour and EZ DOH-it for 2-3 minutes until the dough is smooth and soft and all ingredients are incorporated.
- Remove dough from bucket, spray bucket with cooking spray, “smooth” dough and replace in bucket.
- Cover and let rise until doubled.
- At this point, the dough can be removed from the bucket and divided into 2 equal portions for two medium-sized loaves.
- Divide each piece into 3 equal pieces.
- Roll each piece out to about 12”, or long enough to braid.
- Connect the ropes at the top by pressing together and then tucking under the dough.
- Continue to braid the dough, then press together at the base and tuck under.
- Place the two braided loaves on a greased baking sheet, cover and let rise until almost doubled.
- Bake at 350°F for 25-30 minutes or until golden.
- Remove from oven and brush with butter to soften crust.
- Cool on a wire rack.
- Mix drizzle ingredients and drizzle over the cooled loaf.

Ingredients
Tangzhong
- 50gm (1/3 cup) bread flour
- 250ml (1cup water, could be replaced by milk, or 50/50 water and milk)
Bread
- 350gm (2½ cups) bread flour
- 55gm (3 Tbsp+2 tsp) caster sugar
- 5gm (1 tsp) salt
- 56gm egg (equals to 1 large egg)
- 7gm (1Tbsp +1 tsp) milk powder (to increase fragrance, optional)
- 125ml (½ cup) milk
- 120gm tangzhong (use half of the tangzhong you make from above)
- 5 to 6gm (2 tsp) instant yeast
- 30gm (3 Tbsp) butter (cut into small pieces, softened at room temperature)
Fillings
- bacon, to taste
- cheese, to taste
Instructions
Tangzhong
- Mix flour in water well without any lumps. Cook over medium-low heat, stirring consistently with a wooden spoon, whisk or spatula to prevent burning and sticking while you cook along the way.
- The mixture becomes thicker and thicker. Once you notice some “lines” appear in the mixture for every stir you make with the spoon. It’s done. You get the tangzhong. (Some people might like to use a thermometer to check the temperature. After a few trials, I found this simple method works every time.) Remove from heat.
- Transfer into a clean bowl. Cover with a cling wrap sticking onto the surface of tangzhong to prevent from drying up. Let cool. The tangzhong can be used straight away once it cools down to room temperature. Just measure out the amount you need. The leftover tangzhong can be stored in fridge up to a few days as long as it doesn't turn grey. If so, you need to discard and cook some more. (Note: The chilled tangzhong should return to room temperature before adding into other ingredients. )
Bread
- Combine all dry ingredients: flour, salt, sugar and instant yeast in a bowl. Make a well in the center. Whisk and combine all wet ingredients: milk, egg and tangzhong, then add into the well of the dry ingredients. Knead until you get a dough shape and gluten has developed, then knead in the butter. Mind you, it’d be quite messy at this stage (That's why I used a bread maker). Keep kneading until the dough is smooth, not sticky and elastic. To test if the dough is ready, you might stretch the dough. If it forms a thin “membrane”, it’s done. The time of kneading all depends on how hard and fast you knead. (Note: I use bread maker to do this hardest part and messy job for me. I added the wet ingredients into my bread maker first, then followed by the dry ingredients. The yeast is the last to add.)
- Knead the dough into a ball shape. Place in a greased bowl and cover with a wet towel or cling wrap. Let it proof till it's doubled in size, about 40 minutes (Note: the time will vary and depends on the weather. The best temperature for proofing is 28C. I still used my bread maker in this stage. And my bread maker has a heater.)
- Transfer to a clean floured surface. Deflate and divide the dough into four equal portions. Knead into ball shapes. Cover with cling wrap, let rest for 15 minutes.
- Roll out each portion of the dough with a rolling pin into an oval shape. Sprinkle bacon and cheese evenly as much as you like. Roll from the upper, shorter end down to the bottom (as picture shown). Flatten the dough with your rolling pin. Then roll once again. The seals face down.
- Arrange the rolled-up dough in a greased or non-stick loaf tin (as picture shown). Leave it for the 2nd round of proofing, about 40 minutes, or until the dough rises up to 3/4 of the height of the tin inside.
- Brush whisked egg on surface. Bake in a pre-heated 180C (356F) oven for 35 to 40 minutes. Remove from the oven and tin. Transfer onto a wire rack and let cool completely. Slice to serve or place in an airtight plastic bag or container once it's thoroughly cooled.
Ingredients
Soaker Ingredients
- 204 g raisins
- 61 g candied orange peel
- 92 g candied lemon peel
- 82 g slivered almonds
- 34 g rum
Sponge Ingredients
- 120 grams flour
- 80 grams water
- 0.1 gram instant yeast (a small pinch)
Final Dough Ingredients
- 348 grams flour
- 53 grams milk
- 18.6 grams (2 Tablespoons) osmotolerant yeast or 25.3 grams (2 Tablespoons + 2 teaspoons) instant yeast
- 8 grams (1-⅓ teaspoons) salt
- 8 grams (2-⅓ teaspoons) diastatic malt powder (omit if you don’t have it)
- 51 grams sugar
- 53 grams egg (about one large egg)
- 5 grams grated lemon zest (one average lemon)
- 5 grams grated orange zest (one small orange)
- ⅓ teaspoon of each of these ground spices: cinnamon, cardamom, cloves, allspice, nutmeg
- 273 grams unsalted butter, at room temperature (should be pliable)
- all of the sponge
- all of the soaker
- about 180 grams of marzipan, divided into four pieces
Finishing Ingredients
- clarified butter
- fine granulated sugar
- powdered (confectioner’s) sugar
Instructions
- Combine the soaker ingredients in a medium bowl. Cover and leave at room temperature for about 12 hours.
- Meanwhile, combine the sponge ingredients in another medium bowl. Cover and ferment at room temperature for 12 hours.
- In the bowl of a stand mixer, combine all of the final dough ingredients except the soaker and the marzipan. Mix in slow speed until all the ingredients are incorporated, about 4 or 5 minutes.
- Continue mixing in medium speed until the gluten reaches full development. The dough should come together around the hook and should no longer stick to the sides and bottom of the bowl. This could take about 20 minutes or more, but will depend on your mixer.
- Add the soaked fruits and mix on slow speed just until they are evenly distributed through the dough.
- Transfer the dough to a lightly buttered container. Cover and ferment for 30 minutes at room temperature.
- Turn the dough onto the counter. Divide into four pieces of about 375 grams each. Preshape the dough into balls and let them rest, covered, for 30 minutes.
- Shape the loaves as shown above and place them on parchment-lined baking sheets (two per sheet). Slip them into a large plastic bag with a bowl of warm water. Proof for about 90 minutes, replenishing the water when it cools.
- Meanwhile, preheat the oven to 375F on convection setting or 400F on regular bake setting. You will also need steam during the initial phase of baking, so prepare for this now.
- Bake for 10 minutes, open the oven door briefly to allow any remaining steam to escape, and bake for another 15-20 minutes. If you do not have convection, you may need to rotate the position of the baking sheets halfway through the bake to ensure even browning.
- While the loaves are still warm, brush them with clarified butter. Dredge them in fine granulated sugar, brushing off the excess.
- When cool, sift powdered sugar over the loaves. You can leave the stollen out overnight to let the loaves dry and the sugar crust up a bit.
- To store, wrap tightly in foil; it will keep for several days.
- To serve, slice thinly.
C'est vraiment super bon. J'en referai.
Apparement, on peut le préparer plusieurs semaines à l'avance pour laisser les saveurs s'équilibrer.
Idéal pour faire un cadeau de Noël fait-maison.
Ingrédients
pour la pâte fermentée
- 300g de farine T55 ou T65
- ½ cc de levure sèche instantanée
- ¾ cc de sel fin
- 180 à 200ml d'eau tempérée
pour la pâte finale
- 600g de farine T65
- 2 cc de levure sèche instantanée
- 2 cc de sel fin
- 280 à 300ml d'eau tiède
- 15g de miel
- 40g d'huile végétale neutre
- 1 œuf
- graines de sésame, pavot, nigelle au choix
Instructions
Préparation de la pâte fermentée (la veille)
- Dans un grand saladier, mélanger la farine avec la levure puis le sel et ajouter l'eau. Mélanger avec une cuillère en bois pour former une pâte grossière hétérogène. Ajuster avec de la farine (si la pâte parait trop collante) ou de l'eau (s'il reste de la farine non amalgamée) puis transvaser sur un plan de travail légèrement fariné dès formation d'une boule.
- Pétrir la pâte pendant 5 à 10 min ou le temps qu'elle devienne lisse, souple et élastique (la pâte doit être légèrement collante au toucher - effet scotch).
- Mettre la pâte dans un saladier légèrement huilé et la tourner dans tous les sens pour que sa surface aussi soit recouverte d'une fine pellicule d'huile. Couvrir avec du film alimentaire et laisser lever environ 1h (la pâte doit avoir atteint 1 fois 1/2 son volume initial).
- Travailler brièvement la pâte sur le plan de travail ou directement dans le saladier pour la dégazer puis couvrir à nouveau et placer au réfrigérateur pour la nuit.
Note : la pâte fermentée peut être conservée 3 jours au réfrigérateur ou congelée 3 mois bien fermée dans un sac congélation. Vous pouvez également utiliser la pâte fermentée le jour même après l'avoir laissé pousser 2h au lieu d'1 mais elle aura moins d'arômes.
Préparation de la pâte finale
- Environ 1h avant de préparer le pain, sortir la pâte fermentée du réfrigérateur, la diviser en une dizaine de morceaux et laisser revenir à température ambiante pendant 1 h bien couverts avec un torchon ou du film alimentaire.
- Dans un grand saladier, mélanger la farine et la levure sèche puis ajouter le sel, mélanger et creuser un puits. Verser l'eau tiède, ajouter les morceaux de pâte fermentée et les écraser grossièrement du bout des doigts pour les délayer un peu. Ajouter le miel, l'huile et l'oeuf grossièrement battu.
Mélanger avec une cuillère en bois en partant du centre et en élargissant le mouvement pour faire tomber et incorporer la farine des bords. Continuer à mélanger jusqu'à formation d'une "boule" de pâte hétérogène (ajouter éventuellement un peu d'eau s'il reste de la farine non incorporée). - Transférer la pâte sur un plan de travail légèrement fariné et la travailler énergiquement au départ pour favoriser la formation du réseau glutineux puis dès que la pâte commence à s'homogénéiser et à s'assouplir, la pétrir pendant une dizaine de minutes ou le temps nécessaire pour qu'elle passe le windowpane test et qu'elle soit légèrement collante au toucher.
- Placer la pâte en boule dans un saladier huilé en la retournant pour la recouvrir sur toute sa surface. 1. Couvrir avec du film alimentaire et laisser reposer pendant 2h (la pâte doit doubler de volume).
Note : le temps de repos ici doit impérativement être de 2h: si la pâte double de volume avant ce temps, il faut la re-pétrir gentiment pour la dégazer un peu puis la remettre à pousser le temps nécessaire pour qu'elle double de volume - Transvaser la pâte sur un plan de travail très légèrement fariné si besoin est et la replier 2 ou 3 fois sur elle-même. Diviser en 12 morceaux de même poids (environ 120g) et les bouler sans serrer (la pâte devant être étirée et façonnée par la suite). Couvrir avec du film alimentaire légèrement huilé et laisser en détente pendant 10 min.
- Préparer 2 plaques de cuisson en les garnissant avec du papier sulfurisé légèrement huilé et saupoudré de semoule de maïs (ou de blé).
Façonnage des petits pains Kaiser
- Il existe plusieurs façons de donner leur forme particulière à ces pains: la plus rapide et bien sûr celle utilisée par les professionnels consiste à utiliser un tampon-empreinte spécial (le même que celle utilisée pour les michette italiennes) disponible sur internet; la seconde plus sophistiquée mais qui demande de la patience et de la dextérité consiste en une série de replis de la pâte pour former des "pétales" et la troisième de loin la plus ludique, la plus utilisée parmi les amateurs et qui donne à mon avis les plus beaux résultats est celle du nœud comme indiqué ci-dessous.
- Façonner chaque pâton en boudin d'environ 30 cm (en suivant le procédé détaillé ici). Faire un simple nœud sans serrer (a) puis faire une boucle avec l'extrémité droite d'abord en la faisant passer par-dessus le nœud (b) et ressortir par le centre. Procéder de même avec l'extrémité gauche qui doit faire une boucle par-dessus le nœud (c) et ressortir par le centre mais cette fois par derrière (d).
- Déposer les petits pains au fur et à mesure sur les plaques de cuisson en les retournant (face nouée dessous), huiler légèrement la surface et couvrir avec du film alimentaire sans serrer.
Laisser reposer pendant 45 min puis retourner très délicatement face nouée dessus, couvrir avec le film alimentaire légèrement huilé et laisser à nouveau reposer pendant 40 min environ (les pains doivent avoir doublé de volume).
Note : il faut être particulièrement délicat dans la manipulation pour éviter de dégazer les pains. Vous pouvez utiliser une large spatule huilée glissée sous le pain à la place de vos mains. Personnellement, je préfère me servir du papier sulfurisé sur lequel sont posés les pains: je le soulève légèrement du côté du pain à retourner pour aider celui-ci à se décoller et je le réceptionne retourné dans mon autre main (légèrement huilée également) puis je le remets délicatement à sa place. - Préchauffer le four th. 7-8 (220°C) en plaçant un récipient métallique rempli d'eau chaude à même la sole ou sur le rack le plus bas du four pour créer une atmosphère humide indispensable à la formation de la croûte craquante caractéristique du kaiser.
- Vaporiser les pains avec de l'eau (ou les badigeonner au pinceau toujours délicatement et sans excès d'eau) et les saupoudrer avec les graines choisies si vous les utilisez.
Enfourner et laisser cuire pendant 5 min puis baisser le thermostat à 6-7 (200°C) et prolonger la cuisson environ 15-20 min en retournant les plaques après 10 min pour une cuisson régulière. Les petits pains Kaiser doivent avoir une couleur dorée caramel et sonner creux lorsque leur fond est tapoté. - Transférer les pains sur une grille et laisser refroidir. Et voilà: les pains sont prêts pour le sandwich!
Ingredients
- ⅔ cup (4 ounces) chopped milk chocolate or milk chocolate chips
- ½ cup tahini
- ⅛ teaspoon kosher salt
- ½ teaspoon vanilla extract
Instructions
- Melt the chocolate in a double boiler or by microwaving in 30-second increments, stirring after each, until melted and smooth.
- Stir in the tahini, salt, and vanilla.
- It will thicken as it cools.
Source : « Molly on the range » de Molly Yeh
Note : C'est excellent et surtout très facile à faire.
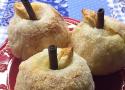
Ingredients
- 4 medium sized apples
- 4 tablespoons golden raisins and currants, mixed
- 1 tablespoon walnut pieces, chopped
- ¼ teaspoon cinnamon
- 3 tablespoon sugar, divided
- 4 tablespoons apple juice or rum
- 4 puff pastry squares (approx. 5 x 5 in.)
- 2 egg yolks
- 1 tablespoon water
Instructions
- Preheat the oven to 400F. Wash the apples, and peel and core them. Mix the raisins, walnuts, cinnamon and 1 tablespoon of sugar, and add the apple juice or rum. Set aside and soak for a couple of minutes, then fill each apple with the mixture. If you have boerenjongens, this is a good time to use them!
- Set each apple, top side down, on a square piece of puff pastry and wrap the apple, by pulling up each corner and tucking it slightly into the cored hole. Make sure all sides are covered and clinging to the apple.
- If you have some extra dough left and a couple of cinnamon sticks, you can make stems and leaves and wrap the apple with an additional decorative something or other, but it's not necessary. If you do use cinnamon sticks, make sure to wrap the top with a little aluminum foil, as they tend to burn easily.
- Make an egg wash with the yolks and the water, and brush on the dough. Sprinkle all four apples with the remaining sugar. Place each apple in a ramekin or small aluminum pie dish, smooth side up. Bake golden brown in 20-25 minutes.
Vraiment délicieux. Il faut porter attention à l'emballage de la pomme pour ne pas avoir d'épaisseurs de pâte qui ne seraient pas cuites.

Ingredients (Four 10" rolls)
- 260 g 1% Milk*
- 6 g Instant Dry Yeast (about 1 packet)
- 8 g Diastatic Malt powder (optional)
- 400 g Bread Flour (all-purpose works too)
- 10 g Honey (or sugar)
- 20 g Olive Oil
- 8 g Salt
- Egg wash: 1 egg white + spoonful of water
- Cornmeal for sprinkling
*Note: You could use a liquid mixture of equal parts whole milk and water. I prefer using all skim or 1% milk.
Instructions
- Warm 260 g milk in the microwave for about 50 seconds. Ideally, the temperature is between 105-110 F to optimize yeast activity. Add 6 g of yeast along with 8 g diastatic malt powder and stir to combine. Let stand for 3-5 minutes until light foam surfaces and bubbles are visible.
Note: Proofing the yeast is done to test the viability of the yeast. If there is no foam surface or little bubbles the yeast is likely dead and should be discarded for new yeast. - Meanwhile, add 400 g flour, 10 g honey, 20 g olive oil, and 8 g of salt to a large mixing bowl. Once the yeast is proofed, pour in the mixture and vigorously mix the dough with your hands until no dry flour remains in the bowl and a cohesive mass forms, about 2 minutes. Cover with plastic wrap and let rest for 15 minutes.
Note: Resting will allow the flour to start hydrating all on its own, and make the dough a little bit easier to work with when we start kneading. - Kneading (Gluten development) - 5:20 pm to 5:30 pm
- Once rested, turn the dough out onto a clean counter and knead for 8-10 minutes. I advise setting a timer to make sure ample time is spent kneading. Knead the dough until it is completely smooth and no longer sticky.
- After kneading the dough, cut off a piece and test for gluten development by carefully stretching the dough very thin to check for a see-through 'window' before tearing.
Note: The gluten window test is the key to understanding if the flour has been hydrated enough which is how gluten is developed. If the dough tears before getting to a slightly translucent window continue kneading for another couple of minutes. - Once done kneading, add the dough to the mixing bowl and cover with plastic wrap. Let rise until doubled in size, about 45-60 minutes though it could take longer depending on the yeast, room/dough temperature..
- Once doubled in size, punch the dough down and divide into 4 equal portions, roughly 175 grams each.
- Using your fingertips lightly press and stretch and piece of dough into a rectangle about 8 inches wide and 1 inch thick. Tightly roll the rough from the bottom to the top. Press and seal the seam created on the bottom of the roll. Now, you should have a log of dough with the seam side down. Applying even pressure with the palm of your hands in the center of the dough begin gently rolling the log out into a cylinder, about 10 inches long.
Note: For shaping, just take a look at the video, it's hard to explain in words. - Evenly sprinkle cornmeal on two baking sheets. Shape each hoagie roll and place 2 on each baking sheet. Cover lightly with plastic wrap or a towel and let the rolls proof until about 1.5 to 2 times in size, another 45-60 minutes.
- With 15 minutes of proofing left, preheat the oven to 375 F. Place an oven-safe pan or another baking sheet on the bottom rack of the oven.
Note: Ice will be dropped on the hot pan to help create a steamy environment for better oven spring. - Using a razor or really sharp knife, score the hoagie rolls with one long slash at a 45-degree angle to allow for oven spring.
- Whisk the egg white and spoonful of water together. Using a brush, lightly spread the egg wash on the exterior to gives us a better crust. Sprinkle a little cornmeal over top. Note: At this point, you can sprinkle on toppings like sesame seeds, or herbs and spices if you would like.
- Place the rolls into the oven on the middle rack and toss in 4 to 5 ice cubes on the hot pan on the preheated pan which will create steam.
- Bake for 10 minutes then rotate the pan. Continue baking for another 8-10 minutes until the crust is golden brown and the internal temperature reaches 200 F.
- Let cool completely on a wire rack. I actually like to store these in a plastic bag for 1 day before making a hoagie.
Ce pain est vraiment très bon. Il est un peu sucré à cause du miel mais ce n'est pas trop. Il se marie très bien avec du beurre salé.
Ingredients
Dough
- 1 ¼ Cup warm milk (should be just warmed to the touch)
- 1 Tbsp/packet Red Star Platinum Yeast
- ⅓ Cup honey
- 3 Tbsp. butter, softened
- 1 ¼ Cup white whole wheat flour
- 1 ¾ Cup unbleached, all-purpose flour
- 1 ½ tsp. kosher salt
- ¾ Cup old-fashioned oats
Topping
- Small amount of honey, warmed
- Small amount of old-fashioned rolled oats
Instructions
- Place warm milk and yeast in EZ DOH bucket and stir to dissolve yeast. Let rest 1 minute.
- Add one cup of flour, then additional dough ingredients. EZ DOH-it for 2-3 minutes, or until dough is smooth and soft and all ingredients are incorporated (add small amounts of additional flour if dough is too sticky).
- Remove dough from bucket, spray bucket with cooking spray, “smooth” dough and replace in bucket.
- Cover and let rise until doubled.
- Remove dough from bucket and deflate.
- Roll dough into a small rectangle, then roll up from long side. Pinch seams. Gently fold ends under and place, seam-side down in a large greased loaf pan (or form two smaller loaves and place in two smaller pans).
- Cover with a clean dishtowel and let rise until the loaf is nearly doubled.
- Gently brush the melted honey onto the top of the loaf and sprinkle the old-fashioned oats over the honey.
- Bake at 350°F for 35-45 minutes. You may want to tent the top of the bread after ½ hr. to prevent over-browning.