Ingredients
Tangzhong
- 4 Tbsp (60g) whole milk or unflavored almond milk
- 2 Tbsp (27g) water
- 2 Tbsp (20g) bread flour
Dough
- ½ cup (120g) whole milk or unflavored almond milk
- 1 Tbsp (9g) instant yeast
- 2.5 cups (320g) bread flour, plus more for bench flour
- 2.5 Tbsp (35g) granulated sugar
- 1 tsp (7g) fine sea salt
- 1 large egg, room temperature
- 1 large egg yolk, room temperature
- 3 Tbsp (42g) unsalted butter, softened
- Cooking spray, for greasing
Egg Wash
- 1 large egg
- Splash of whole milk
- Melted butter or browned butter
Instructions
Tangzhong
- Whisk all the ingredients together in a small saucepan.
- Once combined, place over medium heat, and constantly whisk until the mixture thickens into a paste.
- Remove to a small bowl and set aside.
Dough
- Warm the milk to 95°F (35°C).
- Whisk in the instant yeast until dissolved.
- Store in a warm area and let sit for 8 minutes.
- In a stand mixer bowl whisk together the dry ingredients.
- Add the dough hook and turn the mixer on low.
- Slowly stream in the milk and yeast mixture and mix for a few seconds to combine.
- Add the tangzhong paste, egg and egg yolk.
- Turn the mixer speed up to medium-low and continue to mix until evenly combined, turning the machine off and scraping down the sides of the bowl intermittently throughout mixing.
- Gradually add the butter in pieces, mixing the butter into the dough completely before adding more.
- Once the butter is incorporated, continue to knead the dough at medium-low speed for 5-8 minutes, or until the dough is smooth.
- Lightly grease a medium bowl and set aside.
- Remove the dough from the stand mixer and gently fold all the sides towards the center to help form a ball.
- Place the dough seam side down on a clean work surface and roll it around on the board to create a tight, smooth ball.
- Place the dough in the greased bowl, cover with a damp towel and place in a warm area to proof and double in size, about 1 - 1.5 hours.
- After the dough has risen, punch the dough down and place on a lightly floured work surface.
- Using a bench scraper, divide dough into 6 even pieces around 95–105 grams each.
- To shape the individual buns, place one dough piece in the center of your board.
- Gently stretch and fold the edges of the dough towards the center.
- Flip the dough so it is seam side down.
- Using your fingers pull the dough toward you, making sure the dough keeps contact with the board the entire time, to start to create tension and form a tight dough ball.
- Rotate the dough 90 degrees and repeat this process two more times or until you have done this for the entire perimeter of the bun and have a smooth, tight dough ball.
- Line a rimmed sheet tray with parchment paper and lightly grease the parchment.
- Place the shaped dough on the prepared pan.
- Repeat with the remaining dough, making sure to leave 2.5” (6cm) of space between each bun.
- Cover with a similar-sized sheet tray that is flipped so that the dough will not dry out.
- Let rise at room temperature for another 1-2 hours, or until doubled in size.
Egg Wash and Baking
- Preheat the oven to 375°F (190°C).
- Whisk together the egg and milk until evenly combined.
- Gently brush the tops of the buns with the egg wash.
- Bake for 16-18 minutes or until deeply golden brown.
- Remove the buns to a cooling rack and immediately brush generously with melted butter.
- Let cool completely before serving.

- Ae PooiM - YouTube
- Atelier Alaska DIY Couture Débutant - YouTube
- Couture Enfant & Tricot Débutant - YouTube
- From Carly B - YouTube
- Nathalie Couture easy - YouTube
- ProperFit Clothing Co. - YouTube
- Romy Stan Zak [FR] - YouTube
- Sailrite - YouTube
- sewingtimes - YouTube
- Witchcrafty - YouTube
- withwendy - YouTube

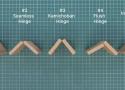
One doesn’t generally associate cardboard with structural components like hinges, but [Itoshige Studio] assures us that you can absolutely create hinges out of this ubiquitous material
. In total the video covers five different designs, ranging from the simple and straightforward to an interlocking tab design that approximates a typical steel hinge with paper rod to keep both sides of the hinge together.
The most simplistic hinge is unsurprisingly just a strip of craft paper, which is also demonstrated as the hinge for a wooden box in lieu of the typical metal hinge. This same principle is then demonstrated for a fancy cardboard box.
From here the designs get increasingly more involved. First a seamless hinge variation, and then a kamichoban hinge design that’s inspired by traditional Japanese room dividers and furniture, using panels that are interconnected with overlapping sections to create a fascinatingly flexible hinge that can fully fold either way.
The flush hinge design is somewhat like the craft paper hinge, but significantly fancier and probably sturdier, while also looking pretty good on something like a cabinet. Finally the interlocking tab hinge is effectively a cardboard version of the hinge design that’s found on every room’s door, with a similar level of flexibility. This is obviously the trickiest one to assemble and get right, but it has its own charm.
Considering that all of these examples use regular corrugated cardboard that we get shipped to our homes by the truckload, the cost to try these examples is your time plus some basic tools and glue. The author also sells a book that contains templates – in addition to digital versions – for these hinges and other designs, if you’d like to enjoy the 100% paper experience.



The Gold Collection → pour acheter les CPs
Easy Folding Guide



Des ingrédients endémiques de l'Australie. À essayer si un jour je me retrouve là-bas.

Ingrédients
- 75g de beurre
- 50g de poudre d’amande
- 85g de sucre glace
- 25g de farine
- 75g de blanc d’oeuf
- 70g de pépites de chocolat
- 60g de chocolat
- 60g de crème
- 10g de beurre
Instructions
Biscuit
- Faire fondre 75g de beurre dans une casserole, jusqu’à l’obtention d’un beurre noisette.
- Mélanger, avec une maryse, 75g de blanc d’oeuf, 85g de sucre glace, 25g de farine et 50g de poudre amande.
- Ajouter le beurre fondu, mélanger délicatement, puis ajouter 70g de pépites de chocolat, mélanger.
- Déposer la pâte dans des moules à savarins.
- Enfourner 25min à 180°.
Crème au chocolat
- Faire chauffer 60g de crème quelques minutes dans une casserole.
- Puis y faire fondre 60g de chocolat. Lorsque le chocolat est fondu, intégrer 10 g de beurre et fouetter le mélange.
Montage
- Démouler les gâteaux lorsqu’ils sont cuits.
- Déposer une cuillère de crème au chocolat dans le creux formé par le moule.



Ingrédients
- 500g de farine
- 10g de sel
- 10g de levure fraiche
- 350g d'eau
- 500g de beurre
- 500g de sucre
Voir aussi Recette de Kouign Amann. Le véritable Kouign amann - YouTube