1796 shaares
165 results
tagged
pain
Ingrédients
Pour la pâte
- 300 g de farine , tamisée
- 100 ml de lait entier
- 4 cuillères à soupe d’eau tiède (à 36°C)
- 70 g de sucre cassonade
- 40 g de beurre demi-sel , coupé en morceaux
- 1 cuillère à café de levure boulangère déshydratée
- 2 oeufs , battus en omelette
- 2 cuillères à café de cardamome fraîchement moulue
- 70 g de fruits secs (raisins blonds, raisins de Corinthe et/ou cranberries)
- 50 g de morceaux de citron confit
Pour le brossage
- 1 jaune d’œuf
- 2 cuillères à soupe de lait
- 2 cuillères à café de sucre
Instructions
Pâte
- Dans une petite casserole, porter le lait à une température de 38°C, puis hors du feu, ajouter le sucre, le sel et le beurre coupé en morceaux, remuer jusqu'à ce que le beurre soit fondu puis réserver.
- Dans la cuve d’un robot culinaire, verser les 4 cuillères à soupe d'eau tiède puis ajouter la levure sèche de boulanger en pluie et remuer jusqu'à complète dissolution.
- Laisser reposer 5 minutes.
- Ajouter le mélange de lait, beurre et sucre, puis les œufs battus et mélanger.
- Ajouter la moitié de la farine tamisée et la cardamome moulue et bien mélanger à l’aide du crochet pétrisseur.
- Ajouter les fruits secs et confits et mélanger.
- Ajouter l'autre moitié de la farine tamisée progressivement et pétrir pendant 5 minutes à vitesse moyenne.
- Transférer la pâte sur un plan de travail généreusement fariné et pétrir la pâte.
- Si besoin, ajouter encore un peu de farine jusqu’à pouvoir former une boule de pâte.
- Couvrir d’un linge et laisser reposer 15 minutes.
- Sur le plan de travail fariné, pétrir à nouveau la pâte à la main pendant 10 minutes puis la transférer dans un grand saladier graissé.
- Couvrir la pâte d'un linge et la laisser pousser pendant 1h30 dans un endroit tiède et à l’abri des courants d’air ou à l’intérieur d’un four (éteint) préchauffé à 30°C.
- Placer la pâte sur un plan de travail fariné, la dégazer et la bouler.
- Chemiser la plaque du four d’un papier sulfurisé.
- Placer la boule de pâte au centre de la plaque, la couvrir et la laisser pousser pendant 1h15 dans un endroit tiède, à l’abri des courants d’air. Elle doit au moins doubler de volume.
- Préchauffer le four à 160°C chaleur tournante puis enfourner le julekake pour une première cuisson de 15 minutes.
Brossage
- Dans un bol, mélanger vigoureusement le lait, le jaune d’œuf et le sucre.
- Au bout de 15 minutes de cuisson, sortir le pain brioché et le badigeonner du mélange de lait, sucre et jaune d’œuf, puis poursuivre la cuisson pendant 15 minutes environ, ou jusqu’à ce qu’il soit bien doré et qu'une croûte se soit formée en surface.
- Laisser tiédir ou refroidir sur une grille et déguster immédiatement, nature ou avec du fromage brun norvégien ou du beurre.

Ingrédients
Pour la pâte
- 1,5 kg de farine de blé , tamisée
- 50 g de levure boulangère fraîche émiettée (ou 30 g de levure boulangère sèche)
- 500 ml de lait entier (à 36°C)
- 160 g de beurre , ramolli, coupé en dés
- 1 cuillère à café de sel
- 3 cuillères à soupe de sucre semoule
- 3 cuillères à café de cardamome , fraîchement moulue
Pour la garniture
- 2 cuillères à soupe de cardamome fraîchement concassée
- 150 de beurre , très mou
- 100 g de sucre cassonade
Pour le brossage
- 1 œuf , battu en omelette
- 1 cuillère à soupe de cardamome fraîchement moulue
- 75 g de sucre semoule
Instructions
Pâte
- Verser la levure dans un grand bol et ajouter le lait. Mélanger.
- Laisser pousser pendant 10 minutes.
- Verser la farine, la cardamome fraîchement moulue et le sucre dans la cuve d’un robot culinaire et mélanger.
- Creuser un puits au centre de ce mélange.
- Ajouter le beurre et verser le mélange de levure au centre du puits.
- A l’aide du crochet pétrisseur, pétrir la pâte à faible vitesse pendant 5 minutes.
- Ajouter le sel puis pétrir à nouveau pendant 5 minutes à vitesse moyenne.
- Enfin pétrir pendant 2 minutes à forte vitesse.
- Couvrir la pâte d’un linge et la laisser pousser pendant 45 minutes dans un endroit chaud, à l’abri des courants d’air.
Garniture
- Mélanger le sucre cassonade et la cardamome dans un bol.
- Transférer la pâte sur un plan de travail et la pétrir pendant 1 minute.
- Diviser la pâte en 4 pâtons égaux.
- Abaisser un pâton à la fois en un rectangle d'environ 1 cm d'épaisseur.
- A l’aide d’une spatule, étaler ¼ de la quantité de beurre et saupoudrer ensuite quelques cuillères à café de sucre cassonade à la cardamome sur chaque rectangle.
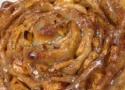
- Découper 10 bandes d'environ 1 à 2 cm de large et enrouler chaque bande autour du pouce jusqu’à former une sorte de torsade ou de nœud.
- Placer les kardemummabullar, espacés, sur une plaque à pâtisserie chemisée de papier sulfurisé ou dans des moules cartonnés.
- Couvrir et laisser pousser pendant 30 minutes dans un endroit chaud, à l’abri des courants d’air.
Brossage et cuisson
- Préchauffer le four à 225°C, chaleur tournante pendant 20 minutes.
- Mélanger le sucre semoule et la cardamome dans un bol.
- Badigeonner les kardemummabullar d'œuf battu et saupoudrer chacun d’un peu de de sucre semoule à la cardamome.
- Enfourner, baisser la température du four à 180°C, et cuire les kardemummabullar au milieu du four pendant environ 25 minutes ou jusqu'à ce qu'elles prennent une belle couleur dorée.
- Retirer du four et laisser refroidir un peu avant de servir.
Ingredients
- ¼ tsp. Red Star Platinum yeast
- 1 ¾ Cup warm water
- 3 Cups unbleached, all-purpose flour (or bread flour)
- 1 ½ tsp. salt
- 1 Cup finely grated asiago cheese
- 2 tsp. dried basil
- ½ Cup chopped sun-dried tomatoes
Instructions
- Dissolve the yeast in the warm water in the EZ DOH bucket. Let rest 1 minute. Add remaining ingredients and “EZ DOH-it” till well-combined. The mixture will be sticky!
- Cover the bucket with a plate or plastic wrap and let it sit on the counter for 12-18 hours.
- Sprinkle a generous amount of flour on a kitchen surface and carefully “pour” dough onto the floured surface and form/pat/push it gently into a ball.
- Sprinkle with additional flour and let rest for 20 minutes.
- At this point, because this dough is so “loose”, I like to use some type of form. Usually, I used a double French bread form, lined with baking parchment.
- Using a VERY sharp knife, or a bench knife, carefully cut the dough in two.
- Now comes the messy part: With a generous amount of flour and a bench knife, push each dough piece “in” on the sides and lengthen it.
- Carefully and quickly, pick it up and place it on one of the parchment-lined forms, lengthening it as you lay it in.
- Repeat with the second piece. (Ta-da- the worst is over!).
- Lightly sprinkle with flour, cover and let rise 1-2 hrs.
- Heat the oven to 425 thirty minutes before baking.
- Bake for 30-45 minutes, until nicely browned.
- Remove from oven and cool on a wire rack.
Ingrédients
- 250 g de farine de blé
- 80 ml de lait
- 2 oeufs
- 80 g de sucre de canne
- 1/2 sachet de levure de boulanger (soit 10 g sec ou 20 g de levure fraîche)
- 30 g de crème fraîche
- 10 g de beurre
- 1 pincée de sel
Instructions
- Diluez la levure dans le lait et laissez reposer 5 minutes.
- Fouettez les oeufs et 30 g de sucre en poudre.
- Disposez la farine dans un grand saladier. Creusez un puits, ajoutez le mélange oeufs-sucre et le sel.
- Pétrissez d'une main en versant petit à petit le lait. Quand la boule de pâte est élastique et homogène, continuez de la malaxer sur le plan de travail en la soulevant pour incorporer de l'air.
- Mettez le pâton dans le saladier, couvrez avec un torchon et laissez lever dans une pièce chaude, jusqu'à ce qu'il triple de volume.
- Beurrez une plaque à pâtisserie. Étalez la pâte avec la paume de la main pour lui donner une forme de galette. Couvrez avec un torchon. Laissez lever 45 minutes dans une pièce chaude.
- Préchauffez le four à 200°C. Badigeonnez la surface avec la crème fraîche. Saupoudrez avec le reste de sucre. Faites cuire pendant 15/20 minutes jusqu'à ce que la galette soit dorée sur les bords.
- Sortez-la du four et laissez refroidir sur une grille.
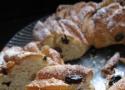
Ingrédients
Pâte
- 7 g de levure sèche
- 300 g de farine à pâtisserie (T45)
- 40 g de sucre semoule
- 1 œuf
- 120 g de lait
- 40 g de beurre en dés
- 1 pincée de sel
Garniture
- 30 gr de noix
- 30 g de beurre fondu
- 30 g de sucre + 1 c à c de cannelle
- 30 g de raisins secs
Instructions
- Verser dans la cuve la levure, la farine, le sucre, l’œuf le lait le sel, le beurre en dés.
- À la fin du programme laisser lever à couvert pendant 45 min environ.
- Sortir la pâte de la cuve et la déposer sur un plan de travail fariné, dégazer et bouler la pâte.
- Étaler la pâte en un rectangle et badigeonner de beurre fondu.
- Répartir par dessus le sucre et la cannelle puis les noix broyés et les raisins secs.
- Rouler le rectangle et couper le boudin obtenu en deux,
- Tresser les deux parties sans trop serrer, former une couronne.
- Déposer sur une plaque farinée ou sur un papier sulfurisé.
- Laisser lever jusqu’à ce que la pâte ait doublé de volume.
- Badigeonner du restant de beurre fondu
- Cuisson dans four préchauffé à 180 °C environ 20 à 25 min
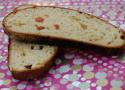
Ingrédients
- 350 g de farine pour pain brioché
- 150 g de coco en poudre
- 150 ml de lait de coco
- 100 ml d’eau
- 30 g de sucre
- 15 g de beurre
- 100 g de mélange exotique
- 1 sachet de levure de boulanger
Instructions
- Mélanger tous les ingrédients sauf le mélange de fruits exotiques.
- Pétrir au robot puissance minimum pendant 15 min ou en MAP programme pâte seule.
- Faire une boule et laisser lever à température ambiante pendant environ 3h ou moins si il fait très chaud.
- Ajouter ensuite les fruits exotiques, et renouveler la levée.
- Enfourner à 180° pendant environ 30 min.
Ingredients
Sourdough
- 210 g flour (Typ 550)
- 145 g Water
- 20g sourdough
Dough
- Sourdough
- 500g Flour Type 550
- 80g Oil
- 10g Salt
- 5g fresh yeast
- 80g egg yolks (from 4 eggs size L)
- 55g Egg (1 Egg size L)
- 60g sugar
- 125g Water
Filling
- 300g almonds, finely grounded
- 300g Marzipan
- 100g bread crumbs
- 100g sugar
- 400g Water
- 4 Egg whites
Glazing
- 100g powdered sugar
- juice of 1/2 lemon
Instructions
- Mix all ingredients for the Sourdough and let it stand at 25°C for about 12 hours.
- Dissolve the yeast in water, then knead in the kitchen machine with eggs, oil, salt, flour and sourdough for 5 min at slow speed.
- The knead 7 min at middle speed. Because the sugar inhibits the gluten development, the sugar is added just now. Add always a tablespoon at once and knead in between always for 1 min.
- Ferment for 1.5 hour.
- While dough is fermenting prepare the filling: Bring water to boil and at the marzipan in small pieces. Stir until it dissolved completely. Now add ground almonds, bread crumbs and sugar and stir the mixture until its starts to bubble. Now set aside to cool down. After cooling fold in the egg white.
- Roll the dough to a rectangle of 25 cm x 45 cm, and spread the filling on it. Roll into a log .
- Place each log on a baking tray lined with baking paper, then use a scissor or dough scrapper to cut it lengthwise, so you got two strands. Cross the strands and braid a braid.
- Proof for 1.5 hours or overnight in fridge.
- Preheat the oven to 200°C and bake for 35 min until golden.
- Mix powered sugar and citron juice and glace the Nusszopf after it has cooled down.

Ingredients
Sponge
- 4 1/2 tsp (16 g) active dry yeast
- 1 tbsp (12 g) all purpose flour
- 1 tbsp (16 g) granulated white sugar
- 3 tbsp (45 g) warm water
- 4 cups (544 g) sifted flour (if measuring by volume, sift first, then measure)
- 2 cups (455 g) warm milk
Dough
- 3 whole eggs
- 8 egg yolks
- 2/3 cup (140 g) granulated white sugar
- 1/4 tsp salt
- 1 tsp vanilla
- the grated zest of 1 orange and 1 lemon
- 3 tbsp (30 g) rum or brandy (or bourbon, if that’s all you have in your cupboard…)
- 1/2 cup (113 g) melted unsalted butter
- 1/2 cup (108 g) vegetable oil
- up to 8 cups (1088 g) sifted all purpose flour (again, if measuring by volume, sift first)
Instructions
Sponge
- In a large bowl, mix together the yeast, 1 tbsp of flour, the sugar and the water.
- Let the mixture sit for 10 – 20 minutes until it is all foamy.
- Stir in the sifted flour and the milk.
- Cover the bowl with plastic wrap and let the sponge is a warm spot for 30 minutes, until doubled in size.
Dough
- In the bowl of a mixer fitted with the paddle attachment, combine the eggs and the sugar.
- Beat on high until pale and thickened.
- Add the risen sponge mixture and stir to combine.
- Mix in the salt, the vanilla, the grated zest, the rum, the butter and the oil.
- Change out the paddle attachment for the dough hook and gradually (1 cup at a time) stir in the sifted flour.
- You will probably run out of room in your mixer before you add even half of the flour. Transfer the dough to a very large bowl and work in enough flour with your hands until you have a soft dough that doesn’t stick to the bowl (you may not need all the flour – but if you need more, that’s OK too).
- Turn out the dough onto a work surface and knead the dough, adding in any remaining flour as necessary, until it is very smooth, soft, and elastic (about 15 minutes).
- Oil your giant bowl and place the dough inside, turning it over to coat it lightly with oil.
- Cover with a tea towel and let rise somewhere warm for 1 – 2 hours, until doubled in volume.
- Prepare your baking tins (two 9″ round springform pans would be perfect) by buttering the bottom and sides, then fold a piece of parchment paper in half lengthwise to make a collar around the inside of the tin. Press it to stick to the buttered sides of the tin.
- Gently punch down the risen dough and reserve 1/3 of it for the decorations.
- Portion off the remaining 2/3 of the dough (depending on how many tins you have) and form it into balls by pinching all the edges in towards the center. Poke the dough all over with a skewer to remove any air pockets.
- Place the dough smooth side up in the prepared baking tins. Cover the formed dough and the reserved dough with a tea towel and let rise for about 30 minutes.
- After 30 minutes, shape the reserved dough into decorations for the paska. Mix together an egg wash of 1 egg + 1 tbsp water and use it to glue on the decorations.
- For each loaf, make a twisted rope around the edge by rolling out two long snakes of dough and twisting them together. Form the rope into a circle and lay it around the edge of the loaf.
- To make the 4-cornered cross, roll out a log of dough with fat ends. Split each end of the log into two strands, then roll them into tapered lengths and coil up each one.
- For a sun-motif (sorta – it should have a few more arms), roll out a strand dough into a thin snake. Coil the ends in opposite directions and attach to the top of the paska. Repeat with another strand of dough (up to 4 strands total) and arrange on top of the paska so it overlaps the first one and the ends point in all four directions, like a compass.
- For the twisted strand, make two long thin stands of dough and twist them together, leaving several inches untwisted at each end. Coil up the ends. You could also make two of these and overlap them to make another 4-cornered cross symbol.
- To make a flower/rosette, roll out a long snake of dough, then flatten it with a rolling pin. Make little notches down one side with a knife, then roll it up from one end, letting the notched side fall open to form the petals. Pinch the closed end together to secure.
- Secure all decorations with toothpicks so they stay put while rising and baking. Cover with a tea towel and let the decorated dough rise for about 30 minutes more, until it is a few inches from the top of the parchment paper collar. While the dough rises, preheat the oven to 350˚F (325˚F convection).
- Brush the risen dough with the remaining egg wash.
- Bake for 10 minutes in the preheated 350˚F (325˚F convection) oven, then reduce the heat to 325˚F (300˚F convection) and bake another 50 or so minutes, until well-browned on top and hollow-sounding when tapped. Leave in the tins until almost cool, then remove while still slightly warm and place on a rack. Carefully remove the toothpicks, and cool completely before slicing the paska into wedges.
Ingredients
For the Dough
- 1 1/2 cups milk
- 1/2 cup plus 1/2 teaspoon sugar
- 1/2 cup water, lukewarm
- 1 (0.25-ounce) package active dry yeast
- 7 1/2 cups all-purpose flour, divided
- 3 large eggs, at room temperature, beaten
- 1/3 cup unsalted butter, melted
- 1 1/2 teaspoons fine salt
For the Egg Wash
- 1 large egg, at room temperature
- 2 tablespoons water
Instructions
- In a heavy-bottomed saucepan, scald the 1 1/2 cups milk and set aside to cool until lukewarm.
- In a large bowl, dissolve 1/2 teaspoon sugar in the 1/2 cup water (lukewarm) and sprinkle the 1 (0.25-ounce) active dry yeast over it. Mix and let stand for 10 minutes.
- Add the lukewarm scalded milk and 2 1/2 cups of flour to the yeast mixture. Beat until smooth. Cover and let rise until light and bubbly.
- Add 3 large eggs, the remaining 1/2 cup sugar, 1/3 cup melted unsalted butter, 1 1/2 teaspoons salt, and 4 1/2 to 5 cups of the remaining flour to make a dough that is not too stiff and not too slack.
- Knead until dough no longer sticks to the hand and is smooth and satiny (about 7 minutes in a stand mixer, longer by hand).
- Place dough in a greased bowl, turn to grease both sides, cover with greased plastic wrap, and let rise until doubled.
- Punch down, cover, and let rise again.
- Reserve a third of the dough for decorating. Shape the rest into a round loaf and place in a 10- to 12-inch greased round pan.
- Shape the reserved dough into decorations of choice—a cross, swirls, rosettes, braiding, etc.—and arrange on top of the dough.
- Cover the pan with greased plastic wrap and let rise until almost doubled.
- Heat oven to 400 F. Brush bread with 1 large egg beaten with 2 tablespoons water.
- Bake 15 minutes. Reduce temperature to 350 F and bake an additional 40 minutes, or until an instant-read thermometer registers 190 F. If necessary, cover the top of the bread with aluminum foil to prevent over-browning.
- Remove from the oven and turn out onto a wire rack to cool completely.
Ingredients
Sourdough Leaven (You are not using it all in the recipe, you need to save some for next bake)
- 200 g sourdough/starter (the starter you keep in the refrigerator and feed every other week)
- 400 g water
- 2 dl (110 g) rye flour
- 2 dl (120 g) all-purpose flour
Berries and seeds
- 2 dl (135 g) flaxseeds
- 2 dl (135 g) sunflower seeds
- 2 dl (140 g) cracked rye
- 2 dl (180 g) rye berries
- 2 dl (160 g) bulgur (100% whole grain quick cooking bulgur wheat)
- 2 dl (190 g) wheat berries (hard red spring wheat berries)
Dough
- 1500 g water (use this to soak the berries and seeds)
- 600 g sourdough leaven
- 3 tablespoons salt
- 1 splash food coloring (kulør) - optional
- 2 teaspoons malted barley flour
- 8 dl (440 g) rye flour (dark rye flour)
- 4 dl (240 g) all-purpose flour
Sprinkles
- sunflower seeds, pumpkin seeds, sesame seeds or poppy seeds.
Instructions
Day 1, morning
- Feed the starter to make the leaven. The leaven will be ready to use when the leaven is bubbling and smells like beer, after about 8 hours at room temperature. Cover the leaven with a clean towel.
- Soak the berries and seeds in water in a large bow (I use to bowl because of the big amount). Cover the bowls with large plates. Let them soak at room temperature until the leaven is ready.
Day 1, night
- Add the leaven to the soaked berries and seed. Cover the bowls with large plates. Let the mixture ferment overnight at room temperature .
- Save the leftover leaven and put it in the refrigerator in a sealed container. This will be your sourdough starter for the next batch of bread. It will keep without feeding for about 14 days in the refrigerator. *
Day 2, morning
- Add the salt, coloring and the flours to the dough and mix thoroughly, to make sure all the flour is fully incorporated, let rise for about two hours.
- Add the dough to two rye bread baking forms. (I use Eva Professionel Rye Bread Tin which holds 3,3 liters).
- Let the bread rise for about an hour, covered with a clean towel. The longer you let it rise, the more sour the bread becomes.
- Poke a few holes with a cake tester or a knitting needle, to prevent the crust to rise and crack.
- Brush the bread with water and sprinkle with your favorite seeds.
- Place the baking form in a preheated oven for 1 hour 15 minutes at 350°F (175℃).
- Turn off the heat, remove the breads from the baking forms, spray with water on all sides and place them back in the oven directly on the rack for about an hour, while the oven cools.
- Take the breads out and wrap them in an clean kitchen towel. This will help softening the crust. Let breads cool completely.
- It's best to wait cutting the bread until the next day.
Ingredients
Dough
- ¼ Cup warm water
- 1 pkg/Tbsp.Red Star Platinum yeast
- ½ Cup milk, warmed
- 2 Cups unbleached all-purpose flour
- 2 Tbsp. butter, softened
- 2 Tbsp. sugar
- ½ tsp. salt
- ¼ tsp. cinnamon
Filling
- 2-3 Apples, peeled cored and thinly sliced. Each slice should then be cut in half
Topping
- 3 Tbsp. melted butter
- 2 Tbsp. cinnamon sugar
Glaze
- 2 Tbsp. butter
- ¼ Cup packed brown sugar
- 1-2 Tbsp. apple cider (or apple juice)
- ½ Cup powdered sugar
Instructions
- Place warm water in EZ DOH bucket.
- Add yeast and stir to dissolve.
- Let rest one minute.
- Add warmed milk, then remaining dough ingredients.
- EZ DOH-it until the dough is smooth and all ingredients are incorporated, about 2-3 minutes.
- Remove dough from bucket, “smooth” the dough by patting, spray bucket with cooking spray.
- Replace dough in bucket, cover and let rise until doubled.
- Remove dough from bucket and divide into 2 equal portions.
- Roll out each ball into an 8x11” rectangle.
- Cut each in 9 strips (lengthwise).
- Using cooking spray, grease 2- 8” round pans.
- Starting at the center of one pan, coil 9 dough strips with apple slices into a spiral, securely pinching ends as you add the strips.
- Repeat with second pan and other 9 strips and remaining apple pieces.
- Cover pans and let rise for 30-45 minutes.
- Preheat oven to 365. (350 doesn’t seem hot enough and 375 is almost too hot J ).
- Bake for 20-25 minutes until golden. (While bread is baking, make glaze: see below)
- Remove bread from oven.
- Gently turn upside down and remove from pan, placing it “right-side-up” on a cooling rack.
- Brush each spiral with 1 ½ Tbsp. melted butter, then sprinkle generously with cinnamon sugar.
Glaze
- Melt butter in a small saucepan.
- Stir in brown sugar and heat to boiling, stirring constantly.
- Reduce heat and boil for 2 minutes.
- Stir in cider.
- Heat to boiling.Remove from heat and let cool.
- Stir powdered sugar into mixture.
- Add more cider, if necessary to thin the glaze.
- Drizzle glaze over the spirals.
Ingredients
Dough
- 2 tsp. dry yeast
- 1 ¼ c. water
- 3 ½ c. unbleached flour
- 1 ½ tsp. salt
- 3 Tbs. olive oil
For the filling and topping
- 8 oz. smoked swiss cheese
- 3 cloves garlic, minced
- 8 oz. Prosciutto, sliced thin
- 4 oz. pepperoni, sliced thin
- Handful of fresh basil leaves
- ~1 tsp. coarse salt
- 3 sprigs rosemary, stems removed
- ~1 tsp. freshly ground black pepper
Instructions
- Sprinkle yeast into 1 c. of the water, in small bowl. Leave for 5 minutes to then stir to dissolve.
- Mix the flour and salt in a large bowl. Make a well in center and pour in dissolved yeast and the oil. Mix in flour from sides of well. Stir in reserved water, as needed, to form a soft, sticky dough.
- Turn dough out onto a lightly floured surface. Knead until smooth, silky, and elastic...~10 mins.
- Pour dough in a clean, oiled bowl and cover with clean kitchen towel. Let rise until doubled in size, 1 1/2-2 hours. Punch down and chafe* for 5 minutes. Let rest 10 minutes.
- Shape into a 14" x 8" rectangle. Cover w/ clean towel and let rest another 10 minutes.
- Spread your cheeses, meats, garlic and basil evenly over dough. Roll up the dough like a swiss roll, starting at one of the shorter sides, but without rolling too tightly. Place on oiled baking sheet. Use a skewer or a carving fork to pierce several holes through the dough to the baking sheet. Sprinkle with 1 Tbs. of olive oil, salt, rosemary and pepper.
- Bake in preheated (400 degrees F) oven for 1 hour, until golden.
Ingredients
Dough
- 1 packet active dry yeast
- 1¼ cups water
- 3½ cups unbleached flour
- 1½ teaspoons salt
- 3 tablespoons olive oil
Filling
- 1 bunch of broccoli rabe washed and woody stems removed (If you don't like broccoli rabe, use broccoli or broccolini instead, blanching it first, then sauteeing in garlic and oil per directions.)
- 2 tablespoons olive oil
- 2 garlic cloves, minced
- hot chili flakes (optional)
- Kosher salt and fresh ground black pepper
- 2 or 3 large red bell peppers, roasted seeded, and peeled - each one sliced flat into 3 or 4 pieces, then blotted dry
- 12 oz mozzarella cheese, sliced
- 8 oz thinly sliced prosciutto
- 8 oz thinly sliced provolone cheese
- Olive oil
- Asiago or any Italian hard cheese *
Instructions
- Make the dough. Sprinkle yeast into 1 cup of tepid water in a bowl. Let sit for 5 minutes until foamy.
- Mix the flour and salt in a large bowl. Make a well in center and pour in dissolved yeast and the oil. Mix in flour from sides of well. Stir in reserved water, as needed, to form a soft, sticky dough.
- Turn dough out onto a lightly floured surface. Knead until smooth, silky, and elastic, about 10 minutes. Place the dough in a clean, oiled bowl and cover with clean kitchen towel. Let rise until doubled in size, 1½ to 2 hours.
- While dough is rising..roast your peppers and prepare the broccoli rabe. Bring a pot with about 1 quart of water, salted, to a boil and have ready a large bowl of ice water. Cut the cleaned and trimmed bunch of broccoli rabe in half, then boil in the salted water for about 3 to 4 minutes. Strain and drop the broccoli rabe into a bowl of ice water to stop the cooking. Strain again and blot dry. Heat the tablespoon of olive in a saute pan. Add the minced garlic and saute until soft but not browned. Add broccoli rabe a little at a time until wilted. Saute, stirring, for 2 to 3 minutes, adding salt and pepper to taste, plus your desired amount of hot chili flakes, if using. Remove the broccoli rabe from the pan to a plate to cool.
- Punch down the risen dough and place it on a floured board. Cover and let it rest for 10 to 15 minutes to relax the gluten. Roll the rested dough into a 14" x 8" rectangle. Cover with a clean towel and let rest another 10 minutes.
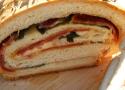
- Spread the mozzarella cheese, prosciutto, roasted red peppers (sprinkle roasted red peppers with kosher salt and pepper), provolone cheese, and broccoli rabe evenly over dough, layer by layer in the order listed. Roll up the dough, starting at one of the shorter sides, but without rolling too tightly. Seal all ends well, pinching the dough together.
- Place on a baking sheer lined with a silpat or parchment paper. Use a skewer or knife to pierce several holes through the dough all the way down to the baking sheet but not all the way through. Brush loaf with olive oil, then top with peels of asiago cheese (or any hard Italian cheese you prefer).
- Bake at 400 degrees F for about an hour until golden brown. Let rest a few minutes before slicing.
Ingredients
Bread
- 2 cup/ 280g/ All purpose flour
- 2 cup/ 320g/ Bread flour
- 2 ½ teaspoon/8g Instant yeast
- 1 teaspoon /5g Salt
- 10.5 oz /1-⅛ cup Water
- 2 tablespoon Olive oil
Topping
- ½ cup Chopped Onion
- 2 tablespoon chopped mint
- 1 ¼ teaspoon Cumin powder
- 1 ¼ teaspoon Coriander powder
- ¼ teaspoon Red Chili Powder
Instructions
- In a bowl of kitchen aid stand mixer add both flour, salt and yeast and gradually add to water to form a sticky dough.
- Knead the dough for about 8-10 minutes to form smooth dough.
- Transfer the dough to lightly greased bowl and cover with plastic wrap and set aside for rise or doubled in volume. It took about 75 minutes.
- Punch down the dough and turn into lightly floured work bench.
- Divide the dough (934g) into 9-12 pieces.
- Roll it into 5-6 inch round.
- Make them slightly concave.
- Prick the disc with fork all over to prevent puffing in the oven.
- Space the rolled disc into lightly floured baking sheet with 1-2 inch space in between.
- Set aside covering with kitchen towel for about 20 minutes.
- While dough is doing its second rise, preheat oven to 400F.
- In a small bowl add chopped onion, mint, cumin, coriander powder and chili powder and mix everything so that spices get mixed well.
- When you are ready for baking, brush circles with olive oil and sprinkle topping mixture from a little height to get uniform topping.
- Bake for about 30 minutes or until sides becomes brown.
- Serve warm.

Ingredients
Over night sponge
- 72 grams bread flour
- 2 1/4 teaspoons osmotolerant yeast (instant worked just as well too)
- 114 milliliters potato water, or whey or water (potato water or whey really make it extra tender & soft)
Dough
- 6 tablespoons butter, room temp.
- 30 to100 grams brown sugar
- lemon zest
- 1 teaspoon salt
- 3 large eggs, room temp.
- 120 milliliters milk, room temp.
- 460 grams bread flour (you can use part whole wheat if you like)
- 2 tablespoons flax seeds, ground
Instructions
- Beat sugar and butter until creamy.
- Add zest and salt and beat.
- Beat in each egg separately and completely; mix will appear curdled.
- Stir in milk and sponge.
- Stir in 2 1/2 cups flour and beat vigorously (in a stand mixer it would clear the sides of the bowl, by hand lifting the spoon up should stretch the dough about a foot.)
- Add remaining flour to make stiff dough.
- Knead 5 minutes or more to incorporate all the flour.
- Dough should be smooth, soft and very supple with a slight stickiness. Looks a little like very thick cake batter or a brioche dough.
- Shape into ball, oil bowl and dough ball.
- Cover and allow to rise about 2 hours, should almost or triple in size.
- Divide into loaves, shaped into balls.
- Allow to rest 20 to 30 minutes before final shaping with rolling pin.
- Press in a + and a x with a rolling pin. For best demarcation of indents be careful to dust dough ball well with flour.
- Shape and place into well oiled cake pans seam side down.
- Allow to rise an hour to 2 hours; more than double in size.
- Brush with egg wash if you want that beautiful glossy finish.
- Bake 350°F: 50 minutes as two loaves, 35 minutes as four loaves.
Ingredients
Beer bread
- 4 tablespoons (55 grams) unsalted butter
- 110 ml beer, I used a golden ale – not too dark, not too light
- 90 grams sourdough starter with 50% hydration (ie, 60 grams of flour and 30 grams of water)
- 1 cup plus 2 tablespoons (about 150 grams) plain/AP flour
- 1 cup (about 130 grams) wholemeal flour
- 2 tablespoons (25 grams) granulated sugar
- 2 teaspoons (1/4 ounce or 7 grams) instant yeast
- 1 teaspoon or a fat pinch (6 grams) salt
- 2 large eggs, at room temperature
Filling
- 2-4 tablespoons gochujang (depending on your tolerance for spicy food)
- 1 ripe persimmon flesh (if using the fuyu or oval variety, the fruit should be so ripe it is bursting and you can scoop out the flesh with a spoon)
- 2 tablespoons smoky paprika, or to taste
- 1 large clove garlic, finely minced or chopped in a food processor
- approximately 1 1/2 cups (170 grams) grated hard-ish cheese, such as cheddar, parmesan, pecorino. We didn’t like the loaf with goat cheese – too many flavours clashing and competing, but it may be your thing.
Instructions
- Dough: Heat the butter and about half of the beer together, just until the butter has melted. Remove from heat and add the remaining beer. Set aside to cool until it’s warm to the touch, about 110F/40C (the liquid shouldn’t make you pull your fingers away quickly). Stir in the sourdough starter until there are only a few lumps.
- Mix together the plain and wholemeal flours. Stir together 1.5 cups flour, and all of the sugar, yeast and salt. If using a stand mixer, pour in the butter-beer-sourdough starter mixture, mix on low just until the flour is moistened. If mixing by hand, stir the ingredients together until flour is just moistened.
- Add eggs, one at a time, and mix until combined. The batter looked a bit shaggy and lumpy at this point. Add the remaining flour, and mix until combined. If using a stand mixer, knead with your dough hook on low for 3 to 4 minutes. If mixing by hand, this is the time to imagine you are playing with mud pies at school, pour/push/coax the dough onto a well floured bench and knead energetically for about 10 minutes – everything will be sticky, shaggy, and despairing. Persevere, and all will be well, eventually. The dough will come together, though it will remain soft.
- Transfer the dough to an oiled medium/large bowl. Cover and set aside for about 60 minutes, or until doubled (mine took a bit longer).
- Filling: Add the first four filling ingredients to a food processor, and mix until well combined to an orange-red paste. Taste and adjust seasoning as needed, ie, if you prefer more paprika or gochujang. I found the persimmon added enough sweetness, but you could add sugar if you like. Then, mix the paste with the grated cheese and leave in the fridge until using.
- Assemble: Lightly oil one loaf pan or two mini loaf pans. Punch down the dough and divide it in half if making two mini loaves. Preheat the oven to 350F / 175C.
- Pullapart: If making mini loaves, turn half of the dough out onto a well-floured counter and roll the dough into a rectangle, maybe 15×8 inches, re-flouring the counter as needed. Sprinkle just under half of the filling mixture over the rectangle, right up to the edge. Cut the dough crosswise into 3 strips, then cut into squares/rectangles that will fit into the loaf pan. Place the loaf pan on its short side so you can stack the squares/rectangles, and begin stacking. If you have too little bread, don’t worry as the slices will expand when proofing. If you have too many slices, just tap the loaf pan and squeeze another few. Sprinkle another tablespoonful of filling over the top. Set aside, cover loosely and let it rise for 30-40 minutes.
- Braid: Roll out the dough as above, spread the filling over the dough rectangle, leaving an edge. Roll up the dough, then, with your best chef’s knife, cut the roll in half lengthwise, leaving one end in tact. Braid the two strands together by placing one over the other. Pick this up and haphazardly place it in the loaf pan. Also set aside, cover and let rise for about 30 minutes.
- Place loaf pans in the oven. If baking one large loaf, bake for 25-35 minutes; if making two small loaves, I found 15-20 minutes was sufficient. The loaves should be golden on top, with darker bits where the gochujang filling has caramelised. Cool and serve.
Ingredients
- 3 to 3 1/2 cups all-purpose flour
- 1 1/2 tsps yeast instant
- 1 tbsp honey
- 1 tsp salt A little over
- 1/2 to 3/4 cups cranberries chopped dried
- 1/2 cup walnuts broken , chopped fine
- 1 1/4 cranberry juice (sweetened)*
Instructions
- *I initially used Tropicana’s Cranberry Delight which is readymade sweetened beverage that is a mix of apple, grape and cranberry juice. It is a bit sweet with a somewhat pronounced sharpness and tang and also has a lighter red colour, all of which to my mind made it a good candidate to be my “fake Beaujolais”. However, I found a combination of 2 parts of Cranberry Delight and one part orange juice made a bread which we liked better as it had a less “fruity” taste and aroma than my first choice.
- Put 3 cups of flour, yeast, honey, salt and chopped cranberries in the processor bowl and run a couple of times to mix well. Warm the juice slightly and then pour into the dry ingredients. Knead until you have a soft elastic and smooth dough that’s just short of sticky. Add just enough extra flour or juice, if necessary, to get this consistency of dough.
- Form the dough into a ball and place it in an oiled bowl, and cover loosely. Le t it rise until almost double in volume. This will take about 2 to 3 hours. Lightly deflate the dough by pressing it out into a square. Pull up the 4 corners and tuck the edges together to shape it into a ball making sure to tuck and pinch all the seams.
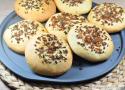
- Put hits back in the bowl and cover loosely, and let it rise till almost double in volume. Lightly flour your working surface and press out the dough into a rectangle about 10” by 4 to 5 inches wide. Make sure the dough isn’t sticking to the surface. Cut it into 16 equal pieces (or more if you want smaller “grapes”) with the bench scraper. I cut mine into twenty and used 16 for the grapes and the rest for the vine and leaves.
- Lightly grease your baking sheet or line it with parchment. Roll out 14 pieces into smooth balls which will form the grapes and the other two pieces can be used to make the grape vine and leaves.
- Create a triangle by setting four balls together in a line followed by a line of three balls then two balls and finally one ball. Angle the remaining four balls to one side of the triangle so that the entire piece resembles a large cluster of grapes with the smaller one to the side, or create your own bunch of grapes as you prefer.
- With the remaining pieces of dough, roll out one into a rope about 10 inches long and shape it into a curved grape vine shape that you attach to the top of the grape cluster. Shape the others into leaves and arrange on the cluster.
- Place the shaped dough in a draft-free place and let it rise for about an hour or so. If it over proofs the dough will be unusable. Determine the dough is ready to be baked by uncovering and making a small indentation in the centre of the role with your fingertip. The dough is ready to be baked if the indentation slowly and evenly disappears.
- Just before your shaped dough is ready for the oven, pre-heat the oven to 230C (450F) with a flat baking tray turned upside down in it or a baking stone if you have one. Slide your baking tray with the dough on it onto the heated baking sheet. An effective and cheap way to achieve a crisp crust is to cover the bread with a stainless steel bowl or a rectangular pan when it is first placed in the oven.
- Bake for 10 minutes then remove the bowl or pan. Continue to bake for another 15 to 20 minutes until the bread is golden brown has a thick crust. Let the bread cool before serving.
Ingredients
For the Overnight Starter
- 1/2 cup whole wheat flour
- 1/2 cup water
- 1/8 tsp dried yeast
For the Dough
- 1/8 cup milk
- 1 tbsp sugar
- 1 tsp dried yeast
- All the overnight starter
- 1 medium sized banana mashed
- 2 3/4 to 3 1/4 cup all-purpose flour
- 2 tbsp coconut oil
- 1 egg lightly beaten
- 1 tsp salt
For the Filling
- 50 gm salted butter soft at room temperature
- 4 tbsp brown sugar
- 1 small to medium banana mashed
- Powdered cinnamon to taste
- Powdered dried ginger to taste
- Bread crumbs or vanilla cake crumbs as required
Instructions
Make the Overnight Starter
- The previous night of baking these buns/ bread, mix together the ingredients for the overnight starter in a medium bowl. Cover and leave on the counter overnight (about 8 to 10 hours).
- The morning of making the bread, proof the yeast in lukewarm milk and sugar. Mix well and keep aside for 5 to 10 minutes till frothy.
Make the Dough
- Using your hand or a kneading machine, mix together the overnight starter, the proofed yeast, 2 and 3/4 cups of flour and remaining ingredients for the dough. Knead well, adding as much more flour as required to make a dough of soft, smooth and elastic consistency. The dough should be just short of sticky.
- Shape the dough into a ball and put in a well-oiled bowl, turning to coat it well. Cover loosely and let it rise till double in volume, about 2 hours or so. In the meanwhile make the filling by mixing together all the filling ingredients in a bowl. It should be of spreadable consistency but not gloopy. Refrigerate till ready to use, if necessary.
For Loaves
- Once the dough has doubled, turn it out onto a floured board. Divide into 2 equal pieces. For loaves, gently shape the dough into flat rectangles that are about 2 centimetres thick. Smear the filling over each rectangle and roll like jelly rolls, from the narrow side, to make 2 loaves. Put the rolls seam side down in parchment paper covered bread tins.
- Cover the tins with a damp clean tea towel and let rise at warm room temperature until almost double. To test if it has risen enough, flour your finger and press gently on the edge - it should very slowly spring back. For comparison, try pressing early on to see how it quickly springs back when the dough has not risen enough.
To Shape & Cut the Buns
- Using a lightly floured wooden rolling pin, roll one of the two pieces of dough as thinly as you can, into a long rectangle. Evenly slather the top of the rectangle with half the filling. Roll the rectangle up as tightly as you can to form a long tube. Cut diagonally and use a chopstick or finger to press down the centres so that the spiral flares out. Place well apart on parchment covered cookie sheet. Repeat with the other piece of dough.
- See the link to the video in post above to understand the shaping process better. Cover the shaped buns with a damp tea towel and let sit in until they have almost doubled.
- Pre-heat the oven to 200C (400F). Put the bread loaves in. After 15 minutes, turn the temperature down to 180C (350) and bake for another 25 to 30 minutes until they’re golden brown, done and sound hollow when tapped. Do the same for the buns but they will need a slightly shorter bake time. Half way through baking, turn the loaves/ buns around as with all that sugar, the bottoms of the buns especially, really want to burn.
- If you have made buns, place them still on the parchment paper on a footed rack on the counter to cool completely. If you have made bread, remove it from the pans, and place each loaf on its side to cool on the footed rack. If you wish to serve warm bread (of course you do), reheat it after it has cooled completely.
- To reheat any uncut bread, turn the oven to 200C (400F) for 5 minutes or so. Turn the oven OFF. Put the bread into the hot oven for about ten minutes. This will rejuvenate the crust and warm the crumb perfectly.
Ingredients
For the Dough
- 1 cup milk
- 50 gm unsalted butter
- 1 tsp instant yeast
- 3 cups all-purpose flour
- 2 tbsp sugar
- 1 tsp salt
For the Topping
- 50 gm unsalted butter
- 1/4 cup white sugar
- 1/4 cup lightly packed light brown sugar
- 1 tbsp ground cinnamon
Instructions
Make the Dough
- Scald the milk over medium heat for 3 to 4 minutes (bubbles on the edges but not boiling). Take it off the heat, add the butter and stir to melt. Let it cool to slightly warmer than room temperature. Stir in the yeast.
- Knead using a stand mixer or by hand. Whisk together the flour, sugar, and salt in a large bowl. Add the milk mixture and knead into a soft, smooth and elastic dough. If the dough seems dry, add milk, one tablespoon at a time till dough is of desired consistency.
- Place the dough into a bowl, cover loosely and let it rise for about 1 1/2 hours or so till doubled in volume. You can also let it rise in the refrigerator overnight. The rise will not be as much as regular dough because of the butter in the dough which will harden the dough. If refrigerating the dough, take it out next morning, lightly knead it, and then let it rise till double in volume.
- Line a 9 x 5 -inch loaf pan with parchment paper. Remove the parchment and set aside on a baking sheet.
Make the topping
- Melt the butter in a mall pan or bowl. Stir in the sugars and cinnamon.
- Deflate the risen dough and press it out or roll out into an 8 x 7 -inch rectangle. Roll the dough into a loaf, starting from the 8-inch edge side. Place it, seam side down, onto the parchment.
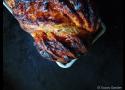
- Slit the loaf 6 to 8 times with a serrated knife, cutting about 2/3rds into the dough. Stuff the slits generously with the cinnamon-sugar-butter.
- Using the parchment, lift the loaf into the pan. Spread the remaining mixture over the top of the dough uniformly. Let it rise till almost double, for about 45 minutes.
- Bake at 180C (350F) for about 30 minutes or so until the bread is done. Do watch the top to see it doesn’t get burned. My loaf came pretty close to it, as you can see from the images. Cool on a wire rack.
C'est bon. Mais je ne suis pas sur d'en refaire. Ce n'est pas mon préféré.
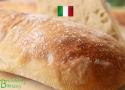
Ingrédients
Biga
- 500 g de farine blanche forte en gluten, genre Manitoba tipo «0»
- 255 g d’eau
- 5 g de levure fraîche
Pâte
- La biga
- 50 g de farine, la même que pour la biga
- 130 ml d’eau tiède en hiver, froide en été
- 10 g de sel
- Semoule de blé dur pour le façonnage
Instructions
Biga
- Dans la cuve du pétrin faire fondre la levure dans l’eau puis ajouter la farine par-dessus.
- Pétrir à la première vitesse, pendant 3 à 4 minutes, jusqu'à ce que la pâte se forme. La pâte est très compacte car très peu hydratée.
- Couvrir et laisser fermenter à température ambiante (idéalement 18 à 20°C), ceci pendant 18 à 24 heures.
- La pâte va fermenter, se développer tout en restant relativement compacte mais bien assouplie.
Pâte
- Au bout d’environ 20 heures le mélange aura fermenté avec un légère odeur acide, la pâte s’est étalée tout en restant collante.
- La transférer dans le bol du robot et démarrer le pétrissage pendant 2 minutes en première vitesse et 2 minutes en vitesse rapide, jusqu'à obtenir une pâte lisse et sans grumeaux.
- A ce stade, tout en pétrissant à la deuxième vitesse, ajouter le sel puis un peu d’eau. Ensuite il faudra ajouter l'eau par petites quantités en alternant avec un peu de farine. Ne pas ajouter la quantité suivante tant que la précédente n’a été absorbée. Cette phase va durer une bonne dizaine de minute. La pâte va devenir très élastique et bien hydratée. C’est incroyable ce que cette pâte est capable d’absorber autant d’eau.
- Huiler légèrement un récipient rectangulaire et avec vos mains mouillées, y transvaser la pâte qui va s’étaler sur toute la surface.
- À ce stade, toujours avec les mains humides, effectuer un premier pliage, en soulevant la pâte d'un côté à l'autre, sur les 4 côtés.
- Ensuite, après 30 minutes, répéter ces pliages encore à deux reprises puis laisser la pâte lever pendant 60 à 90 minutes, cela va beaucoup dépendre de la température ambiante. Elle devrait doubler de volume.
- Une fois la pâte bien développée, saupoudrer généreusement la table d’un mélange de semoule et de farine et retourner le bac délicatement.
- À ce stade, ne pas la manipuler ni la dégonfler, simplement la saupoudrer de semoule et la diviser en deux pains égaux ou plusieurs petits, à choix.
- Retourner délicatement les deux pains sur des feuilles de papier sulfurisé séparées et les saupoudrer de semoule.
- Pour une ciabatta moins épaisse ou des plus petites, étirer légèrement les pains en le tirant avec les mains.
- Laisser les pains à découvert à température ambiante pendant 30 minutes.
- Pendant ce temps, préchauffer à 250 °C. Placer une plaque de cuisson en bas et une pierre à pizza (réfractaire) sur la grille du milieu.
- Une fois le four très chaud, avec une pelle à pizza, glisser les ciabattas, avec le papier sulfurisé pour éviter de faire retomber la pâte.
- Avant de fermer la porte du four, verser un petit verre d’eau sur la plaque du bas pour générer de la vapeur, ce qui empêche la formation immédiate d'une croûte et permet aux ciabattas de lever davantage.
- Cuire à 250 °C pendant 10 minutes, puis baisser la température à 210°C et continuer la cuisson pendant encore 20 à 25 minutes.
- Une fois cuites, éteindre le four et laisser les ciabattas, porte entrouverte, pendant 5 minutes.
- Ensuite les laisser refroidir complètement sur une grille et elles sont prêtes à être dégustées. Buon appetito !