1796 shaares
165 results
tagged
pain

Ingrédients
- 750 g de farine
- 43 cl (+/- 10) de lait frais
- 30 g de levure fraîche
- 100 g sucre
- 100 g de beurre
- 1 gros œuf fermier (60 g)
- 1 zeste de citron bio râpé
- 50 g raisins secs
- 25 g de rhum brun (facultatif)
- 12 g de sel
- 1 jaune d’œuf pour dorer
Instructions
- Si vous optez pour la version avec raisins secs au rhum, faire macérer les raisins quelques heures ou même la veille dans du rhum brun. En principe les raisins devraient complétement absorber l’alcool, qui lui, va complétement disparaître lors de la cuisson et ne laisser que les parfums.
- Dans le bol du pétrin, verser le lait tempéré à 20°C, ajouter la levure et la faire fondre.
- Verser la farine par-dessus ainsi que l’œuf et le sucre. Il est très important de ne pas mettre la levure en contact direct avec le sel, au risque de la détruire.
- Démarrer le pétrissage en 1ère vitesse pendant 2 à 3 minutes, jusqu’à ce que la pâte de forme puis ajouter le sel à ce stade
- Démarrer la 2ème vitesse et pétrir la pâte pendant 5 minutes jusqu’à ce que la pâte se décolle des bords du récipient. Cette opération permet de rendre la pâte élastique et de lui incorporer l’air nécessaire au développement de la levure.
- Puis est venu le moment d’ajouter le beurre. Le beurre doit être froid mais pas glacé, à température ambiante est le mieux, mais surtout pas liquide. L’ajouter par petites portions et continuer le pétrissage pendant 4 à 5 minutes ou jusqu’à ce que la pâte se décolle des bords du récipient et devienne lisse, souple et élastique.
- Si vous avez opté pour les raisins secs, au rhum ou pas rhum, c’est maintenant qui faudra les mettre et continuer le pétrissage pour encore 1 à 2 minutes.
- Lorsque le pétrissage est terminé, faire une belle boule avec cette pâte puis la réserver dans un grand bol, à couvert, pour le pointage à température ambiante, ceci pour 60 à 90 minutes, ce qui permet à la levure de commencer son action.
- Une fois la pâte bien développée, lui donner un rabat (la plier en 4) et la remettre dans le bol puis déposer le au réfrigérateur pendant une heure environ.
- Le temps étant écoulé, déposer la pâte sur le plan de travail et la diviser en deux parts, les bouler très légèrement et les laisser se détendre sous un torchon pendant 10 minutes.
- Reprendre les pâtons et les façonner en long, de la grandeur des moules, ici 25 cm.
- Les déposer dans les moules beurrés et farinés ou comme ici, recouvert d’un papier sulfurisé et les faire pousser dans un endroit chaud (28°C), recouverts d’une feuille plastique, pour une bonne heure de pointage. Il faut un développement maximal pour ce genre de gâteau.
- Préchauffer le four à 180°C, dorer les brioches avec de l’œuf battu, puis avec une paire de ciseau, les entailler profondément 5 à 6 fois afin d’obtenir les pointes caractéristiques des taillaules.
- Enfourner pour 30 à 35 minutes tout en surveillant régulièrement la cuisson et sitôt cuites, les démouler et les refroidir sur une grille.

Ingrédients
- 300 g de farine de blé
- 50 g de farine de riz
- 1 sachet de levure boulangère sèche
- 20 cl de lait
- 70 g de sucre
- 3 cuillères à soupe d’huile neutre (pépins de raisin par exemple)
- de la pâte à tartiner chocolat noisette (ici gianduja)
Instructions
- Faites tiédir le lait avec le sucre jusqu’à dissolution.
- Quand le lait est tiède/chaud (non bouillant – 30/35°C – trempez votre petit doigt dedans, vous ne devez pas trop ressentir la chaleur), ajoutez-y l’huile (neutre en saveur et en couleur, pas comme ce que j’ai fait donc) et la levure de boulanger.
- Mélangez.
- Dans un grand saladier, mélangez les deux farines puis versez-y le lait tiède tout doucement en mélangeant délicatement avec les doigts.
- Travaillez la pâte jusqu’à obtenir une boule, enrobez-la de farine (pour éviter qu’elle ne colle au plat et favoriser son extraction plus tard) et laissez-la monter deux heures dans son saladier, recouvert d’un linge propre, dans un endroit chaud et à l’abri des courants d’air (enfermée dans votre four éteint par exemple)
- Une fois que la pâte à brioche a bien levée, étalez-la sur un plan de travail, préalablement fariné, à l’aide d’un rouleau à pâtisserie. Ni trop épaisse, ni trop fine.
- Munissez-vous d’un emporte pièce rond de 8 cm de diamètre (environ… ou un verre, ou un petit bol) et découpez des cercles jusqu’à épuisement de la pâte.
- Déposez une petite boule de gianduja au centre de l’un des rond de pâte, et repliez-la autour de la boule vers le haut petit à petit jusqu’à avoir fait le tour.
- Faites une sorte de « tourbillon » au moment de fermer la brioche pour solidifier la « soudure » (humidifiez un peu la pâte au besoin).
- Posez votre banh bao sur un carré de papier cuisson et procédez à la réalisation des autres jusqu’à épuisement de la pâte.
- Enfin, posez-les dans votre panier de cuiseur-vapeur, sans trop les coller et laissez-les cuire 10 à 15 minutes. Une fois cuit vos banh bao ont un peu gonflé et sont bien blancs.
- Servez rapidement après cuisson.
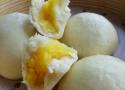
Ingrédients
Farce à la crème-œuf
- 1 œuf
- 30 g de beurre mou
- 35 g de sucre glace
- 20 g de custard powder
- 18 g de fécule de maïs
- 45 g de lait entier
Pâte
- 150 g de farine T 45
- 1,5 g de levure boulangère sèche
- 80 à 85 g d'eau tiède
- 10 g de sucre
- 1 pincée de sel
- 1 c. à café d'huile végétale
Instructions
Pâte
- Mélangez l'eau et la levure, laissez mousser pendant 5 à 10 min.
- Mélangez tous les ingrédients à sec, versez le mélange levure-eau petit à petit.
- Pétrissez pendant 5 min pour avoir une boule lisse et homogène.
- Ajoutez l'huile, pétrissez de nouveau.
- Laissez pousser dans un endroit doux (en couvrant d'un linge humide) et pas trop sec pendant 1 heure.
Farce
- À préparer de préférence la veille et conserver au frais.
- Battez l'oeuf.
- Mélangez le beurre mou avec du sucre, ajoutez l’œuf en plusieurs fois, mélangez bien entre chaque ajout d’œuf.
- Tamisez la fécule et la custard powder, ajoutez dans la préparation précédente, mélangez bien.
- Ajoutez du lait.
- Faites cuire ce mélange au micro-onde pendant 1 min 15, sortez toutes les 20 secondes pour bien mélanger.
- Passez au tamis pour avoir une texture plus fine (pas obligatoire).
- Réservez la farce au frais.
Pliage et cuisson
- Sortez la pâte, dégazez, formez en forme de boudin.
- Divisez en 6 morceaux équivalents.
- Abaissez chaque morceau en petite galette, le bord doit être plus fin que le centre.
- Mettez une belle c. à café de farce au centre de la galette, pliez pour avoir la forme d'un baozi.
- Placez les petits pains dans la panier vapeur, côté plis vers le bas.
- Laissez pousser pendant 30 à 40 min.
- Mettez le panier sur une casserole ou un wok pré-rempli d'eau froide.
- Faites cuire à la vapeur pendant 12 min à partir d'ébullition (départ d'eau froide).
Ingredients
- 400g bread flour (14 ounces; about 2 1/2 cups), plus more for dusting
- 10 g kosher salt (0.35 ounces; about 2 teaspoons), plus more for sprinkling
- 4 g instant yeast (0.15 ounces; about 1 teaspoon), such as SAF Instant Yeast
- 275 g water (9.5 ounces; about 1 cup plus 3 tablespoons)
- 8 g extra-virgin olive oil (0.25 ounces; about 2 teaspoons), plus more to coat pans and for drizzling
- 1 1/2 cups pizza sauce, such as our New York–style pizza sauce
- 12 ounces grated full-fat, low moisture (dry) mozzarella cheese (see note)
- Toppings as desired
- Small handful torn fresh basil leaves (optional)
- 2 ounces grated Parmesan or Pecorino Romano cheese (optional)
Instructions
- Combine flour, salt, yeast, water, and oil in a large bowl. Mix with hands or a wooden spoon until no dry flour remains. (The bowl should be at least 4 to 6 times the volume of the dough to account for rising.)
- Cover bowl tightly with plastic wrap, making sure that the edges are well sealed, then let rest at cool room temperature (no warmer than 75°F or 24°C) for at least 8 hours and up to 24. Dough should rise dramatically and fill bowl. In a hot kitchen, the dough may overproof near the end of that range.
- Sprinkle top of dough lightly with flour, then transfer it to a well-floured work surface. Divide dough into 2 pieces and form each into a ball by holding it with well-floured hands and tucking the dough underneath itself, rotating it until it forms a tight ball.
- Pour 1 to 2 tablespoons oil in the bottom of two 10-inch cast iron skillets or round cake pans (see note). Place 1 ball of dough in each pan and turn to coat evenly with oil. Using a flat palm, press dough around the pan, flattening it slightly and spreading oil around the entire bottom and edges of the pan. Cover tightly with plastic wrap and let dough sit at room temperature for 2 hours (at room temperatures above 75°F or 24°C, the dough may require less time to rise; at temperatures below 65°F or 18°C, it may require more time). After the first hour, adjust an oven rack to the middle position and preheat oven to 550°F (290°C).
- After 2 hours, dough should be mostly filling the pan up to the edges. Use your fingertips to press it around until it fills in every corner, popping any large bubbles that appear. Lift up one edge of the dough to let any air bubbles underneath escape, then repeat, moving around the dough until there are no air bubbles left underneath and the dough is evenly spread around the pan.
- Top each round of dough with 3/4 cup sauce, spreading sauce to the very edge with the back of a spoon. Sprinkle evenly with mozzarella cheese, all the way to the edges. Season with salt. Add other toppings as desired. Drizzle with olive oil and scatter a few basil leaves over the top of each pizza, if desired.
- Transfer pan to oven and bake until top is golden brown and bubbly and bottom is golden brown and crisp when you lift it with a thin spatula, 12 to 15 minutes. Immediately sprinkle with grated Parmesan or Pecorino Romano cheese, if using. Using a thin spatula, loosen pizza and peek underneath. If bottom is not as crisp as desired, place pan over a burner and cook on medium heat, moving the pan around to cook evenly until it is crisp, 1 to 3 minutes. Remove the pizzas and transfer to a cutting board. Cut each pizza into 6 slices and serve immediately.

Ingrédients
- 580g de farine T65 + 1 CS bombée de gluten
- 170g de lait
- 170g d'eau
- 1 oeuf
- 3 CS d'huile d'olive
- 1 sachet de levure sèche de boulanger (8g) délayée dans une CS d'eau tiède
- 1 CC sel
- 1 CS miel
- 1 rizhome de curcuma fraîchement râpé
- des petites graines au choix, légèrement torréfiées (poêlées pendant 15 mn feu moyen, ou four à 170° 10 mn): sésame, courge, tournesol, lin
Instructions
- Déposez les éléments liquides dans la cuve du robot en terminant par la levure délayée préalablement dans 1 CS d'eau tiède.
- Versez les solides par dessus, ajoutez le curcuma, en le râpant à l'aide d'une microplane par exemple.
- Pétrissez au crochet pour obtenir une pâte à la robe jaune homogène, pas trop longuement, 5 minutes suffisent pour obtenir une masse souple un peu collante.
- Couvrez d'un film à même la pâte (elle ne doit pas croûter!), et laissez pousser dans un endroit tiède, sans courants d'air. Une poussée lente, à l'extérieur est préférable à une accélération de la chaleur dans un four, il y a moins de risques de développer une acidité excessive. Si vous avez cependant une forte odeur de levure malgré "une poussée extérieure", ajoutez à votre pâte du jus de citron et un demi zeste...ou bien changez de levure, pour une de meilleure qualité.
- Lorsque la pâte a poussé, appuyez dessus fortement pour chasser l'air. Farinez légèrement un plan de travail (on ne doit pas trop intégrer de farine à présent aux buns!) déposez la pâte, coupez-là en dix morceaux égaux, façonnez-les en boules, en marquant une soudure qui sera le "dessous", si ça colle tant pis, ne refarinez surtout pas vos mains, vos buns doivent rester légers !
- Déposez vos pâtons sur une plaque à biscuits de cuisson (perso je les mets sur deux plaques vierges, ni feuille de cuisson, ni badigeon d'huile qui "croûterait" le dessous des pains, ils doivent rester parfaitement moelleux) antiadhérentes par contre...et ce, de manière espacée et en quinquonce. Recouvrez d'un film alimentaire, pour ne pas faire croûter le dessus des pains. Laissez sur un plan de travail, dans un endroit tiède.
- Préchauffez votre four T 200° sans rien à l'intérieur, surtout pas la grille qui va recevoir vos buns, vous cuiriez le dessous des petits pains beaucoup trop rapidement !
- Dans un bol, délayez 1CS d'eau avec 1 CC de miel, une fois bien diluée, imbibez un petit chiffon propre du liquide. Lorsque les pains ont doublé de volume, enlevez le film et "mouillez" le dessus des buns, parsemez enfin avec vos graines favorites.
- Déposez votre plaque à buns sur une grille parfaitement froide, ajoutez un ramequin d'eau bouillante au milieu des pains, ceci afin qu'il y ait une ambiance légèrement humide dans le four et enfournez pour dix minutes ! Pas plus. C'est près !
- Attendre qu'ils soient totalement refroidis avant de les congeler ou dégustez avec vos garnitures préférées.
- Si on le désire on peut au bout de 30 minutes, couper les pains en deux et les toaster légèrement côté mie.

Ingredients
Dough
- 455 grams (3 1/2 C) unbleached all purpose flour
- 2 1/4 tsp instant yeast
- 1 tsp sugar
- 1 1/4 tsp salt
- 1/2 cup water
- 1/4 cup milk
- 1/4 cup vegetable oil
- 2 large eggs
- 2 large egg yolks
Filling and Topping
- 1 tbsp butter
- 1 tbsp olive oil
- 1 large red onion, halved and thinly sliced
- 6 large shallots, thinly sliced
- 1 tsp sugar
- 1 tbsp herbes de Provence, plus more for sprinkling (mine is from The Spice House)
- 6 ounces grated Gruyere cheese, plus another ounce for sprinkling
- 1 tbsp Dijon mustard
- 1 egg, beaten with 1 T water
Instructions
- Whisk the dry ingredients of the bread in the bowl of a stand mixer.
- Whisk the water, milk, eggs, and egg whites together in a bowl and add to the dry ingredients.
- Mix with the dough hook for about 10 minutes on medium low speed.
- Place the dough into an oiled bowl, cover, and allow to rise until doubled, about an hour.
- While the dough is rising, prepare the onion filling. In a 12 inch skillet, melt the butter and olive oil.
- Add the onions, shallots, and sugar, and cook for about 5 minutes on medium heat. Add the herbs and continue to cook, stirring regularly, for about 20 minutes more, until caramelized.
- When the dough has doubled, place it on a piece of baking sheet sized piece of parchment paper.
- Roll it out to a 12 inch by 11 inch rectangle.
- Spread the mustard lengthwise in the middle of the dough into a 3 inch line.
- Spread the onion mixture over the mustard.
- Sprinkle the 6 ounces of cheese over the onion mixture.
- Using a sharp knife, make diagonal 1 inch cuts on both sides of the stripe of onion and cheese mixture.
- Lift the parchment with the loaf onto a baking sheet.
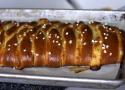
- Fold the ends over the filling, and then fold the strips over the filling, alternating from both sides, so that the top of the dough looks like a braid.
- Preheat the oven to 350 degrees F.
- Cover the loaf loosely with oiled plastic wrap and let it rise until doubled, about 30 to 40 minutes.
- Brush the top of the loaf with the egg wash.
- Sprinkle the center of the braid with about an ounce of grated Gruyere.
- Sprinkle the top of the cheese lightly with herbes de Provence.
- Bake the loaf for about 45 minutes, until nicely browned and the center registers about 190 degrees F.
- Cool on a wire rack. Serve warm, or cool completely and wrap in foil to serve later.
Ingredients
Sponge
- 6 tablespoons (3 ounces) warm water
- 1 teaspoon sugar
- 1 1/2 teaspoons instant yeast
- 1/4 cup (1 ounce) unbleached all-purpose flour
Dough
- Sponge (above)
- 6 tablespoons (3 ounces) sour cream or yogurt
- 1/4 cup (4 tablespoons or 2 ounces) unsalted butter, softened
- 2 large eggs, 1 beaten for dough, 1 beaten with 1 teaspoon water for brushing bread
- 1/4 cup (1 3/4 ounces) sugar
- 1 teaspoon salt
- 1 teaspoon vanilla extract
- 2 1/2 cups (10 5/8 ounces) unbleached all-purpose flour
- Pearl sugar* or sparkling white sugar for sprinkling
Lemon cream cheese filling
- 1/3 cup (2 1/2 ounces) cream cheese, softened
- 2 tablespoons (5/8 ounces) sugar
- 2 tablespoons (1 ounce) sour cream
- 1 teaspoon fresh lemon juice
- 2 tablespoons (1/2 ounce) unbleached all-purpose flour
- 1/4 cup (2 ounces) homemade (recipe below) or prepared lemon curd
Instructions
Sponge
- In a small bowl, combine the sponge ingredients.
- Stir well to combine, loosely cover with plastic wrap, and set aside to proof for 10 to 15 minutes.
Dough in a stand mixer
- Combine the sponge, sour cream, butter, egg, sugar, salt and vanilla in the bowl of a stand mixer.
- Add flour and mix with the paddle attachment until the dough is a rough, shaggy mass.
- Switch to the dough hook and knead on until a soft, smooth dough forms, about 5 to 6 minutes.
- Place the kneaded dough in a lightly greased bowl, cover with plastic wrap, and allow to rise for 60 to 90 minutes, until quite puffy and nearly doubled.
Dough by hand
- Whisk together sour cream, butter, egg, sugar, salt and vanilla in a large, wide bowl.
- Stir in sponge.
- Add the flour and mix with a wooden spoon as best as you can; you may need to get your hands in there to form it into a shaggy ball.
- Turn ball of dough and any incorporated scraps onto a counter and knead until a smooth, soft dough forms, about 5 to 10 minutes.
- Place the kneaded dough in a lightly greased bowl, cover with plastic wrap, and allow to rise for 60 to 90 minutes, until quite puffy and nearly doubled.
Filling
- Combine all the filling ingredients (except the lemon curd) in a small bowl, mixing until smooth and lump-free.
- Reserve the filling and lemon curd until ready to fill the braids.
Bread
- Gently deflate the dough and roll it out on a very well floured counter to a 10″ x 15″ rectangle.
- Transfer rectangle to a large piece of parchment paper, please; I did not and it led to all sorts of trouble.
- With the side of your hand, lightly press two lines down the dough lengthwise, dividing it into three equal columns.
- Spread the cream cheese filling down the center section, leaving the top and bottom two inches free of filling.
- Spread the lemon curd over the cream cheese filling.
- To form the mock braid, cut crosswise strips one inch apart down the length of the outer columns of you dough (the parts without filling).
- Make sure you have an equal amount of 1-inch strips down the right and left sides.
- Be careful not to cut your parchment paper; if you have a bench scraper, this is a great time to use it.
- Remove the four corner segments.
- To “braid”, begin by folding top flap down and bottom flap up over the filling.
- Lift the top dough strip and gently bring it diagonally across the filling.
- Repeat on the right side, and continue down the entire braid, alternating strips until you are out.
- You can tuck the last couple that hand off decoratively under the end of the braid.
- Carefully transfer the dough and the parchment paper to a baking sheet.
- Cover loosely with plastic and set it aside to rise for 45 to 50 minutes, until quite puffy.
- Preheat the oven to 375°F.
- Brush the loaves with egg wash, and sprinkle with pearl or coarse sparkling sugar.
- Bake for 25 to 30 minutes, or until the loaves are golden brown and your apartment smells like a doughnut factory.
- Remove from the oven and cool for 15 to 20 minutes before serving.

Ingredients
- ½ Cup warm water
- 1 pkg/ Tbsp. Red Star Platinum Yeast
- 2/3 Cup warmed buttermilk, or 2 ½ Tbsp. buttermilk powder dissolved in 2/3 Cup warm water
- 1 tsp. salt
- ¼ Cup sugar
- 2 Tbsp. butter
- 3 + Cups unbleached all-purpose flour
Instructions
- Place warm water and yeast in EZ DOH bucket and stir to dissolve yeast.
- Let rest 1 minute.
- Add one cup of flour, then additional dough ingredients.
- EZ DOH-it for 2-3 minutes, or until dough is smooth and soft and all ingredients are incorporated.
- Remove dough from bucket, spray bucket with cooking spray, “smooth” dough and replace in bucket.
- Cover and let rise until doubled.
- At this point, the dough may be formed into rolls (should make about 12) or a 9X 5 loaf. I also have used this several times as a “base” for layered pull-apart bread. To use it as such, roll the dough out into a large rectangle, about 15”x 9”. Spread 2 tablespoons of softened butter on the dough, then sprinkle with your favorite ingredients
- Slice the covered dough in half, lengthwise.
- Then cut three slices the other way, making 8 even-sized pieces.
- Stack the pieces atop one another- four “piles” of two.
- Slice each of the piles in half.
- Grease a 9x5 loaf pan or use a “tea loaf” pan, which measures 13x4” .
- Place each of the “piles” in the pan on its side, working quickly.
- Cover and let rise until doubled, or cover and place in the frig overnight.
- Bake at 375 for 30 minutes or until golden.
- Remove from pan and cool on a wire rack.
- Brush top with softened butter.
Notes
- Sweet: Cinn-sugar and raisins…..maybe some toasted nuts, too! Or maybe some chopped apples…..
- Greek: I used about ½ of a frozen pkg. of spinach (thawed and well-drained); 10-15 Kalamata olives, sliced; 1/3 Cup feta cheese; ½ cup mozzarella; 1 ½ tsp. prepared minced garlic (or 1-2 cloves of garlic, minced); 1/3 Cup chopped (well-drained) roasted red peppers; Mix everything together and spread on the dough - Add what YOU like!
- Ham & Cheese “Devil Bread” : Spread 2 Tbsp. of Dijon mustard on the butter. Follow with 1-2 Cups chopped cooked ham pieces; 1 Cup shredded cheese (I used a mix of cheddar & mozzarella- whatever I had in the fridge)

Ingredients
Dough
- 1 1/3 Cup warm water
- 1 packet/Tbsp.Red Star Platinum yeast
- 2 tsp. Kosher salt
- ½ Tbsp. Sugar
- 2 Tbsp. olive oil
- 3- 3 ¼ C. Unbleached, all-purpose flour
Filling
- Olive oil
- 1 Tablespoon butter
- 1/2 green or Italian pepper, chopped
- 1 medium onion, chopped
- 1/2 can sliced mushrooms
- 1 clove garlic, minced
- 1 package frozen chopped spinach, thawed and squeezed dry
- Pinch cayenne pepper
- Pinch freshly ground pepper
- Pinch of parsley, basil, and oregano
- 1 tsp. garlic powder
- Pinch crushed red pepper seeds
- Pinch salt
- 4 slices provolone cheese
- 1-1/2 cups mozzarella cheese
- 2 Tbsp. grated Parmesan cheese
Instructions
- Place warm water and yeast in EZ DOH bucket and stir to dissolve yeast.
- Wait 1-2 minutes.
- Add 1 cup flour, then remaining ingredients and EZ DOH-it , adding the final ¼ c. of flour gradually till the dough is soft and smooth.
- Remove the dough from the bucket, spray the bucket with cooking spray and then replace dough and cover bucket.
- Let rise till doubled.
- Saute peppers and onions in olive oil and butter.
- Add mushrooms and fresh garlic and saute for 2-3 minutes.
- Add the spinach and spices and cook a minute or two more.
- Roll out dough to a thin oval shape.
- Spread out cooked mixture all over.
- Add cheeses on top.
- Roll and seal the ends.
- Place on lightly greased baking sheet.
- Bake in a 350-degree oven for 30 minutes or until lightly browned on top.

Ingredients
Dough
- 1 pkg/Tbsp. Red Star Platinum yeast
- ¼ Cup warm water
- ½ Cup warm milk
- 2 – 2 ¾ Cups unbleached, all-purpose flour
- 2 Tbsp. softened butter2 Tbsp. sugar
- ½ tsp. salt
Filling
- ½ Cup crumbled feta cheese
- 2 Tbsp. shredded mozzarella cheese
- 1 Tbsp. parmesan cheese
- ½ tsp. Greek seasoning (I use Cavender’s All-Purpose Greek Seasoning)
- ½ pkg. frozen spinach, thawed and squeezed dry
Instructions
- In EZ DOH bucket, stir together yeast and water.
- Let rest 1 minute.
- Add one cup of flour and then remaining dough ingredients.
- EZ DOH-it for 2-3 minutes, adding enough flour to produce a smooth, elastic dough.
- Remove dough from bucket and “smooth” or “cloak” dough, pulling it under.
- Spray the inside of the bucket with cooking spray.
- Replace dough and let rise until doubled.
- While dough is rising, combine filling ingredients.
- After dough has risen, on a lightly floured surface, roll dough out into a large rectangle, 14x 9” approximately.
- Spread with filling.
- Roll up dough, cinnamon-roll style, starting with long edge.
- Slice into 10-12 rolls and place in a greased 8 or 9” round cake pan.
- Cover and let rise until doubled.
- Bake at 375 for 20-25 minutes, or until golden.

Ingredients
Dough
- 1 pkg/Tbsp. Red Star Platinum yeast
- ¼ Cup + 2 Tbsp. warm water
- 2 ½ -3 Cups unbleached all-purpose flour
- 2 Tbsp. butter, softened
- ¼ Cup + 2 Tbsp. warm milk
- ¼ Cup sugar
- 1 egg
- ½ tsp. salt
Filling
- ¼ Cup almond paste
- 2 Tbsp. butter, softened
- ¼ Cup brown sugar
- 1/8 tsp. almond extract
Streusel topping
- 3 Tbsp. sugar
- 1 Tbsp. unbleached all-purpose flour
- 1 Tbsp. butter
Icing
- ¾ Cup powdered sugar
- 1 Tbsp. milk
- 1/8 tsp. almond extract
Instructions
- Place warm water and yeast in EZ DOH bucket and stir to dissolve yeast.
- Let rest 1 minute.
- Add one cup of flour, then additional dough ingredients.
- EZ DOH-it for 2-3 minutes, or until dough is smooth and soft and all ingredients are incorporated.
- Remove dough from bucket, spray bucket with cooking spray, “smooth” dough and replace in bucket.
- Cover and let rise until doubled.
- In a mixing bowl, beat filling ingredients together.
- On a lightly floured surface, roll dough out into a 12” square.
- Spread filling over the dough. Roll up, jelly-roll style and seal seams.
- Cut into 6-8 large rolls or 12 smaller rolls.
- Place in a greased 9” round or square baking pan.
- Cover and let rise until doubled.
- Combine topping ingredients and sprinkle over the rolls.
- Bake at 375 for 20-30 minutes or until golden.
- Carefully turn out rolls onto a wire rack to cool.
- Combine icing ingredients and drizzle over rolls.
Ingredients
- 1 egg, room temperature
- 4 cups of white flour
- 2 teaspoons granulated white sugar + 1/8 teaspoon
- 1 teaspoon yeast
- 1/3 cup water + 1/4 cup warm water
- 1/3 cup milk
- 1/3 stick butter or margarine
- 1 teaspoon salt
Instructions
- Combine 1/4 cup warm water, 1 teaspoon yeast and 1/8 teaspoon granulated sugar in a small cup or bowl. Set aside.
- In a saucepan, combine water, milk, egg salt, and sugar. Bring to a boil on medium heat and add margarine. Once the margarine has melted, remove from heat and bring to room temperature.
- Place the milk mixture in a mixer and add flour to it until the dough no longer sticks to your fingers.
- Make a hole in the middle of the dough ball and pour the yeast mixture in the middle. Cover, and begin to knead until well combined.
- Divide the dough ball into two parts and place them in your greased baking pans. Allow to rise for a half-hour in a warm place (like next to a warm oven or in the sun.) Knead each one a little bit and then allow to rise for another half hour.
- Bake at 350 degrees Fahrenheit for 45 minutes.

Ingrédients
- 120 ml de lait
- 60 g de beurre fondu
- 320 g de farine T55
- 80 g de farine de châtaigne
- 2 oeufs
- 1 c. à café de levure boulangère déshydratée
- 1 c. à café de sel
- 50 g de sucre
- 1 sachet de sucre vanillé
- 1 c. à café d'arôme vanille
- 1 c. à soupe de rhum (facultatif)
- 1 jaune d'oeuf avec un peu d'eau pour la dorure
Préparation
- Dans un petit bol, battre les 2 oeufs. Réserver.
- Dans le bol de votre robot, muni du crochet pétrisseur, diluer la levure boulangère avec le lait tiède.
- Ajouter ensuite les farines, le sucre, le sucre vanillé ainsi que le sel.
- Verser ensuite les oeufs battus, la vanille liquide, sans oublier le beurre fondu.
- Pétrir l'ensemble pendant une dizaine de minutes (jusqu'à obtenir une pâte consistante).
- Couvrir d'un torchon propre et laisser lever pendant 2 heures (la pâte doit doubler de volume). (pour accélérer la pousse, vous pouvez mettre le saladier dans un four préchauffé à 40°).
- Sortir le pâton et le dégazer sur un plan de travail légèrement fariné puis le façonner comme vous le souhaitez (j'ai fait 3 boules que j'ai déposé dans un moule coeur).
- Couvrir d'un torchon propre et laisser lever pendant 1 heure.
- Préchauffer votre four à 170°C (Th. 5-6).
- Badigeonner le dessus de votre brioche d'un mélange jaune d'oeuf / eau.
- Enfourner 25 minutes à 170°C (Th. 5-6). (à surveiller et à adapter à votre four).
- Laisser refroidir avant de déguster.
Ingrédients
- 1kg de farine
- 6 oeufs
- 1/2 litre lait
- 50g de levure boulangère
- 200 à 300 g sucre (+ un peu de sucre perlé)
- 10g de sel
- 250 g de beurre
- 200 g de raisins de Corinthe
Instructions
- Le plus simple est d'utiliser un robot pour pétrir la pâte.
- Il faut incorporer le beurre à la fin du pétrissage d'environ 20 minutes (ainsi que le raisin et le sucre perlé).
- Laisser ensuite reposer une demi-heure.
- Après avoir donné la forme d'un Jésus à deux têtes à votre pâte, laissez lever pendant une heure et demi.
- Traditionnellement la coquille a la forme d'un enfant emmailloté, on la façonne en formant une boule (le corps) à laquelle on colle une boule plus petite de chaque côté (la tête et les jambes).
- Avant d'enfourner dans un four à 180°C pendant 35 minutes, badigeonnez votre pâte de jaune d'oeuf.
Note : avec une paire de ciseaux, il faut ensuite faire une petite fente sur les côtés de votre pâte pour laisser s'échapper un peu le sucre.
Ingredients
Dough
- 500 grams (3-¾ cups) All-Purpose Flour plus extra for dusting
- 125 grams (½ cup + 2 tablespoon) Sugar
- 7.5 grams (2- ½ teaspoon) Rapid Rise (or Quick Rising) Instant Yeast.
- 3 grams (½ teaspoon) Salt
- 100 grams (½ cup) Non-Salted Butter at room temperature
- 100 ml eggs use a measuring cup, it equals about 6-½ Tbps
- 5 ml (1 teaspoon) Vanilla extract
- 120 ml (½ cup) of Milk warm.
Toppings
- 100 grams (½ cup plus 1 teaspoon) Vegetable Shortening plus extra to grease the dough and baking sheets
- 100 grams (⅞ of a cup) Confectioner Sugar
- 120 grams (1 cup) All-Purpose Flour
- 5 grams (2-½ teaspoon) Cocoa powder for half of the topping, if desired
- 5 grams (1 teaspoon) Cinnamon optional for the white topping
Instructions
Dough
- Have each ingredient ready and measured (by weight) before starting, and thoroughly read the notes above. Mix the all-purpose flour, yeast, sugar, and salt in the bowl of a stand mixer at medium speed, just to mix it well.
- Add the butter and mix well (using the stand mixer with the hook attachment), then mix in the eggs and vanilla extract and slowly pour the milk in little by little until the dough looks cohesive (you may need less or more milk, as some flours soak up more liquid than others). Keep beating the mixture for about 7 minutes at medium speed. Add a little more flour around the inside of the bowl (2-3 tablespoons), just enough for the dough to separate from the container. The dough should be soft and slightly sticky.
- YOUR DOUGH SHOULD FEEL VERY SOFT AND ELASTIC.
- Place the dough on your floured working table and knead it just enough to shape it into a ball.
- Place this ball in a large greased bowl to rest. Cover it with plastic wrap (or wax paper) and a kitchen napkin. Let the dough rest in a warm place for about 2 hours until it doubles in size. I usually turn the light on in my oven and place the bowl inside, close to the light. Be aware that if your kitchen is cold, the dough will take longer to rise. Be patient and do not try to proceed to the next step until the mixture has doubled in size.
Toppings
1.While the dough is rising, you can prepare the sugar topping. Soften the shortening with your spatula until it is very creamy, and then add the confectioner's sugar. Finally, add in the flour little by little (if using, add the ground cinnamon in this step). Set this paste aside to use later. If you're making half of the Conchas with the chocolate topping, then divide the paste in two and add the cocoa powder to one half, mixing it until it integrates very well.
- Once the dough has risen and doubled in size, place it onto a floured surface and let it rest for about 5 minutes. Divide the dough into 16 small balls (60 grams each). To shape the balls, lightly flour your hands and place each small ball on the working surface and gently press down with your hand, rotating your hand to form the balls.
- Place them onto greased baking sheets and continue until you've finished shaping all of the dough.
- Using your hands, grease the top of each ball with a little shortening. Do not skip this step, as it will help the topping adhere to the dough.
- To add the topping, flour your hands and divide the topping paste into 16 balls. Use your hands to press down on each one to form a small, flat circle (I like to use a sheet of plastic, like when making tortillas). Place this disk onto the ball of dough, and press it down very firmly.
- Once you've finished placing the topping on the buns, use a concha cutter or a knife to decorate them with the traditional concha shape.
- Allow the conchas to rise in a warm place until they are almost double in size. Depending on the temperature of your kitchen, this step could take anywhere from 1 to 2 hours. Do not leave them to rise any longer, because if you let them grow too much they will collapse inside the oven. Bake in a preheated oven at 325º degrees for 20 minutes, or until the bottom of the conchas are lightly golden. If you are placing more than one baking sheet in your oven, rotate them after 10-12 minutes. Move the sheet on the bottom rack to the top rack and vice versa to have an even baking.
Ingrédients
Pour la pâte
- 550g Farine blanche
- 20g Levure fraîche
- 250ml Lait
- 100g Beurre
- 1 Oeuf
- 50g Sucre fin
- 1/2cc Sel
- 250g Raisins secs
Pour la crème pâtissière
- 125g Sucre
- 500ml Lait
- 50g Maïzena
- 5 Oeufs
Pour le glaçage
- 250g Sucre glace
- 4cs Jus de citron
- 1 Blanc d'oeuf
Instructions
- Faites tremper les raisins secs dans un bol de lait.
- Placez les ingrédients suivants dans le bol du robot pétrisseur pour former la pâte: la farine, le lait, la levure, le sel, l’oeuf, le sucre et le beurre en gros dés. Pétrissez environ 10 minutes pour obtenir une pâte bien homogène.
- Sortez ensuite la boule de pâte du bol du robot pour la faire reposer une heure à température ambiante dans un saladier fariné et recouvert d’un linge.
- Pendant ce temps, préparez la crème pâtissière qui viendra garnir le milieu des couques: chauffez le lait avec la moitié du sucre. Dans un saladier, battez les jaunes d’oeufs avec l’autre moitié du sucre et ajoutez-y la Maïzena. Ajoutez-y ensuite le mélange de lait chaud. Versez le tout dans une casserole et faites chauffer en remuant sans cesse à l’aide d’un fouet. Amenez à ébullition à feu moyen et dès qu’il y a une belle ébullition et que la pâte s’est quelque peu épaissie, arrêtez la cuisson et placez la crème dans un plat à four. Filmez-la immédiatement, en collant bien le film alimentaire sur la pâte pour éviter qu’une croûte ne se forme sur la crème pâtissière lorsque celle-ci refroidit. Placez le plat au réfrigérateur pour la faire refroidir totalement.
- Après ce temps de repos, applatissez la pâte au rouleau à pâtisserie pour former le plus grand rectangle possible sans déchirer la pâte.
- Etalez uniformément la crème pâtissière sur tout le rectangle de pâte.
- Egouttez ensuite les raisins secs et répartissez-les sur toute la surface.
- Découpez des bandes de 2 cm de pâte dans le sens de la largeur du rectangle de pâte et roulez les bandes de pâtes sur elles-mêmes.
- Placez ces roulades sur une plaque de four recouverte de papier sulfurisé et laissez reposer 30 minutes.
- Battez le jaune d’oeuf restant avec un tout petit peu d’eau et badigeonnez les couques à l’aide d’un pinceau.
- Préchauffez le four à 210°C et enfournez les couques à mi-hauteur pendant 15 minutes.
- Laissez refroidir entièrement. Préparez ensuite le glaçage en mélangeant le sucre glace, le blanc d’oeuf et le jus de citron à l’aide d’un fouet.
- Répartissez ce glaçage sur la surface des couques et dégustez!

Ingrédients
- 3 tasses d'eau chaude (pas bouillante)
- 2 c. à thé de levure instantanée
- 2 c. à thé de sel
- 2 c. à thé de sucre
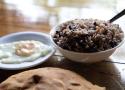
- 1 paquet de bacon, cuit et coupé en dés
- 2 tasses de cheddar, râpé et séparé
- 6 tasses de farine
- 1/8 c. à thé de poivre noir moulu
Instructions
- Dans un grand bol, mélanger l'eau, la levure et le sucre. Fouetter et laisser reposer 5-7 minutes dans un endroit chaud (le four éteint avec la lumière allumée).
- Incorporer 1 tasse de cheddar et tous les autres ingrédients (gardez quelques morceaux de bacon pour saupoudrer le dessus plus tard) dans le bol contenant la levure et mélanger jusqu'à incorporation complète. La pâte sera très collante.
- Couvrir la pâte avec un linge à vaisselle propre et humidifie et déposer dans le four éteint avec la lumière allumée environ 1h30.
- Déposer la pâte sur une surface enfarinée et pétrir quelques minutes.
- Couper la pâte en deux, mettre dans deux moules à pain rectangulaires, puis saupoudrer le dessus avec la tasse de cheddar restante et les morceaux de bacon réservés plus tôt.
- Couvrir la pâte avec le linge à nouveau et le placer dans un endroit chaud pendant 30 minutes.
- Préchauffer le four à 400°F et enfourner les pains pendant 15 minutes.
- Après 15 minutes, placer une feuille de papier d'aluminium sur les pains, abaisser la température à 350°F et cuire pendant 35 minutes.
- Au bout de 35 minutes, retirer la feuille de papier d'aluminium et continuer la cuisson 10 minutes.
Ingredients
- 450 g (3 1/2 cups) bread flour
- 7 g (1 1/2 teaspoons) instant yeast (see note)
- 7 g (1 3/4 teaspoons) Diamond Crystal kosher salt; for table salt, use half as much by volume or the same weight
- 270 g (1 1/4 cups) tepid water
- 25 g (2 tablespoons plus 1 teaspoon) canola or other neutral flavored oil
- 15 g (1 tablespoon) fresh lime juice
- 12 g (2 teaspoons) sugar
- Nonstick cooking spray
Instructions
- In a stand mixer bowl, whisk flour, yeast, and salt to combine. In a liquid measuring cup or bowl, whisk water, oil, lime juice, and sugar until sugar is dissolved.
- Fit stand mixer with dough hook, and on medium-low speed, slowly pour water mixture into flour mixture and mix until a shaggy dough forms, about 2 minutes. Increase the speed to medium and continue to mix, scraping down bowl and dough hook as needed, until the dough is smooth and stretchy and clears the sides of bowl, but sticks to the bottom, about 5 minutes.
- Using clean hands, transfer dough to a lightly oiled work surface and knead by hand to form a smooth, round ball, about 30 seconds. Place dough seam side down in a lightly greased large bowl. Cover bowl with plastic wrap and let sit at warm room temperature (75°F/24°C) until doubled in size, 1 to 1 1/2 hours.
- Transfer dough to a lightly oiled work surface. Using your hands, punch dough down to deflate, then form it into a taut ball, and let rest, covered, for 20 minutes.
- Divide dough into 4 even portions for longer banh mi loaves or 6 dough portions for shorter loaves (see notes). Lightly spray the dough portions all over with cooking spray, cover with plastic wrap, and let rest for 15 minutes.
- Working with one dough portion at a time, pull edges of the dough towards the center, pinching ends together, to create a tight ball. Set dough ball seam side down on work surface, then cup dough beneath your palm and work it in quick circular motion to form a smooth ball. Repeat with remaining portions of dough. Let rest, covered, for 15 minutes.
- Flip each dough ball so that the seam side is on top. Working with one dough ball at a time, use your fingers to press down and deflate two-thirds of the ball; the remaining one-third of the dough ball should still be airy and plump with an elongated football shape.
- Using a small, lightly oiled French tapered rolling pin or other small rolling pin, roll the deflated side of dough until it is evenly flat and fans outward (for smaller loaves about 10 inches wide and 1/8 inch thick; for larger loaves, 12 inches wide and 1/8 inch thick), while keeping the inflated portion of the dough untouched (this ensures the center of each will be full and fluffy). The rolled out portion of the dough should be longer than the still inflated portion of the dough.
- Using both hands and starting with the still-inflated portion of dough, gently roll the dough over itself to form a log; continue rolling until a longer baguette forms with tapered ends (you should have a tapered baguette measuring about 1 1/2 inches thick in the middle that is about 8 inches long for smaller loaves and 10 inches long for larger ones). Gently press and pinch seam closed along the length of loaf.
- Transfer shaped loaf, seam side down, to a perforated baguette tray that has been lightly coated with cooking spray (see notes). Repeat loaf shaping with remaining portions of dough, then spray the loaves evenly with cooking spray and loosely cover with plastic wrap. Let rest until the dough springs back slowly when pressed lightly, about 45 minutes.
- Meanwhile, adjust oven racks to the upper-middle position and the lowest position. Place a large baking dish on the bottom oven rack and fill halfway with boiling water. Preheat oven to 475°F (246°C).
- Holding a bread lame concave side up, with handle oriented at a 30-degree angle to loaf, make one 1/4-inch deep slash along the centerline of each loaf, using a single swift motion from one end to the other, but leaving 1/2-inch uncut at each end.
- Using a spray bottle of water, mist the surface of each loaf. Working quickly, place loaves in the oven, then mist the inside walls of the oven with water. Bake loaves for 8 minutes, then rotate the tray and bake 4 minutes longer.
- Reduce oven temperature to 400°F (205°C) and continue to bake loaves until golden brown all over, 6 to 8 minutes. If the bottoms of the loaves have not achieved the desired color, flip loaves upside down and bake until bottoms are golden brown, 2 to 3 minutes. Transfer loaves to a wire rack and let cool for at least 15 minutes before serving.

Ingredients
- 2/3 cup (150ml) milk, whole or 2%
- 2 ¼ tsp(8g) active dry yeast
- 1/2 cup (100ml) sugar
- zest of 1/2 orange
- zest of 1/2 lemon
- 2 1/2 cups (312g)all purpose flour
- 1/4 tsp salt
- 1/3 cup (75g) unsalted butter, diced and at room temperature
- 2 large eggs, at room temperature
- 1 tsp vanilla extract
- 1 egg + 1 tbsp (15ml) milk, for the egg wash
- ¼ cup (80g) orange marmalade
- 3 tbsp pearl sugar (or crushed sugar cubes)
- About 20 candied orange peel sticks
- 12 candied cherries
Instructions
- Warm up the milk to a warm temperature (not hot!) in a sauce pan or in the microwave. Stir in the yeast and set aside for 10 minutes. Your yeast should foam.
- In a large mixing bowl, combine the sugar, lemon zest and orange zest, and rub with your fingers so the zest releases moisture and the sugar becomes moist and lumpy. Whisk in the flour and salt.
- Dig a well in the middle and add the eggs and the milk with yeast. Stir until all the flour is incorporated and you get a very sticky mixture. Add the cubed butter and knead for 10 minutes until all the butter is well incorporated.
- Transfer the dough to a large, greased bowl. Cover with a cloth and set aside in a draft-free environment for 2-3 hours, until the dough has doubled in size.
- Line a large baking sheet with parchment paper.
- When the dough has doubled in size, punch it in the middle to deflate it. Transfer the dough onto a floured working surface and shape into a ball. Transfer the dough ball onto the parchment paper-lined baking sheet. Poke a whole in the middle of the ball with your index finger, and enlarge the hole to form a crown. Do not hesitate to form a large hole (about 4 inches in width) in the middle as its size will decrease when the crown bakes.
- If you have a trinket, stick in somewhere underneath the crown.
- Cover the crown with a cloth and let rise for 1 more hour.
- Pre-heat your oven to 350°F (180°C).
- After the one-hour mark, whisk the egg yolk with the milk and brush it all over the crown. Sprinkle evenly with pearl sugar.
- Bake the brioche for 30 minutes until it looks puffy and golden.
- Take out of the oven and immediately brush marmalade over top to give it a nice shine. When the brioche has completely cooled down, decorate it with citrus peels and candied cherries.

Ingredients
Dough
- 2 1/3 cups (280g) King Arthur Unbleached All-Purpose Flour
- 1/2 cup (57g) King Arthur Organic Whole Wheat Flour
- 1/2 cup (113g) water, lukewarm (100°F)
- 1/4 cup plus 2 tablespoons (85g) milk, lukewarm (100°F)
- 4 tablespoons (57g) butter, at room temperature
- 2 1/2 tablespoons (31g) granulated sugar
- 1 1/4 teaspoons table salt
- 2 teaspoons instant yeast
- 3/4 teaspoon Cloud Forest Ground Cardamom
Filling
- 1/2 cup (99g) granulated sugar
- 2 teaspoons to 1 tablespoon Cloud Forest Ground Cardamom
- 1 1/2 teaspoon ground cinnamon
- 1 1/2 teaspoons black cocoa
- 1/2 teaspoon ground black pepper, optional
- 1/4 teaspoon table salt
- 1 large egg, beaten with 1 tablespoon water (egg wash)
Glaze
- 1/4 cup (56g) water
- 2 tablespoons (25g) granulated sugar
- 1/4 teaspoon Cloud Forest Ground Cardamom
Topping
- Swedish pearl sugar, for sprinkling
Instructions
To make the dough
- In the bowl of a stand mixer fitted with a dough hook, combine all of the dough ingredients. Mix for 1 to 2 minutes on low until combined, then increase to medium speed and knead until the dough is smooth and pulls away from the sides of the bowl, about 5 minutes. If mixing by hand, add the dough ingredients to a large bowl and mix to combine. Let the dough rest for 20 minutes and then knead until smooth.
- Place the dough in a lightly greased bowl, cover, and let it rest for 60 minutes or until puffy and risen but not necessarily doubled in size.
To make the filling
- In a small bowl, combine all of the filling ingredients except for the egg wash and set aside.
To roll the dough
- Place a piece of parchment on your work surface and lightly flour it. (Alternatively, you can work directly on a lightly floured surface, though the parchment helps with transport later.) Gently transfer the dough onto the floured surface and sprinkle flour on top. Press or roll the dough with a rolling pin into a rectangle, roughly 12" x 20" with the long side running parallel to the edge of your work surface.
- Brush the entire surface of the dough with egg wash. Reserve any excess. Sprinkle the filling mixture evenly across the entire surface of the dough. Fold the dough like a letter in thirds: starting on the right side, fold one third into the center, then the opposite third over the first.
- After the letter fold, the dough block should measure approximately 12" x 6 1/2". Roll briefly to extend the width of the dough so that it measures roughly 12" x 8". Lift the parchment and dough onto a baking sheet. Cover the dough with plastic or slide a food-safe bag over the entire tray, press out all the air, and chill for 10 to 15 minutes in the refrigerator.
- Keep the parchment on the baking sheet and gently transfer the dough to a lightly floured work surface and roll to elongate it to a 16" x 8" rectangle.
- Using a ruler and a pizza wheel or sharp knife, make small notches along the short side of the dough at 1" intervals. Repeat on the other short end of the dough. Align the ruler with the notches at both ends, placing it flat on the dough. Use it as a guide to cut 8 strips that are 1" wide and 16" in length.
- One at a time, twist the ends of each dough strip in opposite directions. The dough may start to form a tube, which is OK, but stop shy of twisting so tightly that a tube fully forms. (For the best rise, it is better to have a looser twist than a very tightly wound tube.)
Loosely coil the tube into a single layered spiral, tucking only the tip underneath at the end. Press gently to seal. Using both hands or a spatula, carefully place each spiral onto the parchment-lined baking sheet. Repeat with the remaining dough until all the buns are shaped. - Cover the cardamom buns loosely and place them in a warm place to rise for 60 to 75 minutes, or until slightly puffy and risen. Towards the end of the rising time, preheat the oven to 450°F.
- When ready to bake, gently brush each cardamom bun with the reserved egg wash.
- Bake the cardamom buns for 13 to 20 minutes, or until deep golden brown and the interior temperature reaches at least 185°F when measured with a digital thermometer.
To make the glaze
- While the rolls bake, prepare the glaze. In a small saucepan, stir together the glaze ingredients. Bring the mixture to a boil over medium heat while stirring and simmer for 5 to 7 minutes, or until the sugar has dissolved and the mixture has thickened slightly. Set aside until ready to use.
- When the buns are finished baking, remove them from the oven and glaze immediately. Sprinkle with Swedish pearl sugar quickly before the glaze dries.
- Storage information: These cardamom buns are best enjoyed warm the day they are baked, but once baked, they can be stored overnight in an airtight container at room temperature and reheated a day later in a 350°F oven for 10 minutes. Freeze for longer storage.