1812 shaares
514 results
tagged
recette
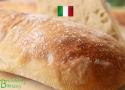
Ingrédients
Biga
- 500 g de farine blanche forte en gluten, genre Manitoba tipo «0»
- 255 g d’eau
- 5 g de levure fraîche
Pâte
- La biga
- 50 g de farine, la même que pour la biga
- 130 ml d’eau tiède en hiver, froide en été
- 10 g de sel
- Semoule de blé dur pour le façonnage
Instructions
Biga
- Dans la cuve du pétrin faire fondre la levure dans l’eau puis ajouter la farine par-dessus.
- Pétrir à la première vitesse, pendant 3 à 4 minutes, jusqu'à ce que la pâte se forme. La pâte est très compacte car très peu hydratée.
- Couvrir et laisser fermenter à température ambiante (idéalement 18 à 20°C), ceci pendant 18 à 24 heures.
- La pâte va fermenter, se développer tout en restant relativement compacte mais bien assouplie.
Pâte
- Au bout d’environ 20 heures le mélange aura fermenté avec un légère odeur acide, la pâte s’est étalée tout en restant collante.
- La transférer dans le bol du robot et démarrer le pétrissage pendant 2 minutes en première vitesse et 2 minutes en vitesse rapide, jusqu'à obtenir une pâte lisse et sans grumeaux.
- A ce stade, tout en pétrissant à la deuxième vitesse, ajouter le sel puis un peu d’eau. Ensuite il faudra ajouter l'eau par petites quantités en alternant avec un peu de farine. Ne pas ajouter la quantité suivante tant que la précédente n’a été absorbée. Cette phase va durer une bonne dizaine de minute. La pâte va devenir très élastique et bien hydratée. C’est incroyable ce que cette pâte est capable d’absorber autant d’eau.
- Huiler légèrement un récipient rectangulaire et avec vos mains mouillées, y transvaser la pâte qui va s’étaler sur toute la surface.
- À ce stade, toujours avec les mains humides, effectuer un premier pliage, en soulevant la pâte d'un côté à l'autre, sur les 4 côtés.
- Ensuite, après 30 minutes, répéter ces pliages encore à deux reprises puis laisser la pâte lever pendant 60 à 90 minutes, cela va beaucoup dépendre de la température ambiante. Elle devrait doubler de volume.
- Une fois la pâte bien développée, saupoudrer généreusement la table d’un mélange de semoule et de farine et retourner le bac délicatement.
- À ce stade, ne pas la manipuler ni la dégonfler, simplement la saupoudrer de semoule et la diviser en deux pains égaux ou plusieurs petits, à choix.
- Retourner délicatement les deux pains sur des feuilles de papier sulfurisé séparées et les saupoudrer de semoule.
- Pour une ciabatta moins épaisse ou des plus petites, étirer légèrement les pains en le tirant avec les mains.
- Laisser les pains à découvert à température ambiante pendant 30 minutes.
- Pendant ce temps, préchauffer à 250 °C. Placer une plaque de cuisson en bas et une pierre à pizza (réfractaire) sur la grille du milieu.
- Une fois le four très chaud, avec une pelle à pizza, glisser les ciabattas, avec le papier sulfurisé pour éviter de faire retomber la pâte.
- Avant de fermer la porte du four, verser un petit verre d’eau sur la plaque du bas pour générer de la vapeur, ce qui empêche la formation immédiate d'une croûte et permet aux ciabattas de lever davantage.
- Cuire à 250 °C pendant 10 minutes, puis baisser la température à 210°C et continuer la cuisson pendant encore 20 à 25 minutes.
- Une fois cuites, éteindre le four et laisser les ciabattas, porte entrouverte, pendant 5 minutes.
- Ensuite les laisser refroidir complètement sur une grille et elles sont prêtes à être dégustées. Buon appetito !

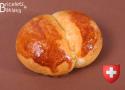
Ingrédients
-500 g de farine blanche
- 30 à 32 cl de lait entier pasteurisé
- 80 g de beurre
- 25 g de levure fraîche
- 10 g de sel
- 5 g de sucre
- 10 g d’extrait de malt
- 2 jaunes d’œuf + lait
Instructions
- Délayer la levure et le sucre dans le lait, tempéré en hiver ou froid en été.
- Dans la cuve de votre pétrin, mettre la farine, l’extrait de malt et le lait-levure. En première vitesse, pétrir 2 à 3 minutes jusqu’à ce que la pâte se forme.
- Couper le beurre froid en petits cubes et toujours en vitesse lente, l’ajouter petit à petit à la pâte.
- Ensuite en 2ème vitesse, pétrir pendant 3 à 4 minutes, la pâte va absorber tout le beurre et se détacher des parois de la cuve.
- Ajouter enfin le sel et continuer le pétrissage pendant encore 5 à 6 minutes, la pâte va devenir belle lisse et élastique.
- Contrôler l'élasticité de votre pâte en l'écartant doucement entre les doigts elle doit s'étendre et créer une fine membrane presque transparente. Si c'est le cas, c’est que le réseau de gluten s’est formé et la pâte est prête.
- Contrôler aussi la température de votre pâte, elle devrait se situer entre 23 et 25 degrés en fin de pétrissage.
- Sortir la pâte du pétrin, en faire une boule et la déposer dans un grand bol recouvert d’une feuille de plastique afin de la protéger des courants d’air. Laisser lever pendant 30 minutes à température ambiante. On appel cette phase le pointage et la pâte va commencer à fermenter.
- Reprendre la pâte à moitié fermentée puis la diviser en 15 pâtons de 60 g, les bouler et sur un torchon enfariné, laisser reposer pendant 30 minutes recouverts d’un torchon humide.
- Sur votre surface de travail enfarinée, reprendre les pâtons un à un et avec une petite baguette en bois (ici j'utilise un bout de crayon de couleur), presser fortement au milieu de chaque boule pour obtenir la forme typique du petit pain au lait, mais sans toutefois les couper.
- Ensuite les déposer sur une plaque de cuisson recouverte d’un papier sulfurisé.
- Laisser reposer les petits pains, à couvert pendant 15 minutes puis les dorer avec le jaune d’œuf mélangé à du lait.
- Dans un endroit abrité des courant d’air, laisser encore fermenter les pains pendant 20 à 30 minutes, selon la température de la pièce.
- Dorer une deuxième fois les petits pains et les enfourner dans le four préchauffé à 200 degrés. Après 5 minutes, régler le four à 180°C et continuer la cuisson pendant encore 10 minutes.
- Aussitôt cuits, laisser refroidir les pains sur une grille.

Ingredients
Dough
- 1 Tbsp/Packet Red Star Platinum Yeast
- ¾ Cup milk , warmed (not hot)
- 1/3 Cup sugar
- 3 Tbsp. softened butter
- ½ tsp. salt
- 1 egg
- 2 ½ + Cups unbleached, all-purpose flour
Filling
- 1/3 Cup peanut butter
- ½ Cup brown sugar
- If desired: mini chocolate chips
Frosting
- 1 Cup powdered sugar
- 2 Tbsp. peanut butter
- 2 Tbsp. milk
Instructions
- Place warm milk and yeast in EZ DOH bucket and stir to dissolve yeast.
- Let rest 1 minute.
- Add one cup of flour, then additional dough ingredients.
- EZ DOH-it for 2-3 minutes, or until dough is smooth and soft and all ingredients are incorporated.
- Remove dough from bucket, spray bucket with cooking spray, “smooth” dough and replace in bucket.
- Cover and let rise until doubled.
- Stir together filling ingredients.
- Remove dough from the bucket and roll out into a rectangle, about 12x9”.
- Spread with peanut butter filling ingredients.
- If desired, sprinkle with chocolate chips or chopped peanuts.
- Roll up tightly from the long side.
- Slice into 9 equal-sized rolls and place in a 9” greased round pan.
- Cover and let rise. (I like to cover with plastic wrap and place in the fridge. They will rise overnight and you can bake them in the morning).
- When risen, bake at 375 for 20-25 minutes, or until golden.
- Mix the frosting ingredients thoroughly, adding powdered sugar if too thin.
- Frost rolls while warm.

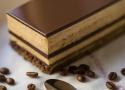
Ingredients
For the cake
- 240ml guinness
- 140g salted butter
- 70g cocoa powder + 2 Tbsp Black Cocoa Powder
- 300g Dark Brown Sugar
- 50g Golden Caster Sugar
- 180ml sour cream OR crème fraiche
- 2 large eggs
- 4g Flaked Salt
- 2 Tbsps vanilla extract
- 250g plain flour
- 2½ tsp baking powder
- 100g Dark or Milk Chocolate Chips
For the topping
- 3 tbsp baileys
- 140g icing sugar
- 300g Mascapone at room temperature
- 200ml double cream
- 1 Tbsp Vanilla Extract or bean paste
- Pinch of flaked salt
Instructions
- Preheat oven to 160°C Fan. Grease a 23cm tin with melted butter and set aside. I like to dust mine with a little cocoa powder too.
- In a large saucepan, combine the Guinness and butter. Place over medium-low heat until the butter melts, then remove from heat. Add the cocoa powder and caster sugar, and whisk until well blended. Combine all the ingredients together and bake for 55 minutes/ 1 hour, or until risen and firm. A skewer inserted into the centre should come out clean.
- Let the cake cool completely in the pan on a wire rack.
- Add all the topping ingredients together into the bowl of your stand mixer and using the beater attachment, beat together until thick and creamy.
- Once the cake is fully cooled, remove it from the pan and place it on a serving plate or cake stand. Spread the frosting over the top of the cake only, so it resembles the creamy head of a pint of Guinness.

Ingrédients
- 1 kg de farine
- 1 à 1½ cuillère à soupe de sel
- 2 cuillères à soupe de sucre
- 21 g de levure
- 6 dl de lait tiède
- 100 g de beurre fondu, refroidi
- 1 jaune d'œuf battu, pour badigeonner
- quelques raisins secs
Instructions
- Mélanger la farine, le sel et le sucre, puis former un puits.
- Délayer la levure dans un peu de lait, verser le tout dans le puits avec le reste du lait et le beurre.
- Pétrir jusqu’à obtenir une pâte souple.
- Laisser reposer à couvert à température ambiante jusqu’à ce que la pâte double de volume.
- Diviser la pâte en 12 portions égales.
- Former 3 morceaux à partir de chacune d’elles : une boule de la taille d’une noisette, qui servira de queue, un boudin d’environ 28 cm de long pour le corps, avec le reste de la pâte, former un morceau ovale d’environ 9 cm de long pour les oreilles.
- Entailler le morceau ovale au milieu pour former les oreilles.
- Pour le corps du lapin, enrouler le boudin.
- Assembler le corps, les oreilles et la queue du lapin directement sur la plaque préparée.
- Laisser les lapins lever encore une fois pendant le préchauffage.
- Badigeonner de jaune d’œuf et garnir de raisins secs (par ex. pour les yeux).
- Cuire 12 à 15 minutes au milieu du four préchauffé à 220 °C (chaleur supérieure/inférieure) (four à chaleur tournante 200 °C).

Ingrédients
Sirop
- 210 g d’eau
- 6 g d’anis étoilé
- 18 g d’écorce de citron, citron vert et orange ou de zestes
- 210 g de miel
- 100 g de cassonade
- 1 pincée de fleur de sel
Pâte
- 150 g de farine de seigle
- 70 g de farine T55 (ou T45)
- 3 g de cannelle moulue (3/4 de cuillère à café)
- 2 g de mélange à pain d’épices (1/2 de cuillère à café)
- 12 g de bicarbonate alimentaire
- 135 g de beurre
Finition
- ½ cuillère à soupe de gelée de coing
- 1 ou 2 bâtons de cannelle
Ingrédients
Crème citron
- 190g de sucre
- 120g de beurre fondu
- 3 œufs
- Jus + zeste de 3 citrons
- 1 pincée de sel
Pâte
- 300g de farine
- 175g de beurre
- 150g de sucre
- 75g de poudre d’amande
- 1 œuf + 1 jaune
- 1 c. à c. de levure
- 1 pincée de sel
- Quelques gouttes d’arôme d’amande mais pas obligé
Instructions
- Mélange farine, sucre, sel et beurre.
- Ajoute levure, œufs, arôme et poudre d’amande.
- Fonce ton moule et précuis 10 min à 180°C avec billes.
- Retire les billes et remets au four pour 10 min pour une base bien dorée.
- Mélange les ingrédients de la crème citron.
- Verse sur la pâte précuite et enfourne 30 à 40 min à 180 °C.
- Laisse bien refroidir avant de couper.


Ingrédients
- 500g de farine
- 10g de sel
- 10g de levure fraiche
- 350g d'eau
- 500g de beurre
- 500g de sucre
Voir aussi Recette de Kouign Amann. Le véritable Kouign amann - YouTube
Ingredients
- 1 cup butter
- 1 cup brown sugar
- 1 cup white sugar
- 2 eggs
- 1 tsp vanilla
- ¾ tsp salt
- 1 tsp baking soda
- 2 cups flour
- 1 cup chocolate chips
Instructions
- Melt butter in a cast iron.
- Turn off the heat
- Add remaining ingredients and mix.
- Bake on 325°F for 25 minutes.
Testé. Ce n'est pas concluant.
Ingrédients
- 1 bouteille de crémant de Loire
- 1 citron
- 15 cL de cointreau
- 12 cL de sirop de sucre de canne
Instructions
- Mettre au frais la bouteille de crémant de Loire.
- Presser le citron.
- Une fois que la bouteille est bien fraîche, verser le contenu dans un saladier et y ajouter le Cointreau, le sirop de sucre de canne et le citron pressé.
- Servir bien frais.
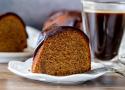
Ingredients
Coffee Bundt Cake
- 3 cups all-purpose flour (375 grams)
- 1 teaspoon baking powder
- ½ teaspoon baking soda
- ¼ teaspoon salt
- ½ cup unsalted butter (112 grams) softened
- ½ cup vegetable oil (120 ml) or canola
- 2 cup light brown sugar* (400 grams) packed
- 4 large eggs room temperature
- 1 cup sour cream (240 ml) room temperature
- 3 tablespoons instant coffee powder feel free to use 2 tablespoons for a less intense flavor
- 2 tablespoons hot water (30 ml)
Chocolate Ganache
- 4 ounces dark chocolate (112 grams) around 50%, or feel free to use semi-sweet`
- ½ cup heavy cream (120 ml)
Instructions
Coffee Bundt Cake
- Preheat the oven to 350F (180C or 160C fan forced).
- Whisk together the flour, baking powder, baking soda and salt.
- In a very large mixing bowl, beat together the butter, brown sugar and oil until creamy (seeing sugar granules is fine).
- Beat in the vanilla extract and eggs 1 at a time. Stop mixing when you no longer see pieces of egg in the batter.
- Turn off the mixer and scrape down the sides and bottom of the bowl. Add in about 1/2 of the flour mixture and beat on a low speed until just combined.
- Add the coffee grounds to the hot water int a small cup or bowl and stir. Add the coffee and sour cream to the cake batter and mix with the beater on a low speed until combined.
- Turn off the mixer and add in the rest of the flour mixture. With a hand held whisk, whisk until smooth.
- Brush a non-stick bundt pan with pan release/cake goop or grease and lightly dust with flour.
- Pour the batter into the prepared pan.
- Bake in the preheated oven for 45-55 minutes, or until an inserted toothpick comes out clean.
- Let the cake cool in the pan for about 15 minutes, then carefully invert the pan and slide the cake out.
Chocolate Ganache
- Chop the chocolate into very fine pieces and place in a heatproof bowl.
- Heat the cream until almost boiling.
- Pour the hot cream over the chopped chocolate. Let sit for 3-5 minutes, then whisk until smooth.
- If there are still some lumps of chocolate, microwave for 30-second intervals at medium heat (not high heat, which is often the default) and whisk between each interval until smooth.
Assembly
- If the bottom of the cake is very domed (what was the top while the cake was baking), gently saw off the rounded top using a serrated knife.
- Place the cake on a plate or cake stand that you plan to serve it on.
- Pour/drizzle the chocolate ganache over top, letting it drip over the sides.
J'ai testé. À reproduire !
Ingrédients
- 4 à 5 citrons non traités
- 1 beau morceau de gingembre frais bio (avec la peau)
- 60g de sucre
- 1L d’eau non chlorée
Instructions
- Presser les citrons, les placer dans un bocal avec le gingembre en morceaux, le sucre, puis recouvrir d’eau non chlorée.
- Bien mélanger, fermer le bocal, et laisser fermenter 3 à 5 jours à température ambiante (au-dessus de 20°C si possible).
- Remuer une fois par jour pour faire entrer les levures de l’air, qui favorisent la fermentation. Des petites bulles devraient apparaître : signe que ça prend vie !
- Filtrer la boisson, puis la transvaser dans une bouteille hermétique (type limonade) pour une seconde fermentation de 2 à 4 jours.
- Penser à dégazer quotidiennement pour éviter toute explosion ou geyser à l’ouverture !
- Placer au frais, et déguster bien frais.
Note c'est bon mais c'est très amer. À tester à l'orange pour voir si c'est mieux.

Fromages faciles
Autres styles
Styles légèrement plus complexe
Styles à plus long affinage
Ingrédients
Pâte sablée
- 125g de farine
- 1 pincée de sel
- 60g de beurre
- 25g de sucre
- 1 jaune d'œuf
- eau
Garniture
- 2 œufs
- 20cL de bière ambrée ou blonde
- 180g de vergeoise
- 30g de beurre
Instruction
Pâte sablée
- Mélanger le beurre mou coupé en cubes avec la farine et le sel et sabler à la main ou au robot avec la feuille
- Ajouter le sucre puis le jaune d'œuf
- Si besoin, ajouter de l'eau jusqu'à obtenir une boule lisse non collante
- Laisser 10 min au frigo et étaler dans le moule couvert de papier cuisson
- Placer au congélateur 30 min afin que les bords ne retombent pas
- Piquer et précuire la pâte à blanc pendant 10 min à 190°C
- S'il y a un surplus, préparer des motifs de décoration
Garniture
- Étaler la vergeoise sur la tarte précuite
- Mélanger les œufs et la bière et verser sur la tarte
- Enfourner 10 min à 210°C
- Sortir la tarte et repartir le beurre coupé en petits morceaux
- Poser les décorations en pâte s'il y en a
- Poursuivre la cuisson env. 20 min jusqu'à ce que la tarte soit bien dorée

Ingrédients
Garniture
- 250 ml (1 tasse) de mélasse
- 250 ml (1 tasse) de cassonade
- 3 œufs battus
- 250 ml (1 tasse) de lait
- 30 ml (2 c. à soupe) de beurre
- 5 ml (1 c. à thé) de jus de citron
- 30 ml (2 c. à soupe) de fecule de maïs
- 250 ml (1 tasse) de raisins secs
Pâte brisée
- 800 ml (3¼ tasses) de farine à pâtisserie
- 5 (1 c. à the) de sel
- 250 ml (1 tasse) de graisse végétale
- 125 ml (½ tasse) d'eau glacée
Instructions
- À feu moyen, faire chauffer la mélasse, la cassonade, les œufs, le lait, le beurre et le jus de citron.
- Épaissir avec la fécule de mais.
- Ajouter les raisins.
- Vider le tout dans une abaisse non cuite.
- Faire cuire au four à 175°C (350"F) pendant 35 à 40 minutes.
Pâte brisée
- Tamiser la farine et le sel.
- À l'aide d'un couteau enfariné, couper la graisse en petits morceaux; continuer à mélanger tout en coupant (ainsi, la pâte ne deviendra pas élastique).
- Arroser d'eau glacée et continuer de couper jusqu'à ce que la pâte "boule bien", sans coller aux doigts.


- {Tuto} Mon frigo de séchage à viandes - Cook'n'Roll
- Ail noir - Cook'n'Roll
- Boeuf Irlandais séché au piment doux - Cook'n'Roll
- Canard séché au Comté - Cook'n'Roll
- Filet de canard séché au foie gras - Cook'n'Roll
- Foie gras mi-cuit au chocolat - Cook'n'Roll
- Pastirma - viande séchée aux épices - Cook'n'Roll
- Porc séché - Cook'n'Roll
- Porc séché au frigo, comme une coppa - Cook'n'Roll
- Thon séché - Cook'n'Roll
Un blog que je viens de découvrir. Ça a l'air vraiment très bien !