Ingrédients
- 200g de sucre
- 250g d'amandes concassées
- 250g de fruits confits (cerise, orange, angélique)
- 1 cuillère à café de cannelle
- 1 cuillère à café de levure chimique
- 50g de beurre
- 50g de farine
- 6 œufs
Instructions
- Travailler les jaunes d’œufs et le sucre jusqu'à doubler le volume.
- Ajouter les amandes concassées cuillère par cuillère, la farine et la levure.
- Ajouter les fruits confits, la cannelle, le beurre en crème et les blancs battus en neige ferme.
- Beurrer et fariner un moule à manqué de 30 cm de diamètre.
- Faire cuire au four préchauffé à 180°C pendant 20 minutes.
- Baisser la température à 150°C et laisser 15 à 20 minutes.
- Éteindre le four et laisser le gâteau reposer 10 minutes avant de le sortir.
- Démouler à froid.
Note recette de gâteau de Noël portugais récupérée par ma maman dans les années 80


Ingredients
- 6 large egg yolks
- ½ cup granulated sugar
- 1 cup heavy whipping cream
- 2 cups milk
- ½ teaspoon ground nutmeg
- pinch of salt
- ¼ teaspoon vanilla extract
- ground cinnamon , for topping
- alcohol optional, see note
Instructions
- Whisk the egg yolks and sugar together in a medium bowl until light and creamy.
- In a saucepan over medium-high heat, combine the cream, milk, nutmeg and salt. Stir often until mixture reaches a bare simmer.
- Add a big spoonful of the hot milk to the egg mixture, whisking vigorously. Repeat, adding a big spoonful at a time, to temper the eggs.
- Once most of the hot milk has been added to the eggs, pour the mixture back into the saucepan on the stove.
- Whisk constantly for just a few minutes, until the mixture is just slightly thickened (or until it reaches about 160 degrees F on a thermometer). It will thicken more as it cools.
- Remove from heat and stir in the vanilla, and alcohol*, if using.
- Pour the eggnog through a fine mesh strainer into a pitcher or other container and cover with plastic wrap.
- Refrigerate until chilled. It will thicken as it cools. If you want a thinner, completely smooth consistency, you can add the entire mixture to a blender with 1 or 2 tablespoons of milk and blend until smooth.
- Serve with a sprinkle of cinnamon or nutmeg, and fresh whipped cream, if desired.
- Store homemade eggnog in the fridge for up to one week.

Ingredients
- 1 pound can fish or 2½ cups flaked, cooked fresh fish (I used a 14.75 ounce can of Salmon.)
- 3 eggs
- ½ cup soft bread crumbs (I tore 1 slice of bread into small pieces.)
- 1 tablespoon melted butter or shortening
- 1 teaspoon salt
- ⅛ teaspoon pepper
- 1 tablespoon chopped parsley
Instructions
- Preheat oven to 350° F.
- Separate the eggs.
- Put the egg whites in a mixing bowl, and beat until stiff. Set aside.
- Put the egg yolks in another mixing bowl; beat until smooth.
- Flake the fish and add to the bowl with the beaten egg yolks.
- Add bread crumbs, butter or shortening, salt, pepper, and parsley; stir to combine.
- Fold in the beaten egg whites.
- Put in a greased loaf pan, and place in oven and bake until firm (about 40 – 50 minutes).
- Remove from oven and cut into slices. If desired, serve with peas, cream or white sauce, egg sauce, or tomato sauce.

Ingredients
Meatloaf
- ½ medium onion diced
- 1 teaspoon butter
- 2 eggs
- ¾ cup milk
- ¾ cup Italian breadcrumbs or seasoned breadcrumbs
- 2 pounds lean ground beef 80/20
- 1 tablespoon ketchup or chili sauce
- 1 teaspoon Italian seasoning
- 2 tablespoons fresh parsley chopped, or 2 teaspoons dried parsley
- 1 teaspoon Kosher salt & ½ teaspoon black pepper more to taste
Meatloaf Sauce
- ½ cup chili sauce *see note
- ½ cup ketchup
- 2 tablespoons brown sugar optional
Instructions
- Preheat the oven to 350°F. Line a rimmed baking pan with aluminum foil and spray with cooking spray.
- In a small pan, cook onions in butter over medium low heat until tender. Let them cool completely.
- In a medium bowl, combine eggs, milk, and breadcrumbs. Let the mixture sit for 5-10 minutes.
- Add the ground beef, cooked onions, ketchup or chili sauce, Italian seasoning, parsley, and salt & pepper to the bowl. Mix until just combined.
- Form a 8"x4" loaf on the prepared baking pan and bake for 40 minutes.
- While the meatloaf is cooking, combine the chili sauce and ketchup (and brown sugar if using). Spread mixture over the meatloaf and bake for an additional 10-15 minutes or until cooked through and the meatloaf reaches an internal temperature of 160°F. Broil for 1-2 minutes if desired.
- Let the meatloaf rest for 10 minutes before slicing and serving.

Ingredients
- ½ pound butter, softened (2 sticks)
- ¾ cup plus 1 tablespoon granulated sugar
- ¾ cup packed light brown sugar
- 2 large eggs
- 1¼ teaspoons vanilla extract
- ¼ teaspoon freshly squeezed lemon juice
- 2¼ cups flour
- ½ cup rolled oats
- 1 teaspoon baking soda
- 1 teaspoon salt
- Pinch cinnamon
- 2⅔ cups Nestle Tollhouse semisweet chocolate chips
- 1¾ cups chopped walnuts
Instructions
- Cream butter, sugar and brown sugar in the bowl of a stand mixer on medium speed for about two minutes.
- Add eggs, vanilla, and lemon juice, blending with mixer on low speed for 30 seconds, then medium speed for about two minutes, or until light and fluffy, scraping down bowl.
- With the mixer on low speed, add flour, oats, baking soda, salt, and cinnamon, blending for about 45 seconds.
- Remove bowl from mixer and stir in chocolate chips and walnuts.
- Preheat oven to 300°F.
- Portion dough with a scoop (about 3 tablespoons) onto a baking sheet lined with parchment paper about 2 inches apart.
- Bake for 20 to 23 minutes, or until edges are golden brown and center is still soft.
- Remove from oven and cool on baking sheet for about 1 hour.
Ingredients
- 2 tbsp butter
- 2 tbsp mayo
- ½ tbsp Dijon mustard
- 3 cloves of garlic
- 1 tbsp parsley
- 1 tsp Italian herbs seasoning
- 1 tsp salt
C'est vraiment bon.
Je n'avais pas de persil ni de mélange d'herbes italiennes.
J'ai fait mon propre mélange d'herbes pour remplacer.
C'est testé et approuvé
Cette recette est parfaite pour 1 sandwich si on suit la vidéo ou 2 sandwich si on applique le mélange que sur sa face intérieure.

Ingredients for 10 yields
For the cake:
- 4 Eggs whites
- Pinch Salt
- ¼ cup + 2 Tbsp. (75g) Sugar
- 180-200g whole almonds or 140g ground almonds
For the cream:
- 4 Egg yolks
- ¼ cup + 2 Tbsp. (75g) Sugar
- 1 teaspoon Vanilla extract
- 100ml Heavy cream
- ½ cup + 1 Tbsp (130g) Butter, softened
For decoration:
- Sliced almonds
Instructions
- Make the cake: preheat oven to 170°C (340°F). Grease two 8-inch (20cm) round cake pans with butter, line bottom with parchment paper. Grease the parchment as well, set aside.
- In a food processor, process the almonds into fine crumbs. You also can use store bought ground almonds.
- In a large clean bowl, place egg whites and pinch of salt. Beat the egg whites with a pinch of salt until foamy, then gradually add the sugar, beat until stiff peak form.
- Gradually fold ground almonds into the meringue. Do not over fold. Divide the batter between prepared pans.
- Bake for 20-25 minutes. Allow to cool.
- Make the cream: in a bowl, whisk egg yolks with sugar and set aside.
- In a small saucepan bring the cream to a gentle simmer. Gradually pour hot cream into the egg yolk mixture while constantly whisking. Transfer the mixture back into the saucepan and cook until thicken, stirring constantly. Remove from heat, add vanilla extract and stir, transfer the mixture into a bowl, cover and place in the fridge for 1 hour.
- In a large bowl beat softened butter. Gradually add chilled cream and whisk until combined. Add 2-3 tablespoons at the time.
- Place 1 cake layer on a place or a cake stand, the spread a layer of cream, then top with the second layer cake. Spread the cream on top and sides of the cake.
- Decoration: toast almond flakes on a dry pan, allow them to cool. Then, decorate the side and top of the cake with toasted almond flakes.
- Keep the cake in the fridge for at least 4 hours before serving.

Cette liqueur est aussi appelée "liqueur d'officier" ou aussi "confiture de vieux garçon".
Le principe : malgré son nom, il ne s'agit pas d'une confiture mais de fruits à l'alcool!
Utiliser en quantités égales (100 g environ), tous les fruits de saison de mai à octobre à l'exception des agrumes et autres fruits exotiques (bananes, mangues, ...). Déguster aux environs de Noël et toujours avec modération.
La recette :
-
Utiliser un grand bocal en verre ébouillanté et fermant hermétiquement.
-
Au fil des saisons, de mai à octobre, placer des fruits sains, lavés et essuyés, dans le bocal.
-
Ajouter la moitié du poids en sucre, recouvrir d'alcool de fruits (acheté au supermarché).
-
Fermer hermétiquement. Entre chaque ajout de fruit, conserver au frais et à l'abri de la lumière et compléter d'alcool si le niveau vient à baisser.
-
Incorporer successivement :
- fraises (petites et fermes) (fait)
- cerises (équeutées) (fait)
- groseilles (égrappées) (fait)
- framboises (fait)
- cassis (égrenés) (fait)
- pêches (pelées, dénoyautées et coupées en dés) (fait)
- abricots (pelés, dénoyautés, coupés en deux) (fait)
- nectarines et brugnons (dénoyautés, coupés en quatre) (fait)
- melon en dés (fait)
- prunes : mirabelles (fait), Reine-Claude (fait), quetsches
(coupées en deux et dénoyautées) - grains de raisins blancs et noirs (fait)
- poires (pelées, épépinées et en dés) (fait)
- ...
Il faut attendre 3 mois avant de déguster cette liqueur.
Conseils et suggestions :
-
Ne mettre qu'en très petite quantité les fruits très aqueux tels que fraises, melon et poires.
-
Surveiller régulièrement pour vérifier que des moisissures n'apparaissent pas. Si elles apparaissent, les retirer et ajouter un peu d'alcool.
-
En guise de conseil de dégustation, vous pouvez vous en servir pour agrémenter des desserts comme des coupes de fruits, des glaces.
Here a recipe for all who want to try it
- 595grams of flour (Tipo 00 flour)
- 386grams Of water (cool temperature)
- 18 grams of salt
- One teaspoon of dry yeast or a quarter of fresh yeast block
If you don’t have tipo 00 flour use type 405 which is very similar but little less water.
Important: mix the flour and salt because yeast hates salt. Let the yeast dissolve in the water and then put it slowly in the flour to mix it well and then knead. I only can recommend a technique to knead it correctly.
Let it rest in a bowl for 3 hours but cover it with a wet kitchen blanket to keep the dough humid. That is very important to prevent it from drying
Ingrédients
Pour l’éponge
- 310 ml d’eau tiède
- 5 gr de levure boulangère type saf
- 1 cuillère à soupe de sucre en poudre
- 1 cuillère à soupe de farine tout usage
Pour la pâte
- 400 gr de semoule fine
- 100 gr de farine
- 9 gr de sel
- 2 cuillères à soupe de sucre
- 50 ml d’huile d’olive
- 50 ml huile neutre
- 1 jaune d’œuf pour la dorure
- Mélange graines
Instructions
- Dans le bol du pétrin, mélanger ensemble l’eau tiède, le sucre, la levure boulangère et la cuillère de farine.
- Couvrir et laisser fermenter 30 minutes.
- Ajouter ensuite la semoule fine (ou extra fine), la farine, le sucre le sel et lancer le pétrissage vitesse 2.
- La pâte doit devenir souple et lisse. Si la pâte manque d’eau, rajouter une cuillère à soupe à la fois pour obtenir cette texture.
- Incorporer alors l’huile en filet toujours en pétrissant.
- La pâte devient parfaitement lisse avec des bulles d’air par endroit.
- Couvrir et mettre à lever dans un endroit à l’abri des courants d’air (four fonction étuve) pour 2 heures de pousse.
- Dégazer la pâte et façonner une ou deux galettes en fonction de votre moule.
- Badigeonner de jaune d’œuf battu et parsemer de graines.
- Laisser de nouveau lever pour 45 minutes et enfourner le pain au four préchauffé th. 185°C pour 25 minutes de cuisson.Le pain doit être bien doré.
- Laisser reposer sur une grille avant de le découper.
Colle à la farine
Délayez de la farine (de préférence de seigle) avec un peu d'eau, de façon qu'il n'y ait pas de grumeaux. Sur ce mélange versez de l'eau bouillante jusqu'à consistance de bouillie claire. Continuez à chauffer en agitant sans cesse avec une spatule en bois. Si la colle est trop épaisse, éclaircissez en ajoutant un peu d'eau. Cette colle est ordinairement utilisée pour la pose des papiers peints.
Colle de farine imputrescible et insecticide
Pour rendre la colle imputrescible il suffit d'ajouter au mélange eau-farine de l'essence de térébenthine dans la proportion d'un verre à vin par litre de colle. La « prise » de cette colle peut être retardée par l'apport de sucre en poudre (2 cuillerées à soupe par litre de colle), ce qui peut être intéressant pour certains types de travaux. L'essence de térébenthine ayant des propriétés insecticides, son usage est particulièrement indiqué pour la pose de papiers peints dans les maisons anciennes ou la garniture intérieure de meubles anciens.
Colle de riz
Cette colle est très blanche, transparente et d'une force extraordinaire; aussi l'emploie-t-on de préférence pour le cartonnage de luxe. En mettant moins d'eau vous obtiendrez une colle idéale pour réaliser des objets en papier mâché.
Délayez de la farine de riz (en vente dans les épiceries sous le nom de « crème de riz ») dans de l'eau froide (comptez 200 g de farine pour ½ litre d'eau). Lorsque le mélange aura-la consistance d'une pâte à crêpes, faites-le cuire sur feu doux pendant une dizaine de minutes.
Colle pour faïence
Prenez une poignée de fleur de farine de froment et pétrissez-la avec un peu d'eau, de manière à obtenir une pâte ferme et liée. Continuez à pétrir cette pâte sous un robinet d'où s'écoule un mince filet d'eau. Lorsque l'eau s'écoule claire et limpide d'entre les doigts, la pâte est changée en gluten, colle d'une solidité extraordinaire qui convient à la restauration des faïences.
Colle pour la porcelaine
Mélangez ½ litre d'eau-de-vie ordinaire à la même quantité d'eau. Ajoutez-y, en délayant, 30 g d'amidon et 50 g de craie finement pulvérisée. Ajoutez 15g de colle forte de menuisier « à l'ancienne ». Mettez sur le feu jusqu'à ébullition, ajoutez alors 15g de térébenthine. Mélangez bien le tout.

Un index de recettes de sauces piquantes. Il y en a même une à faire à partir de piments déshydratés.
Old-fashioned soda cookies
Ingredients
- 2 c. sugar
- 2 eggs
- 1 c. lard
- 1 c. sour milk or buttermilk
- 1 tsp. vanilla
- ½ tsp. nutmeg
- 1 tsp. soda
- ½ tsp. baking powder
- ½ tsp. salt
- 4 to 6 c. flour
Instructions
- Cream sugar, eggs and lard together; add sour milk, vanilla and nutmeg.
- Sift soda, baking powder and salt with flour; mix to a stiff dough.
- Roll out on bread board about 1/8-inch thick; cut with cookie cutter.
- Sprinkle with additional sugar.
- Bake in 275 to 300-degree oven until done. These cookies may be filled.
Note j'aime beaucoup ça. C'est tout simple mais ça doit bien se marier avec du chocolat ou de la confiture. Attention, ça fait beaucoup de biscuits. J'en ai eu 75. J'ai cuit 20 minutes à 300 degrés.
Pineapple cookies
Ingredients
- 1 cup shortening
- 1½ cups sugar
- 1 egg
- 1 can (8¾ oz.) crushed pineapple, with juice
- 3½ cups all-purpose flour
- 1 tsp. soda
- ½ tsp. salt
- ¼ tsp. nutmeg
- ½ cup chopped nuts
Instructions
- Mix shortening, sugar and egg thoroughly.
- Stir in pineapple.
- Stir together flour, soda, salt and nutmeg; blend in.
- Mix in nuts.
- Chill at least 1 hr.
- Heat oven to 400°F.
- Drop rounded teaspoonfuls of dough about 2 inches apart on lightly greased baking sheet.
- Bake 8 to 10 min., or until no imprint remains when touched lightly.
Snow on the mountain cookies
- Cream together
- 1½ c. shortening
- 1 c. brown sugar-light
- 2 - 1. baker unsweetened squares melted
- 1 well heated egg
- Sift together
- ¼ tsp salt
- 2 c. flour
- ¼ tsp. (baking) soda
- add alternately with ½ c. buttermilk, 1 tsp. vanilla, ¾ c. chopped nuts
- bake 12 min at 350°F
- frost with powdered sugar frosting

Ingredients
- 5 Lemons
- ⅓ cup (80ml) Lemon juice
- 2 tablespoons Lemon zest
- ½ cup + 2 tablespoons (125g) Sugar
- 2 cups (480ml) Heavy Cream/Double cream
- 1 teaspoon Vanilla bean paste (optional)
Instructions
- Wash the lemons well and let them dry.
- Cut lemons in half longwise, then using a spoon, scoop out the inside of the lemons. Do it very carefully.
- Place the lemons you scoop out in a sieve and squeeze 1/4 cup of lemon juice.
- In a small saucepan mix sugar and lemon zest. Add heavy cream.
- Heat over medium-low heat, bring to a simmer, stirring constantly. Simmer for about 3 minutes. Until you see gentle bubbles.
- Remove from heat, add lemon juice and whisk to combine. Allow to cool for 10 minutes.
- Strain through a fine mesh strainer to remove zest – this step is optional.
- Pour the mixture into the lemon shells. You also can serve in on cups/ramekins.
- Allow to cool completely to room temperature, then refrigerate for at least 2 hours or until set. Keep covered in the fridge.
Ingrédients
- 1 magret de canard
- 1 foie gras éveiné non assaisonné
- gros sel de guérande
- 1 cas large de sel fin
- 1 cas rase de poivre moulu
Instructions
- nettoyez le magret de canard et placez le 15 heures dans le gros sel, au frigo.
- rincez le et séchez le bien avec de l'essuie-tout.
- ouvrez le en portefeuille sans aller jusqu'au bout.
- assaisonnez le foie gras avec le sel fin et le poivre moulu, massez pour bien faire pénétrer.
- mettez une belle tranche de foie gras assaisonné à l'intérieur du portefeuille de canard et refermez.
- ficelez bien serré et enroule le tout dans un torchon propre.
- placez le tout dans le bas du frigo pendant 3 semaines avant de déguster.
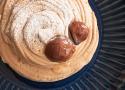
Ingrédients
- 150 g Crème de marron
- 0,5 l Crème liquide
- 20 g Sucre glace
Instructions
- Commencez par monter la crème liquide au batteur en chantilly et ajoutez à la fin le sucre glace.
- Dans un saladier, mettez la crème de marrons et mélangez avec un fouet un peu de crème fouettée à la crème de marrons petit à petit, en soulevant délicatement la crème fouettée.
- Plus vous allez incorporer de l’air et plus votre crème sera légère.
- Versez le mélange et mettez dans des ramequins ou des coupes à glace.
- Placez votre mousse à la crème de marrons au frigo afin qu’elle puisse prendre et refroidir.
J'ai fait ça pour les fêtes.
C'est super bon.
J'ai mis plus de crème de marron (≈ 2x) pour réhausser le goût qui est un peu trop subtil.
J'ai servi ça avec des brisures de marrons glacés et une gavotte.
Ingredients
- ½ cup unsalted butter, room temperature
- ½ cup tahini
- 1 c sugar
- 1 large egg
- 1 egg yolk
- 1 tsp vanilla
- 1 cup + 2 tb flour
- ½ tsp baking soda
- ½ tsp baking powder
- 1 tsp kosher salt
- 1¾ cup valrhona discs (64% cocoa)
- maldon salt
Instructions
- In the bowl of an electric mixer fitted with a paddle attachment, cream the butter, tahini, and sugar together on medium speed until light and fluffy, about 5 minutes. add the egg, egg yolk, and vanilla and continue mixing on medium for another 5 minutes. sift the flour, baking soda, baking powder, and salt into a large bowl and combine. add the flour mixture to the butter mixture and mix on low until just combined. add the chocolate discs and mix them in by hand with a rubber spatula.
- Line a baking sheet with parchment paper. using a 2-ounce ice cream scoop, scoop out 12 dough balls and place them on the baking sheet. wrap the baking sheet with plastic wrap and place it in the freezer for no less than 12 hours. this will allow the gluten in the flour to relax and will give you a tender soft cookie. do not skip this step.
- At this point you can bake 1 or bake 12. keep the cookie dough balls in zip-top bags in the freezer for up to 6 months.
- Preheat the oven to 325ºf and line a baking sheet with parchment or a silicone mat. space the cookie dough balls at least 3” apart to allow for them to spread. bake for 13-16 minutes until just golden brown around the edges. they will still look fairly unbaked in the middle, which is perfect. sprinkle each with maldon salt when they come out o the oven. allow to cool for 20 minutes on the baking sheet or cooling rack.
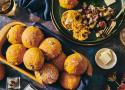
Ingredients
- 4¾ cups (570g) King Arthur Unbleached All-Purpose Flour
- 1 teaspoon cinnamon
- ¼ teaspoon ginger
- ¼ teaspoon cloves, optional
- ¼ cup (50g) light brown sugar or dark brown sugar, packed
- 1½ teaspoons (9g) table salt
- 1 tablespoon (10g) instant yeast
- ¾ cup (170g) pumpkin purée or squash purée
- 2 large eggs
- ¾ cup (170g) water
- 4 tablespoons (57g) butter, softened
- ¾ cup (128g) dried cranberries or golden raisins
- ¼ cup (46g) crystallized ginger, diced
Instructions
- Weigh your flour; or measure it by gently spooning it into a cup, then sweeping off any excess. Mix and knead all of the dough ingredients except the fruit and crystallized ginger — by hand, mixer, or bread machine — until you've made a soft, fairly smooth dough. Pumpkin varies in water content, so add extra water or flour if needed. Right at the end, knead in the fruit and crystallized ginger.
- Place the dough in a lightly greased bowl, cover the bowl, and allow the dough to rise for 1 1/2 hours, until it's almost double in bulk.
- Turn the dough out onto a lightly greased surface, gently deflate it, and divide it into 16 pieces, roughly 2 3/4 ounces each.
- Roll each piece into a ball. Place rolls in the lightly greased cups of a couple of standard muffin pans (which will help them maintain their round shape); or onto a greased or parchment-lined baking sheet.
- Set aside, covered lightly, to rise for 1 hour, or until the rolls look puffy.
- Preheat the oven to 350°F.
- Bake the rolls for 25 to 30 minutes, until they're lightly browned and the center of one reads 190°F on an instant-read thermometer.
- Remove the pans from the oven and turn the rolls out onto a rack to cool. Serve warm or at room temperature.
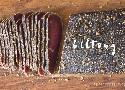
Ingredients
- 2000 g Beef—silverside or toprump
- 5 Tbsp Brown (malt) or cider vinegar
- 2.5 Tbsp Coarse salt (2% of the meat weight)
- 2 tsp Ground black pepper
- 2 Tbsp Coriander seed
- 1½ Tbsp Brown sugar (optional)
Instructions
- Toast the coriander seeds in a dry pan, then grind down in a pestle and mortar or spice grinder. It should be mostly powder, with a few pieces of seed shells left in.
- Using a sharp knife, following the grain of the meat, cut into 1 inch (2.5cm) thick lengths and place in a non-metallic container.
- Combine all the spices and sprinkle into the meat. Sprinkle the vinegar on and rub everything in thoroughly whilst turning the meat with your hands.
- Cover the container and let your biltong cure for 24 hours in the fridge, turning and rubbing through the meat occasionally.
- Remove the meat from the container and pat dry with kitchen towels, taking care not to remove too much of the spice.
- Add a hook to the thickest end of each length. Plastic-covered paper clips make for a cheap solution. Hang in your biltong box, or in a well aired, ventilated space with a fan blowing gently to increase air flow. Do not point a fan directly at the meat (to avoid case hardening). Make sure none of the pieces are touching. Place some newspaper below the meat to catch any liquid.
- Drying times will vary with humidity, airflow and temperature. Test the readiness of your biltong every couple of days by squeezing the sides together with clean fingers. If you feel any give in the meat, it’s still ‘wet’ inside.
- Once ready, cut into thin slices with a sharp knife and enjoy some of the best meat you’ll ever eat.
Notes
- if using cheaper cuts of game or beef, add 1 tsp of bicarbonate of soda per kg to tenderize the meat.
- if you don’t have any coarse salt and need to substitute with table salt, double-check that it’s not iodized salt – iodine leaves a bitter taste in the mouth.