


C'est une bonne idée pour avoir une représentation visuelle d'une année. Ici, c'est fait par rapport aux températures mais ça pourrait être fait par rapport à d'autres indicateurs.
Quelques exemples intéressants :

Ingredients
- 2 cups sugar
- ⅔ cup cocoa
- 6 tablespoons flour
- 1 teaspoon salt
- 2 cups milk
- 2 tablespoons butter
- 2 teaspoons vanilla
Instructions
- Mix dry ingredients together well.
- Add milk and cocoa.
- Heat until thick, stirring constantly.
- Add butter and vanilla and whisk until melted.
- Serve warm

Ingrédients
- 1 kilo de pommes de terre longues à chair ferme
- 4 belles tranches de lard maigre
- 2 oignons
- 4 cuillères à soupe d’huile (ou du saindoux)
- 2 cuillères à soupe de farine
- 2 ou 3 gousses d’ail
- Thym, laurier, persil, sel et poivre
Instructions
- Dans une cocotte en fonte, faire revenir à feu moyen une belle tranche de lard par convive.
- Lorsque le lard est doré, le retirer de la cocotte et réserver.
- Ajouter de l'huile et augmenter le feu. Faire rôtir les pommes de terre entières ou coupées en deux selon la taille.
- Lorsque celles-ci sont dorées (pas noires), les retirer de la cocotte et réserver.
- Ajouter les oignons coupés en rouelles, éventuellement un peu d'huile, et faire blondir à feu moyen.
- Ajouter de la farine et faire un roux en grattant bien le fond de la cocotte.
- Remettre les pommes de terre, mouiller pour juste couvrir les légumes.
- Ajouter une branche de thym, une feuille de laurier, deux ou trois gousses d'ail, sel et poivre.
- Laisser cuire à feu doux pendant 45 minutes environ, puis remettre dans la cocotte les tranches de lard.
- Juste avant de servir, parsemer votre cacasse à cul nu de persil frais et rectifier l'assaisonnement.
Ingrédients
- 8 tasses tomates vertes
- 3 tasses oignons
- ½ cuillère à thé graine de céleri
- ¼ cuillère à thé poivre de Cayenne
- 2 tasses sucre
- 2 tasses vinaigre blanc
- ¼ tasse épices à marinade dans un coton fromage
Préparation
- Laver et couper les tomates vertes en dés.
- Couper les oignons en dés.
- Dans une grande marmite, mêler le vinaigre, le sucre, les graines de céleri et le poivre de Cayenne.
- Ajouter les légumes.
- Ajouter les épices à marinade, enrobés dans un coton fromage.
- Faire mijoter jusqu'à ce que les légumes soient cuits, en brassant de temps en temps.
- Verser dans des bocaux stérilisés et sceller.

The following is a list of all National Parks included in Olson’s route:
- Grand Canyon National Park, Arizona
- Petrified Forest National Park, Arizona
- Saguaro National Park, Arizona
- Guadalupe Mountains National Park, Texas
- Carlsbad Caverns National Park, New Mexico
- Big Bend National Park, Texas
- Hot Springs National Park, Arkansas
- Mammoth Cave National Park, Kentucky
- Great Smoky Mountains National Park, Tennessee
- Everglades National Park, Florida
- Dry Tortugas National Park, Florida
- Biscayne National Park, Florida
- Congaree National Park, South Carolina
- Shenandoah National Park, Virginia
- Acadia National Park, Maine
- Cuyahoga Valley National Park, Ohio
- Isle Royale National Park, Michigan
- Voyageurs National Park, Minnesota
- Theodore Roosevelt National Park, North Dakota
- Badlands National Park, South Dakota
- Wind Cave National Park, South Dakota
- Rocky Mountain National Park, Colorado
- Great Sand Dunes National Park and Preserve, Colorado
- Black Canyon of the Gunnison National Park, Colorado
- Mesa Verde National Park, Colorado
- Canyonlands National Park, Utah
- Arches National Park, Utah
- Capitol Reef National Park, Utah
- Bryce Canyon National Park, Utah
- Zion National Park, Utah
- Great Basin National Park, Nevada
- Grand Teton National Park, Wyoming
- Yellowstone National Park, Wyoming
- Glacier National Park, Montana
- North Cascades National Park, Washington
- Mount Rainier National Park, Washington
- Olympic National Park, Washington
- Crater Lake National Park, Oregon
- Redwood National and State Parks, California
- Lassen Volcanic National Park, California
- Yosemite National Park, California
- Kings Canyon National Park, California
- Sequoia National Park, California
- Pinnacles National Park, California
- Channel Islands National Park, California
- Joshua Tree National Park, California
- Death Valley National Park, California

Comment faire des trous dans des pierres. Tuto !
On s'entend que ce n'est pas des carbonara mais ça a quand même l'air super bon !
Ingrédients
- 500 g de pommes de terre
- 200 g de lardons fumés
- 3 œufs
- 100 g de parmesan râpé
- 20 cl de crème fraîche
- Poivre, persil frais
Instructions
- Épluchez et coupez les pommes de terre en cubes. Faites-les cuire dans de l'eau bouillante salée jusqu'à ce qu'elles soient tendres.
- Faites revenir les lardons dans une poêle jusqu'à ce qu'ils soient dorés.
- Dans un saladier, battez les œufs avec la crème fraîche, le parmesan râpé et du poivre.
- Égouttez les pommes de terre et ajoutez-les dans la poêle avec les lardons.
- Versez la préparation à base d'œufs sur les pommes de terre et mélangez rapidement pour que les œufs cuisent et enrobent les pommes de terre.
- Servez chaud, saupoudré de persil frais haché.

J'ai découvert cette recette chez mon amie -M-. Très bon !
Ingredients
Brown Sugar Crumble
- 1 cup (132g) all purpose flour
- ½ cup (105g) light brown sugar, packed
- ½ cup (100g) granulated sugar
- 1 tsp ground cinnamon
- Pinch of kosher salt
- ½ cup unsalted butter, melted
Blueberry Sour Cream Coffee Cake
- 1½ cups (195g) all purpose flour
- 1 tsp baking powder
- ¼ tsp baking soda
- ½ tsp kosher salt
- 6 tbsp unsalted butter, room temp
- ¾ cup (150g) granulated sugar
- 1 large egg, room temp
- ½ tsp vanilla extract
- Scant ¼ tsp almond extract (optional)
- ¾ cup (185g) sour cream, room temp
Blueberries
- 2 cups (270g) fresh blueberries (see notes for frozen instructions)
- Zest of 1 lemon
- 1 tbsp cornstarch
Lemon Icing (optional)
- ½ cup (55g) powdered sugar
- ½ tbsp milk
- ½ tbsp lemon juice
Instructions
Brown Sugar Crumble
- In a medium bowl, whisk together all of the dry ingredients.
- Pour in the melted butter and mix to combine. It should be evenly moistened with a mix of large and small clumps.
- Place in the refrigerator while we make the batter.
Blueberry Sour Cream Coffee Cake
- Preheat the oven to 350°F and grease and line the bottom of a 9″ springform pan.
- In a medium bowl, whisk together the flour, baking powder, baking soda, and salt. Set aside.
- In a large mixing bowl using a hand or stand mixer with the paddle attachment, mix together the butter and sugar until light and fluffy.
- Then mix in the egg and extracts, followed by the sour cream.
- Before mixing in the dry ingredients, first prep the blueberries.
- Place the clean blueberries in a bowl and toss with the zest. Then toss with the cornstarch.
- Now back to the batter. Mix in the dry ingredients and just before it’s all combined, add in half of the blueberries.
- Switch to a rubber spatula and mix in the berries by hand, careful not to break them. The batter will also be VERY thick.
- Spread the batter in the bottom of the prepared pan and top with an even layer of the remaining blueberries.
- Top with a layer of the chilled crumble and bake for 45-50 minutes, or until a toothpick in the center comes out clean with a few moist crumbs.
- Allow the cake to cool for about 1 hour at room temperature.
- For the icing, whisk together all of the ingredients and drizzle over the cooled cake.
- Now slice and enjoy!
Ingredients
- 1+½ cup (260g) dark chocolate, melted
- 1 cup boiled rice
- ½ hot water
- Cocoa powder, for dusting
Process
- Begin by melting dark chocolate in the microwave, heating it in 30-second intervals until it is completely melted.
- In a blender, combine cooked rice, boiled water, and the melted dark chocolate. Blend until you achieve a smooth, velvety mousse like texture.
- Pour the mixture into a bowl and refrigerate it for 2 hours until it sets.
- Once the pudding is set, dust the top with cocoa powder and enjoy!

Ingrédients
- 400 g fromage frais Philadelphia nature à température ambiante
- 400 g mascarpone à température ambiante
- 200 g sucre en poudre
- 5 oeufs à température ambiante
- 320 g crème liquide entière 30%mg à température ambiante
- 26 g maïzena
- 1 cs extrait naturel de vanille
Préparation
- Préchauffer le four à 225° chaleur traditionnelle (non tournante). Beurrer légèrement un moule à charnière de 20cm de diamètre. Découper deux grands carrés de papier cuisson (environ 30-40cm de côté). Disposer le premier papier dans le moule : il va adhérer grâce au beurre. Il y aura des plis sur les côtés ce n'est pas grave, ça donne le charme au cheesecake. Disposer le second papier cuisson pour éviter tout écoulement. Les papiers doivent dépasser de 3cm minimum au dessus du moule.
- Dans un large récipient, mélanger le philadelphia et le mascarpone pour les détendre. Ajouter le sucre et mélanger pendant 3 minutes.
- Ajouter les oeufs un à un en fouettant entre chaque pour bien les incorporer (j'utilise mon batteur électrique pour cette recette, voir matériel ci-dessus).
- Tamiser la maïzena puis incorporer à la pâte en fouettant environ 2 minutes : il ne doit pas y avoir de grumeaux.
- Enfin, verser la vanille, puis la crème liquide en filet tout en fouettant pour avoir un mélange final bien lisse.
- Verser la pâte dans le moule préparé. Taper le fond du moule contre le plan de travail pour éliminer le maximum de bulles d'air.
- Enfourner environ 40-45 minutes : cela dépend beaucoup de votre four. Il faut que le dessus soit bruni (pas noir non plus). Il va gonfler un peu sur les côtés mais ça retombera ensuite. Le centre du cheesecake doit bouger comme un flan : on a l'impression que ce n'est pas cuit, mais c'est suffisant pour une texture crémeuse à la dégustation. Plus on le cuit, moins il sera crémeux.
- Hors du four, déposer le moule sur une grille pour refroidissement. Placer ensuite au moins 4 heures au réfrigérateur (non couvert) pour qu'il prenne sa texture finale (une nuit c'est bien aussi).
C'est super bon, très facile. Le rapport temps passé vs résultat est très favorable. À refaire !


Décidément, un rien vous habille !
Petit éloge de la nudité
Si j’apprécie le fait de nager ou de faire un sauna tout nu, le naturisme ne m’avait jamais réellement attiré. Sans juger ceux qui le pratiquaient, je considérais que ce n’était tout simplement pas pour moi.
Jusqu’au jour où un couple d’amis est parti vivre à l’étranger. Depuis trente ans, ils passent toutes leurs vacances dans un centre naturiste. Ils nous ont invités à les rejoindre une semaine.
J’ai tout d’abord rechigné. Mes plus bas instincts patriarcaux, dont j’ignorais jusqu’à l’existence, se sont rebellés à l’idée que mon épouse soit nue au milieu d’étrangers. Mais elle a argué que nous n’aurions plus beaucoup d’opportunités de revoir nos amis, que je n’étais pas obligé de l’accompagner, que ce n’était que quelques jours, qu’au pire, cela ferait une expérience intéressante.
J’ai opposé un mâle refus catégorique. C’est ainsi que, quelques mois plus tard, nous avons débarqué en famille avec armes et (trop de) bagages au sein d’un gigantesque complexe naturiste.
La première chose qui m’a rassuré fut de constater que beaucoup de gens étaient bel et bien habillés. Si la nudité est obligatoire à la plage et à la piscine, le reste du camp est entièrement libre.
Force est de constater que, durant les premières heures, mon regard fut irrémédiablement attiré par ces corps nus marchant, faisant du mini-golf, du vélo ou de la pétanque. Mon esprit y voyait quelque chose d’anormal, de choquant. Moi-même, je ne me déshabillais que pour accéder à la plage.
Et puis, bien plus rapidement que tout ce que j’avais pu imaginer, mon sentiment de normalité a basculé. Ces jeunes, ces vieux, ces vieilles, ces hommes, ces femmes, ces enfants, ces ados, ces gros·ses, ces maigres. Tou·te·s sont devenu un brouillard couleur chair bronzée dans lequel je me mouvais sans avoir à faire attention à ma propre apparence, à l’image que je véhiculais.
Une nudité normale, respectueuse et déconnectée
Depuis les zones de campings de tentes Décathlon aux larges chalets devant lesquels sont garées des Tesla flambant neuves, le camp naturiste fédère un panaché de catégories sociales. Pourtant, une fois dégagées de l’incontournable apparat des vêtements, les classes ne se distinguent plus. Une sensation d’égalité se dégage.
Très vite, mon propre corps m’est apparu comme parfaitement normal, banal. Ni le plus gros, ni le plus maigre, ni le plus musclé, ni le plus malingre. J’ai acquis la conviction particulièrement reposante qu’il n’intéressait personne. Ce fait est particulièrement important pour les femmes habituées à être reluquées. Mon épouse m’a confié l’étonnant sentiment de confiance de se sentir nue sur la plage avec un respect naturel des hommes. Car, dans un camp naturiste, un homme indélicat ne va pas s’attarder sur un corps comme il peut le faire en temps normal sur un décolleté ou un string. Les corps nus sont la normalité.
Il faut avouer que cette ambiance respectueuse est rendue possible par l’organisation d’une sécurité impressionnante. De jeunes jobistes patrouillent en permanence. Tout comportement indélicat est immédiatement sanctionné et, en cas de récidive, peut mener à l’exclusion.
La liberté de la nudité n’est pas simplement psychologique. Elle est également matérielle. Mon épouse et moi-même avons découvert que nous avions prévu beaucoup trop de linge pour la semaine. Pas de linge, pas de lessive, pas d’usure, pas de besoin de renouveler une garde-robe. Outre l’égalité, la nudité offre une contre-mesure incroyable au consumérisme.
Nous qui ne supportons pas le tabac, nous avons également rarement été aussi peu dérangés par la cigarette. Si certains fument, ils m’ont semblé moins nombreux que dans les endroits que je fréquente habituellement. Philosophiquement, le refus du tabac et le l’alcool font partie des fondements historiques du naturisme. Il est d’ailleurs interdit de fumer sur l’île naturiste du Levant, dans le Var.
Une règle évidente d’un camp naturiste est l’interdiction de prendre des photos sur lesquelles peuvent apparaitre d’autres membres. Cela semble logique, mais cela a un impact profond : l’immense majorité des vacanciers se déplace sans smartphone. Sans poche, c’est d’ailleurs peu pratique. À quelques rares exceptions près, je n’ai vu personne rivé sur son écran durant toutes la semaine. En croisant des bandes d’adolescents qui se retrouvaient ou se déplaçaient, je fus plus frappé par la disparition totale des smartphones que par l’absence de vêtements.
En les voyant faire du surf ou des concours de poirier, la nudité souriante de ces corps élancés m’est apparue comme une métaphore de la déconnexion.
La contre-sexualisation de la nudité
L’une de mes craintes inconscientes avant de pratiquer le naturisme était certainement l’aspect sexuel. Je ne supporte ni le voyeurisme ni l’exhibitionnisme et j’avais peur de me retrouver au milieu d’une population pratiquant une forme douce des deux.
Je m’étais totalement fourvoyé.
Ce n’est pas la nudité qui sexualise. C’est nous qui sexualisons la nudité en la cachant, en la rendant honteuse.
Nous avons tellement peur que nos enfants soient confrontés à la violence de la pornographie en ligne que nous en oublions que c’est l’une des seules occasions durant laquelle ils seront confrontés à la nudité. Le corps est alors irrémédiablement associé au sexe, à la violence, à l’humiliation.
L’hyper sexualisation de la nudité est poussée à l’extrême par les religions qui cherchent à camoufler le corps des femmes. Mais, d’une manière générale, toutes les religions monothéistes rejettent violemment la nudité. En cachant le corps, on génère artificiellement la honte et la violence. On transforme le corps en marchandise tout en soumettant l’esprit aux dictats religieux.
À l’inverse, l’ostentation si prisée par le consumérisme est également délétère. Sur tout le séjour, une seule personne m’a négativement impactée. Une femme sur la plage qui, bien que nue, portait de lourds bracelets aux poignets et aux chevilles, un collier, des lunettes de soleil de marque, un chapeau compliqué. Marchant avec des sandales aux talons surélevés, elle fumait de longues et très fines cigarettes. Il m’a fallu quelques secondes avant de comprendre pourquoi j’avais été choqué. Contrairement aux milliers d’autres naturistes, cette personne mettait sa nudité en scène. Elle perpétuait, probablement sans en être conscient, le jeu capitaliste de la marchandisation des corps. Le fait qu’elle ait été la seule de tout mon séjour à fumer sur la plage n’est probablement pas anodin.
La maladie de l’anti-nudité
Le souvenir d’un ancien voisin m’est un jour revenu. Il y a quelques années, cet homme, avec qui j’échangeais jusque là de simples « Bonjour », avait commencé à m’injurier en hurlant, en me traitant de malade mental. Il m’avait fallu de longues minutes de palabres pour comprendre qu’il m’avait un jour vu nu dans mon jardin.
Il faut reconnaitre que lorsqu’il faisait nuit noire, persuadé que personne ne pouvait me voir, j’allais parfois me plonger nu dans le bac d’eau qui nous sert de piscine.
Mes explications et excuses n’ont en rien atténué sa colère. Le simple fait que je puisse être nu chez moi m’avait transformé définitivement en monstre abject mentalement dérangé.
Ma brève expérience du naturisme m’a permis de me rendre compte à quel point ce rejet de la nudité est une maladie. Car nous sommes tous nus sous nos vêtements. Nous avons tous un corps. Il n’y a rien de plus naturel que la nudité. Que ce voisin soit entré dans une colère aussi noire pour un événement aussi anodin en dit long sur sa propre haine inconsciente du corps humain.
En rejetant et sexualisant la nudité, nous traumatisons le regard de nos enfants sur leur propre corps, nous générons artificiellement de la violence, de la souffrance, de la honte.
À toutes les personnes qui sont complexées vis-à-vis de leur propre corps, je ne peux que conseiller de passer quelques jours dans un camp naturiste.
Cela demande du courage, c’est réellement étrange. Ce n’est certainement pas pour tout le monde.
Mais c’est un avant-goût d’une liberté que nous avons trop souvent camouflée. C’est un remède contre la marchandisation et la bigoterie qui étouffent nos corps et nos esprits.
Être nu, c’est une lettre d’amour à la vie, à l’humanité. Nues, les personnes sont belles. En se croisant au détour d’une promenade, leurs regards se disent :
« Vous êtes beaux, vous êtes belles ! Décidément, un rien vous habille ! »
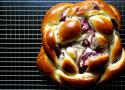
Ingredients
- 170g blackberries
- 2 cinnamon sticks
- ¼ cup water
- ⅛ cup fresh orange juice
- 2 strips of orange peel
- 1 teaspoon granulated sugar
- 8g active dry yeast
- ¼ cup plus 1 teaspoon honey
- ⅔ cup warm water
- ⅓ cup olive oil plus a bit to coat a bowl
- 2 large eggs
- 1 teaspoon salt
- 4 cups (500g) all purpose flour
- Eggwash
Instructions
- In a large bowl, whisk a teaspoon honey and yeast into the warm water. Wait a few minutes until the yeast is activated and the mixture becomes foamy.
- Add the remaining honey, oil, eggs and salt to the yeast mixture and whisk until incorporated.
- Add flour slowly, incorporating as you go. You do not want to add too much flour, you just want a shaggy dough to form. Use the last bit of flour to flour your counter top to ensure that the dough does not stick while you kneed. I like to use the last bit of flour to flour my counter instead of adding more to ensure that I am using the most minimal amount of flour possible.
- Kneed the dough for 5-10 minutes until a smooth, elastic ball of dough forms. If the dough gets too sticky as you are kneeding it, a just enough flour to your hands and board to make the dough soft.
- In a large bowl, coated barely with oil, place your ball of dough and cover with cling wrap for 45 minutes, or until the dough has doubled in size.
1.While the dough is rising, make your blackberry filling, so that it has time to cool down before you fill the bread. - Put all ingredients in a small saucepan. Simmer for 10-15 minutes. The mixture does not have to be thick and jammy, but you should be able to trace a line with a wooden spoon through the mixture and have it hold for a second.
- Cool down mixture to before filling the bread. You can speed this up by putting it in the freezer for 10 minutes.
- Once the dough has doubled in sized, remove from bowl and cut in two equal pieces. Using a rolling pin, roll out one of the pieces in a large rectangle shape. It doesn’t have to be perfect. Spread half of the blackberry filling in the middle of the rectangle, leaving two inches of space around so that it doesn’t squish out everywhere. Roll your rectangle into a a long rope, with the filling inside. Stretch your rope as long as you can without the dough ripping (mine was about 2.5-3 feet long). Set aside and repeat with the second half of dough.
- Cut both of your ropes of dough in two so that you have four equal pieces of dough.
- Take two of the ropes and lay them next to each other. Take the third rope and weave it between the other two (lay it on top of the rope on the left and under the rope on the right). Take the last rope and do the same, but in the opposite way (lay it under the rope on the left and under the one on the right).
- You will now have eight rope-ends of dough. There will be four ends that come out from under the plus sign in the middle (the right hand rope-end of each pair), take this end and bring it over the end to the right of it. Repeat for all four rope-ends. Now take the rope end that you just went over (originally the left of the pairs) and bring it over the rope directly to the left of it. Repeat until you have run out of dough.
- Once you run out of dough, tuck the ends under your bread. Transfer to a parchment lined baking sheet. Apply an egg wash and let rise for another hour. About 45 minutes into the rise, preheat your oven to 375 degrees Fahrenheit. Add a final eggwash before placing your bread in the oven for 40-45 minutes.
- After 15-20 minutes of baking, you may want to add aluminum foil to the top of the bread if it is getting dark too fast (I always have to do this, otherwise my bread burns). Once it is cooked (you will know when the bread sounds hollow when you knock on the bottom; also, you can press on the top and if it is too mushy it probably needs some extra cooking).
- Remove your bread from the oven and let cool completely on a cooling rack before cutting into it.
La pâte est très bonne.
La garniture est très bonne mangée seule mais elle se perd une fois dans la pâte.
En plus, on sent toutes les graines des fruits ce qui n'est pas très agréable comme texture.
Je trouve que c'est beaucoup de travail pour ce que c'est.
Je ne pense pas en refaire.

Ingrédients
- 4 petites baguettes de pain
- 500 g de poitrine de porc fraîche (peu de gras)
- 3 tiges de citronnelles
- 1 échalote
- 1 gousse d’ail
- Graines de sésame blanc
- Pâté de foie asiatique
- Beurre
- 1 Carotte
- 1 Concombre
- ½ Papaye verte (ou 1 navet blanc)
- Coriandre
- Piment
- Sauce piquante
- Mayonnaise
- 1 cuillère à café de sel
- 1 cuillère à café de poivre
- 2 cuillères à soupe de sucre,
- 1 cuillère à soupe de miel
- 1 cuillère à soupe de vinaigre de riz blanc
- 1 cuillère à soupe de sauce d’huître
- 1 cuillère à soupe de saumure de poisson ( nuoc mam )
- 1 cuillère à café d’huile de tournesol
Instructions
- Couper le porc en petits morceaux.
- Faire mariner la viande avec 1 cuillère à soupe de sucre, 1 cuillère à soupe de miel, 1 cuillère à soupe de saumure de poisson, 1 cuillère à soupe de sauce d’huître et 1 cuillère à café de poivre.
- Ajouter l’ail haché, la citronnelle émincée, l’échalote et des graines de sésame blanc.
- Mélanger tous les ingrédients et puis laisser reposer pendant une ou deux heures.
- Enfiler les morceaux de viande sur les piques à brochettes en bambou puis les griller au-dessus des charbons de bois ardents au charbon ou les cuire à la poêle avec un peu d’huile.
- Enlever les graines de la papaye verte.
- Éplucher la carotte, le concombre et la papaye verte (ou le navet blanc) et les râper en juliennes ou en lamelles.
- Insérer quelques rondelles fines de piment.
- Mélanger les crudités avec 1 cuillère à soupe de sucre, 1 cuillère à café de sel, 1 cuillère à soupe de vinaigre blanc.
- Remuer les ingrédients puis laisser mariner pendant une heure.
- Couper les petites baguettes dans l’épaisseur.
- À l’intérieur de la baguette, tartiner de beurre ou de pâté de foie asiatique.
- Mettre le porc grillé, les crudités marinées, la coriandre émincée en leur centre.
- Arroser de sauce piquante et de mayonnaise.
- Refermer les baguettes et goûtez. Bon appétit !