1695 shaares
376 results
tagged
to-do

Ingrédients
- 500g de farine
- 10g de sel
- 10g de levure fraiche
- 350g d'eau
- 500g de beurre
- 500g de sucre
Voir aussi Recette de Kouign Amann. Le véritable Kouign amann - YouTube

Ingredients
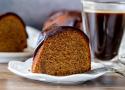
Coffee Bundt Cake
- 3 cups all-purpose flour (375 grams)
- 1 teaspoon baking powder
- ½ teaspoon baking soda
- ¼ teaspoon salt
- ½ cup unsalted butter (112 grams) softened
- ½ cup vegetable oil (120 ml) or canola
- 2 cup light brown sugar* (400 grams) packed
- 4 large eggs room temperature
- 1 cup sour cream (240 ml) room temperature
- 3 tablespoons instant coffee powder feel free to use 2 tablespoons for a less intense flavor
- 2 tablespoons hot water (30 ml)
Chocolate Ganache
- 4 ounces dark chocolate (112 grams) around 50%, or feel free to use semi-sweet`
- ½ cup heavy cream (120 ml)
Instructions
Coffee Bundt Cake
- Preheat the oven to 350F (180C or 160C fan forced).
- Whisk together the flour, baking powder, baking soda and salt.
- In a very large mixing bowl, beat together the butter, brown sugar and oil until creamy (seeing sugar granules is fine).
- Beat in the vanilla extract and eggs 1 at a time. Stop mixing when you no longer see pieces of egg in the batter.
- Turn off the mixer and scrape down the sides and bottom of the bowl. Add in about 1/2 of the flour mixture and beat on a low speed until just combined.
- Add the coffee grounds to the hot water int a small cup or bowl and stir. Add the coffee and sour cream to the cake batter and mix with the beater on a low speed until combined.
- Turn off the mixer and add in the rest of the flour mixture. With a hand held whisk, whisk until smooth.
- Brush a non-stick bundt pan with pan release/cake goop or grease and lightly dust with flour.
- Pour the batter into the prepared pan.
- Bake in the preheated oven for 45-55 minutes, or until an inserted toothpick comes out clean.
- Let the cake cool in the pan for about 15 minutes, then carefully invert the pan and slide the cake out.
Chocolate Ganache
- Chop the chocolate into very fine pieces and place in a heatproof bowl.
- Heat the cream until almost boiling.
- Pour the hot cream over the chopped chocolate. Let sit for 3-5 minutes, then whisk until smooth.
- If there are still some lumps of chocolate, microwave for 30-second intervals at medium heat (not high heat, which is often the default) and whisk between each interval until smooth.
Assembly
- If the bottom of the cake is very domed (what was the top while the cake was baking), gently saw off the rounded top using a serrated knife.
- Place the cake on a plate or cake stand that you plan to serve it on.
- Pour/drizzle the chocolate ganache over top, letting it drip over the sides.
J'ai testé. À reproduire !

Fromages faciles
Autres styles
Styles légèrement plus complexe
Styles à plus long affinage

Ingrédients
Pâte sablée
- 125g de farine
- 1 pincée de sel
- 60g de beurre
- 25g de sucre
- 1 jaune d'œuf
- eau
Garniture
- 2 œufs
- 20cL de bière ambrée ou blonde
- 180g de vergeoise
- 30g de beurre
Instruction
Pâte sablée
- Mélanger le beurre mou coupé en cubes avec la farine et le sel et sabler à la main ou au robot avec la feuille
- Ajouter le sucre puis le jaune d'œuf
- Si besoin, ajouter de l'eau jusqu'à obtenir une boule lisse non collante
- Laisser 10 min au frigo et étaler dans le moule couvert de papier cuisson
- Placer au congélateur 30 min afin que les bords ne retombent pas
- Piquer et précuire la pâte à blanc pendant 10 min à 190°C
- S'il y a un surplus, préparer des motifs de décoration
Garniture
- Étaler la vergeoise sur la tarte précuite
- Mélanger les œufs et la bière et verser sur la tarte
- Enfourner 10 min à 210°C
- Sortir la tarte et repartir le beurre coupé en petits morceaux
- Poser les décorations en pâte s'il y en a
- Poursuivre la cuisson env. 20 min jusqu'à ce que la tarte soit bien dorée


Ingrédients
Garniture
- 250 ml (1 tasse) de mélasse
- 250 ml (1 tasse) de cassonade
- 3 œufs battus
- 250 ml (1 tasse) de lait
- 30 ml (2 c. à soupe) de beurre
- 5 ml (1 c. à thé) de jus de citron
- 30 ml (2 c. à soupe) de fecule de maïs
- 250 ml (1 tasse) de raisins secs
Pâte brisée
- 800 ml (3¼ tasses) de farine à pâtisserie
- 5 (1 c. à the) de sel
- 250 ml (1 tasse) de graisse végétale
- 125 ml (½ tasse) d'eau glacée
Instructions
- À feu moyen, faire chauffer la mélasse, la cassonade, les œufs, le lait, le beurre et le jus de citron.
- Épaissir avec la fécule de mais.
- Ajouter les raisins.
- Vider le tout dans une abaisse non cuite.
- Faire cuire au four à 175°C (350"F) pendant 35 à 40 minutes.
Pâte brisée
- Tamiser la farine et le sel.
- À l'aide d'un couteau enfariné, couper la graisse en petits morceaux; continuer à mélanger tout en coupant (ainsi, la pâte ne deviendra pas élastique).
- Arroser d'eau glacée et continuer de couper jusqu'à ce que la pâte "boule bien", sans coller aux doigts.


- {Tuto} Mon frigo de séchage à viandes - Cook'n'Roll
- Ail noir - Cook'n'Roll
- Boeuf Irlandais séché au piment doux - Cook'n'Roll
- Canard séché au Comté - Cook'n'Roll
- Filet de canard séché au foie gras - Cook'n'Roll
- Foie gras mi-cuit au chocolat - Cook'n'Roll
- Pastirma - viande séchée aux épices - Cook'n'Roll
- Porc séché - Cook'n'Roll
- Porc séché au frigo, comme une coppa - Cook'n'Roll
- Thon séché - Cook'n'Roll
Un blog que je viens de découvrir. Ça a l'air vraiment très bien !
Ingrédients
- 1 càc d'anis vert
- 1 càc de clou de girofle
- 2 étoiles de badiane
- 1 baton de cannelle
- 125 ml de lait
- 250 ml de miel
- 125 g de beurre
- 250 g de farine
- 1 sachet de levure chimique
- 80 g de sucre cassonade
- 2 œufs
Instructions
- Réduire en poudre les quatre épices.
- Torréfier 1 càc de 4 épices pendant quelques secondes.
- Ajouter le lait, le miel et le beurre coupé en dés.
- Chauffer jusqu'à ce que le beurre soit fondu.
- Mélanger la farine, la levure chimique et le sucre.
- Une fois refroidi, ajouter le mélange épicé au mélange de farine.
- Ajouter les œufs.
- Verser dans un moule à cake chemisé.
- Enfourner à 170°C pendant 50 minutes.
Claire Saffitz Makes Perfect Challah and Babka | Try This at Home | NYT Cooking - YouTube
Ingredients
For the Preferment
- 1 teaspoon active dry yeast
- 1¼ cups/169 grams bread flour
For the Dough
- ½ cup/72 grams golden raisins (optional)
- ⅓ cup/113 grams honey
- ⅓ cup/75 grams extra-virgin olive oil
- 1large egg yolk, at room temperature
- 2large eggs, at room temperature, plus 1 beaten egg, for egg wash
- 3cups/405 grams bread flour, plus more for kneading the dough
- 11 grams kosher salt (about 1 tablespoon Diamond Crystal or 1½ teaspoons Morton coarse kosher salt)
- Poppy or sesame seeds, for sprinkling (optional)
Instructions
- Make the preferment: In a medium bowl, combine the yeast and ¼ cup/57 grams warm tap water (100 to 110 degrees), and whisk until the yeast is dissolved. Add another ½ cup/113 grams room temperature water and the bread flour, and stir with a flexible spatula or bowl scraper until you have a smooth, pasty mixture with no dry spots. It should look like a thick batter.
- Scrape the mixture into the center of the bowl and cover tightly. Let the preferment sit at room temperature until it’s nearly tripled in size, extremely bubbly across the surface, and jiggles on the verge of collapsing when the bowl is shaken, 1 to 2 hours (depending on the ambient temperature).
- If making a raisin-studded challah, while the preferment is getting bubbly, place the raisins in a medium bowl and cover with boiling water. Cover the bowl and let the raisins soak until they’re plumped and softened, 15 to 20 minutes. Drain the raisins, pat them dry, and set aside.
- Mix the dough: In a medium bowl, whisk together the honey, olive oil, the yolk and 2 of the eggs until smooth, then add to the bowl with the preferment. Add the bread flour and salt. Use a flexible spatula or bowl scraper to stir the mixture, making sure to scrape the sides and bottom of the bowl to incorporate the preferment, until a shaggy dough comes together.
- Knead the dough: Generously flour the work surface, then scrape the dough and any floury bits out of the bowl and onto the surface (reserve the bowl). Generously flour the dough. Use the heel of your hands to knead the dough, adding flour as needed if the dough is sticking to your hands or the surface, until the dough is very smooth, elastic and slightly tacky, 10 to 15 minutes. (You can also combine everything in a stand mixer and mix on low speed with the dough hook for 8 to 10 minutes, adding more flour as needed until the dough pulls away from the sides of the bowl.)
- Test the dough: Pinch off a golf ball-size piece and flatten it with your fingertips. Stretch the dough outward in all directions gently and slowly: You should be able to form a sheet of dough that’s thin enough to allow light to pass through without tearing. If the dough tears, continue kneading. For a raisin-studded challah, use your hands to flatten the dough into a 1-inch-thick slab (the shape doesn’t matter) and scatter the drained raisins over the dough. Roll up the dough and gather it back into a ball, then knead until the raisins are distributed throughout.
- Let the dough rise: Gather the dough into a smooth ball, dust lightly with flour and place back in the reserved bowl. Cover and let the dough sit in a warm spot until it’s doubled in size, 1 to 2 hours (depending on the ambient temperature).
- Divide the dough: Punch down the dough inside the bowl to expel the gasses that built up during the first rise, then scrape the dough out onto a clean work surface. For a braided loaf, use a bench scraper or knife to divide the dough into 6 equal pieces. (You can eyeball it, or weigh the pieces for accuracy — each piece should weigh 180 to 190 grams.) For a round loaf, divide the dough in half.
- Braid or twist the dough: For a braid, roll each of the 6 pieces into snakes measuring about 18 inches long and slightly tapered at the ends. Dust the strands in flour to coat them lightly, then line them up so they’re side by side. Pinch together the ends of the strands to connect them at the top.
- Take the strand on the far right and cross it over the other strands, so it’s all the way on the far left side, placing it perpendicular to the other strands. Then, take the strand that was originally on the far left, and is now second from the left, and bring it all the way to the far right, also placing it perpendicularly.
- Fan out the remaining strands so there’s a generous space in the center. Take the strand on the far left and bring it to the center, but group it with the strands on the right. Next, bring the strand that’s second from the right and cross it over to the far left, also placing it perpendicular. Then, fan out the strands again, leaving a space in the center, and bring the strand on the far right to the center, grouping it with the strands on the left. Bring the strand second from the left to the far right and cross it over to the far left. Then, repeat this process until you’ve braided the entire length of the strands, tugging gently on the strands as you work to create tension in the braid. Pinch the ends of the braids and tuck them underneath the loaf, then transfer to a parchment-lined sheet pan. Make sure you have a couple of inches of clearance on either side of the braid so it can expand.
- Alternatively, for a round, roll the two pieces of dough into long snakes measuring about 28 inches long, making sure to taper the snakes at one end. Dust the strands in flour to coat them lightly, then line them up so they’re side by side with the tapered ends aligned. Twist the two strands together, then start at the tapered end and roll up the twist into a tight coil, wrapping the fatter end around and tucking the end underneath the coil. Transfer the coil to a parchment-lined sheet pan.
- Egg wash and proof the dough: Beat the remaining egg in a small bowl until it’s streak-free. Brush the loaf with the egg, then loosely cover the dough with some lightly oiled plastic wrap on a sheet pan, and let it rise at room temperature until it’s doubled in size, extremely puffy, and springs back but holds a slight indentation when poked gently with a wet finger, another 1½ to 2 hours (but possibly longer, depending on ambient temperature). The dough is easy to underproof, so, if you’re unsure, err on the side of overproofing. (The round loaf will also take longer to proof.) Alternatively, before proofing, you can refrigerate the dough overnight, but omit the egg wash and make sure it’s covered (plastic should cover it loosely but be sealed around the pan so the dough doesn't dry out).
- Heat the oven: Arrange a rack in the center of the oven and heat it to 350 degrees.
- Bake: Uncover the challah and brush with another layer of egg wash. Sprinkle the loaf with poppy or sesame seeds (if using) and bake until the loaf is shiny and burnished, an instant-read thermometer registers 190 degrees when inserted into the center, and it sounds hollow when tapped on the bottom, 35 to 40 minutes. Let the challah cool completely on the baking sheet.


Ingrédients
- 125 g de farine de riz
- 2 jaunes d’œufs
- 165 g de beurre (à température ambiante)
- 80 g de sucre glace
- 80 g de poudre d'amande
- 1 pincée sel
Instructions
- Mettez le beurre (mou ou ramolli à l’aide d’une fourchette), le sucre glace et la poudre d’amandes dans un bol et mélangez à l’aide d’un fouet jusqu’à homogénéisation.
- Ajoutez les 2 jaunes d’œufs puis la farine de riz et la pincée de sel.
- Fouettez pour obtenir une belle pâte homogène.
- Enfournez à 180°C entre 30-40 minutes environ (suivant la taille) jusqu’à ce que le sablé soit bien doré.
- Laissez refroidir.
Ingrédients
Pour la macération des fruits
- 30 g d'amandes , mondées et grossièrement hachées
- 30 g de noisettes , pelées et grossièrement hachées
- 30 g de noix , grossièrement hachées
- 30 g d'écorce d'orange confite , hachée
- 30 g de zeste de citron confit , haché
- 50 g de pruneaux (dénoyautés), émincés
- 2 cuillères à soupe de café instantané (dissout dans 1 cuillère à soupe d'eau chaude)
- 2 cuillères à café d’extrait naturel de vanille
- ¼ cuillère à café de clou de girofle moulu
- ¼ cuillère à café de cannelle moulue
- ¼ cuillère à café de noix de muscade râpée
- ¼ cuillère à café de gingembre frais râpé
- ½ cuillère à café de zeste d'orange
- ½ cuillère à café de zeste de citron
- 250 ml de rhum
- 100 ml de vin rouge doux
- 60 ml de mélasse noire
Pour le gâteau
- Fruits macérés précédemment préparés , égouttés
- 175 g de beurre mou
- ¼ cuillère à café de sel
- 150 g de sucre en poudre
- 6 oeufs
- 500 g de farine , tamisée
- 1 cuillère à café de levure chimique
Instructions
Macération des fruits
- Faire mariner le mélange au moins 15 jours avant le jour de la préparation.
- Verser tous les ingrédients dans un récipient en verre pouvant être bien couvert. Déposer au réfrigérateur.
- Remuer de temps en temps et ajouter du rhum et du vin si le mélange sèche.
Gâteau
- Environ 3 heures avant le début de la préparation du gâteau, sortir la macération des fruits du réfrigérateur et la réserver pour qu’elle atteigne la température ambiante.
- Égoutter les fruits est réserver le liquide de macération.
- Préchauffer le four à 190˚C.
- Graisser et fariner un moule rond d'environ 25 cm de diamètre et 8 cm de profondeur, ou un moule rectangulaire d'environ 22 x 12 x 8 cm.
- Dans le bol d'un batteur électrique, déposer le beurre et le sel et battre jusqu'à obtenir la consistance d’une crème.
- Ajouter le sucre et continuer à battre pendant environ 5 minutes.
- Ajouter les œufs un à un et battre pendant 5 minutes.
- Séparément, mélanger la farine et la levure chimique.
- À l’aide d’une spatule, incorporer alternativement un peu de farine et un peu de fruits macérés en remuant délicatement jusqu’à incorporation totale de la farine.
- Bien mélanger et verser l’appareil dans le moule.
- Enfourner et cuire au four pendant 50 minutes ou jusqu'à ce qu'un cure-dent soit inséré et en ressorte sec. Il pourrait être nécessaire de couvrir le moule à la fin pour que le gâteau ne brunisse pas trop.
- Sortir le gâteau du four et le laisser reposer 5 minutes avant de le démouler sur une grille.
- Arroser le gâteau du liquide de macération réservé avant de le déguster.

Ingredients
- 3/4 Cup milk
- 1 Cup flour
- 1/2 teaspoon salt
- 1 egg
- 6 tablespoons margarine
- 1/4 Cup sugar
- 1 package dry yeast
- 1/3 Cup flour
Instructions
- Warm 3/4 Cup milk and 6 Tablespoons margarine until margarine melts. Set aside to cool.
- Mix 1 Cup flour, 1/4 Cup sugar, 1/2 teaspoon salt and 1 package dry yeast.
- When milk-margarine mixture is cool enough to touch (need not be cold) add to dry ingredients and beat.
- Add 1 egg, 1/3 Cup flour and beat again.
- Add enough flour for dough (this is the hard part it will be very stiff for mixing), dump out of bowl and knead. (Keep adding a little flour as you knead as it becomes too sticky), about 10 minutes.
- Put in greased bowl, cover with towel and set aside to double (usually about 1-1 1/2 hours). Then punch down and knead again. Shape into loaf and put in greased bread pan. Let double again. Bake in slow oven (325-350 degrees) about 30-45 minutes until brown.


Ingredients
COOKIES
- 110 g butter
- 100 g granulated sugar
- 100 g dark brown sugar
- 1 egg (57-60 g with shell)
- 1 teaspoon vanilla extract
- 230 g all-purpose flour
- ½ teaspoon baking powder
- ½ teaspoon baking soda
- 1 tablespoon instant espresso powder
- ½ teaspoon salt
MASCARPONE CREAM
- 180 g mascarpone cheese
- 1 teaspoon vanilla extract
- 90 g confectioners sugar
- 20 g agave or honey
- 120 g heavy cream
- 1 tablespoon cocoa powder for dusting
Instructions
COOKIES
- Melt the butter in the microwave or in a small saucepan over low-medium heat. You don’t want it to bubble, so as to not lose any of the liquid in the butter. Pour the melted butter into a big mixing bowl and let it cool down to room temperature in the fridge. Takes about 20 minutes.
- Once the butter has reached room temperature add the granulated sugar and brown sugar and with spatula whisk it together for 1 minute. Alternatively, mix it together in a stand mixer using the paddle attachment.
- Add the egg, vanilla extract and mix it in until combined.
- In a separate bowl, stir together flour, baking powder, baking soda, instant espresso powder and salt. Add the dry ingredients to the wet mixture and with spatula mix it together until just combined.
- Using a 2 tbsp/ 1.3 ounce cookie scoop, scoop out 11 cookies and place them on a tray lined with baking paper. Then roll them between your hands into a ball. Place the prepared cookies in the fridge to set for 1 hour.
- Meanwhile, preheat the oven at 180ºC / 355ºF and prepare a baking sheet with baking paper. Place 6 cookies per baking tray and bake one tray at a time for 10-11 minutes.
- Once baked, let them cool down on the baking tray for 3 minutes as they still will be soft when they are done. After they have cooled down a bit, use a spatula to lift them onto a cooling rack and let them cool down completely.
MASCARPONE CREAM
- In a medium bowl with an electric mixer or in a stand mixer using the whisk attachment, whip together all of the ingredients until it reaches stiff peaks and it holds its shape. If making ahead of serving, place in the fridge, covered by plastic wrap, until ready to assemble.
- When ready to serve, add the cream to a piping bag fitted with a piping tip e.g. Wilton 2A. Pipe the mascarpone cream on top of the cookies in a swirl, starting from the middle and moving outwards. Add a tablespoon of cocoa to fine mesh sieve and finish the cookies with dusting of cocoa powder.
- DIY Slippers : 16 Steps (with Pictures) - Instructables
- DIY Your Own Cozy Shoes 룸슈즈만들기 | How to make slippers the size you want. [sewingtimes] - YouTube
- Free Slipper Sewing Pattern for Women • Heather Handmade
- Free Slipper Sewing Patterns and Ideas
- Megan Ta Da: House Slippers To Be Sewn
- NativeTech: Making Woodland Style One-piece, Soft-sole, Center-seam Moccasins
- Step into Comfort: DIY Slippers to Keep Your Feet Cozy
- winter socks/house slippers10 MINUTES MAKING / Very easy even for beginners - YouTube
- Всего 4 шва, а тепло и комфорт вашим ногам обеспечен. Домашние тапки с теплой подошвой без выкройки. - YouTube
- How To Make Slippers In Any Size - Free Sewing Tutorial | Sewing Bee Fabrics

Un projet qui pourrait m'être utile pour m'entrainer les doigts !