1826 shaares


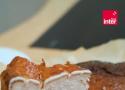
Ingrédients
- 400 g de cream cheese (type fromage à tartiner, aussi trouvable en fromagerie en version artisanale)
- 400 g de mascarpone
- 300g de crème de marron
- 150 g de sucre semoule
- 5 œufs
- 30 cl de crème fleurette
- 25 g de fécule de maïs
Instructions
- Verser le cream cheese, le sucre, le mascarpone et la crème de marron dans la cuve d’un batteur et mélanger à vitesse moyenne. Quand le mélange est bien homogène, ajouter les oeufs un par un en laissant le batteur mélanger en même temps, toujours à vitesse moyenne.
- Incorporer la fécule et mélanger à nouveau. Ajouter ensuite la crème en filet et augmenter la vitesse pour homogénéiser l'appareil. Il est normal que l’appareil soit liquide.
- Beurrer un moule rond de 24 cm de diamètre. A l’aide d’un morceau de beurre, chemiser le moule avec du papier sulfurisé ; le papier doit dépasser tout autour du moule et adhérer aux parois. Y verser la préparation.
- Donner un coup sec avec le moule sur le plan de travail afin de chasser les bulles d’air. Enfourner et cuire 40 minutes à 220 degrés, chaleur tournante. La préparation doit brunir, mais le centre doit rester très crémeux.
- À la sortie du four, le cheesecake doit reposer. Une fois que le gâteau a refroidi, réserver 4 heures au frais ou, mieux, une nuit entière. Démouler avant de servir.


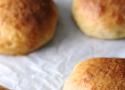
Ingredients
Tangzhong
- 4 Tbsp (60g) whole milk or unflavored almond milk
- 2 Tbsp (27g) water
- 2 Tbsp (20g) bread flour
Dough
- ½ cup (120g) whole milk or unflavored almond milk
- 1 Tbsp (9g) instant yeast
- 2.5 cups (320g) bread flour, plus more for bench flour
- 2.5 Tbsp (35g) granulated sugar
- 1 tsp (7g) fine sea salt
- 1 large egg, room temperature
- 1 large egg yolk, room temperature
- 3 Tbsp (42g) unsalted butter, softened
- Cooking spray, for greasing
Egg Wash
- 1 large egg
- Splash of whole milk
- Melted butter or browned butter
Instructions
Tangzhong
- Whisk all the ingredients together in a small saucepan.
- Once combined, place over medium heat, and constantly whisk until the mixture thickens into a paste.
- Remove to a small bowl and set aside.
Dough
- Warm the milk to 95°F (35°C).
- Whisk in the instant yeast until dissolved.
- Store in a warm area and let sit for 8 minutes.
- In a stand mixer bowl whisk together the dry ingredients.
- Add the dough hook and turn the mixer on low.
- Slowly stream in the milk and yeast mixture and mix for a few seconds to combine.
- Add the tangzhong paste, egg and egg yolk.
- Turn the mixer speed up to medium-low and continue to mix until evenly combined, turning the machine off and scraping down the sides of the bowl intermittently throughout mixing.
- Gradually add the butter in pieces, mixing the butter into the dough completely before adding more.
- Once the butter is incorporated, continue to knead the dough at medium-low speed for 5-8 minutes, or until the dough is smooth.
- Lightly grease a medium bowl and set aside.
- Remove the dough from the stand mixer and gently fold all the sides towards the center to help form a ball.
- Place the dough seam side down on a clean work surface and roll it around on the board to create a tight, smooth ball.
- Place the dough in the greased bowl, cover with a damp towel and place in a warm area to proof and double in size, about 1 - 1.5 hours.
- After the dough has risen, punch the dough down and place on a lightly floured work surface.
- Using a bench scraper, divide dough into 6 even pieces around 95–105 grams each.
- To shape the individual buns, place one dough piece in the center of your board.
- Gently stretch and fold the edges of the dough towards the center.
- Flip the dough so it is seam side down.
- Using your fingers pull the dough toward you, making sure the dough keeps contact with the board the entire time, to start to create tension and form a tight dough ball.
- Rotate the dough 90 degrees and repeat this process two more times or until you have done this for the entire perimeter of the bun and have a smooth, tight dough ball.
- Line a rimmed sheet tray with parchment paper and lightly grease the parchment.
- Place the shaped dough on the prepared pan.
- Repeat with the remaining dough, making sure to leave 2.5” (6cm) of space between each bun.
- Cover with a similar-sized sheet tray that is flipped so that the dough will not dry out.
- Let rise at room temperature for another 1-2 hours, or until doubled in size.
Egg Wash and Baking
- Preheat the oven to 375°F (190°C).
- Whisk together the egg and milk until evenly combined.
- Gently brush the tops of the buns with the egg wash.
- Bake for 16-18 minutes or until deeply golden brown.
- Remove the buns to a cooling rack and immediately brush generously with melted butter.
- Let cool completely before serving.
Ingredients
- 2 large eggs (about 110 grams)
- 50 grams honey
- 70 grams water
- 1 tsp salt
- 100 grams melted and cooled unsalted butter
- 250 grams all purpose flour
- 1 tsp instant yeast (I used SAF Gold, which is good for enriched dough. Red Star Platinum would be good too)
Instructions
- In a medium bowl, whisk the eggs, honey, water, salt and melted butter together.
- Whisk the flour and yeast together and sift it into the egg and butter mixture.
- Whisk (I love using a Danish dough whisk for this) the ingredients together for about 30 seconds to a minute. The dough should look fairly smooth.
- Cover the bowl with plastic wrap and let sit for about 2 hours.
- Remove the dough from the bowl and do a couple of "stretch and folds" from all four sides until the dough resists.
- Place the dough back into the bowl, cover the bowl with plastic wrap, and refrigerate the dough for 24 to 48 hours.
- When you are ready to bake, remove the dough from the refrigerator and divide it into 6 equal pieces.
- Line a quarter sheet pan with parchment paper.
- Shape the pieces into balls, and then flatten the balls by pressing down on them with you hand. Place the disks on the parchment paper and cover with oiled plastic wrap. Let the rolls proof for 2 to three hours, depending on the temperature of the room.
- Preheat your oven to 375 degrees F. Brush the rolls with an egg wash (beaten egg and water) and bake for 10 minutes. Reduce the oven temperature to 325 degrees F and bake for another 10 minutes, until the rolls are golden brown.
- Cool the rolls on a wire rack.
- Store in an airtight container.
Ingredients
- 3/4 cup very warm water, divided
- 1 pkg yeast
- 2 Tbsp sugar
- 4 Tbsp melted butter, divided
- 1 large egg
- 2 chipotles, chopped + 2-3 Tbsp adobo sauce (from canned chipotles in adobo)
- 3 - 4 cups flour
- 1 1/4 tsp salt
- Sesame seeds
Instructions
- Put 1/2 cup water into the bowl of your stand mixer fitted with the dough hook and stir in the sugar. Sprinkle 1 package of yeast over top and let rest 10 minutes.
- Add 2 Tbsp melted butter, egg, chopped chipotles, adobo sauce, and remaining 1/4 cup water.
- Add 3 cups flour and salt and turn mixer on to low.
- Knead 5-7 minutes, until dough comes together and forms a soft, smooth ball. (Dough should clean the sides of the bowl, add additional flour if necessary.)
- Cover the dough, and let it rise for 1 to 2 hours, or until doubled.
- Turn the dough onto a floured surface and divide it into 8 equal pieces.
- Shape each piece into a round ball and flatten with your palm to 3 inches across. Place the buns on a lightly greased or parchment-lined baking sheet, cover, and let rise for an hour.
- Preheat oven to 375.
- Brush the buns with 1/2 Tbsp of the melted butter and sprinkle with sesame seeds.
- Bake 15 - 18 minutes, until golden.
- Remove them from the oven, and brush with the remaining melted butter.
- Let buns cool before slicing.

Ingredients
- 1 pkg/Tbsp. Red Star Platinum Yeast
- 1 ¼ Cups warm water
- 2 ½-2 ¾ Cups unbleached, all-purpose flour
- 1 Cup yellow cornmeal
- 3 Tbsp buttermilk powder (original recipe called for ¼ Cup nonfat dry milk powder)
- 3 Tbsp. butter, softened
- 2 Tbsp. sugar
- 1 ½ tsp. salt
Instructions
- Place warm water and yeast in EZ DOH bucket and stir to dissolve yeast.
- Let rest 1 minute.
- Add one cup of flour, then additional dough ingredients.
- EZ DOH-it for 2-3 minutes, or until dough is smooth and soft and all ingredients are incorporated, adding enough flour so that the dough is not sticky.
- Remove dough from bucket, spray bucket with cooking spray, “smooth” dough and replace in bucket.
- Cover and let rise until doubled.
- Remove dough from bucket.
- Roll out into a rectangle, then roll up (jelly-roll fashion) and pinch seam shut.
- Place in a greased loaf pan (I LOVE my hearth loaf pan, which measures 12”x5 ½”x 2 ¼”, for this loaf……if you don’t have a similar pan, it can be baked in a 9x5” loaf pan with a longer baking time, or just shape it into a loaf measuring the size above and bake it on a greased baking sheet).
- Let rise until doubled.
- Bake at 375 for 30-40 minutes.
- Remove from pan and cool on wire rack.
- Brush the top of the loaf with butter.

Ingrédients
Pâte
- 750 g de farine boulangère pour pain
- 485 g d'eau
- 30 g de levure de boulanger fraîche
- 15 g de sel fin
Garniture
- 200 g de fromage de brebis
- 2 tranches de jambon blanc
- 2 ou 4 tranches de jambon de Bayonne
- 200 g de beurre ramolli
- 200 g de beurre de roquefort
Instructions
- Pour réaliser cette recette de pain surprise, commencer par préparer tous les ingrédients.
- Verser le sel fin dans la farine. Mélanger et mettre en fontaine.
- Ajouter la levure de boulanger émiettée...
- ...et l'eau tiède.
- Mélanger au batteur (avec l'accessoire crochet) pendant 3 minutes à petite vitesse...
- ...puis poursuivre ce pétrissage pendant 8 minutes à vitesse moyenne. Stopper le pétrissage à ce stade.
- Retirer le crochet, former une boule de pâte...
- ...et couvrir d'un linge propre. Laisser pousser la pâte 20 minutes dans un endroit tiède, comme une chambre de pousse.
- Retirer le torchon...
- ...et rompre la pâte avec la paume de la main.
- Transvaser cette pâte dans un cercle à pain surprise légèrement graissé à l'aide d'un aérosol à graisse. Ce cercle sera également posé sur une plaque à pâtisserie à revêtement anti-adhérent.
- Couvrir d'un torchon propre et laisser lever à nouveau pendant 1h30 à 2h. Lorsque la pâte arrive à quelques centimètres du bord du cercle, retirer le torchon...
- ...et laisser pousser encore quelques minutes jusqu'à ce que la pâte dépasse du cercle et soit bombée sur le dessus.
- Enfourner dans un four ventilé (ou chaleur tournante), préchauffé à 200°C, et laisser dorer entre 30 et 40 minutes selon la grosseur du pain.
- Au terme de la cuisson, retirer le pain du four...
- ...et retirer le cercle en inox. Laisser refroidir.
- Avec un couteau à pain...
- ...découper le chapeau du pain délicatement.
- Remettre le pain droit et enfoncer la pointe d'un couteau filet de sole entre la mie et la croûte de façon verticale. Attention à ne pas transpercer le fond.
- Par un mouvement de haut en bas, découper la mie sur tout le pourtour du pain.
- Veiller à couper la mie jusqu'au fond, en le faisant le plus régulièrement et le plus droit possible, et surtout sans transpercer la croûte du fond.
- Retirer le couteau et le planter horizontalement à 1 cm de hauteur de la croûte du fond. Il est nécessaire de faire une entaille de 3 à 4 cm pour être à l'aise.
- Lorsque le couteau est enfoncé, le faire pivoter du côté tranchant, afin de couper le fond du pain surprise. Veiller à épouser le contour du pain, sans pour autant transpercer la croûte.
- Retirer le couteau, faire pivoter la lame et la réintroduire délicatement dans le même trou et renouveler la découpe du fond, toujours sans transpercer la croûte.
- Retirer le couteau et introduire délicatement la main à la verticale entre la mie et la croûte. Avec le bout des doigts, décoller totalement le bloc de mie de sa croûte. Faire de même sur tout le pourtour. Attention à ne pas l'abîmer.
- Retirer le bloc de mie et réserver la croûte et le chapeau.
- Découper au couteau à pain le bloc de mie en 8 tranches régulières, d'épaisseur égale. Attention à ne pas les casser.
- Beurrer la surface des tranches de mie.
- Disposer le jambon de Bayonne...
- ...et recouvrir d'une seconde tranche de mie. Presser pour bien faire adhérer et découper au ciseaux le jambon qui déborde sur le pourtour.
- Faire de même avec le beurre de roquefort...
- ...que vous aurez préparé préalablement et qui aura la consistance d'une pommade.
- Continuer avec du jambon blanc et enfin avec le fromage de brebis. Vous pouvez laisser marcher votre imagination pour trouver d'autres idées de garniture.
- Découper chaque galette de pain de mie garni...
- ...en 8 avec un gros couteau éminceur.
- Disposer les mini-sandwichs dans le pain de mie...
- ...afin de reconstituer le pain.
- Il est possible de faire un étage de chaque (un étage de jambon, un étage de roquefort, etc...) ou bien de mélanger toutes les variétés.
- Refermer le pain surprise avec son couvercle. Juste avant de le servir aux invités, parfaire sa présentation en l'entourant d'un ruban à charlotte. Bon appétit !
Ingredients
- 2 1/4 cups warm water (not more than 115F / 46C)
- 2 teaspoons sugar
- 2 1/4 teaspoons yeast
- 2 tablespoons shortening (only if you add onion to the dough)
- 1/3 cup sweet onion, finely chopped (I did not use onion in the dough)
- freshly ground black pepper, to taste
- 3 cups (approx 400 grams) bread flour
- 2 tablespoons canola oil (I used peanut oil)
- 1 cup sweet onion, finely chopped (I used white onions)
- 2 teaspoons poppy seeds
- 1 tablespoon salt
- 3 cups (approx 400 grams) bread flour
Instructions
- For the sponge: In a large glass bowl, whisk together the water, sugar and yeast and allow to stand about 5 minutes or until foamy. If using onions in dough: In a small saute pan over low heat, sweat 1/3 cup onion in shortening until it’s soft and translucent.
- With a wooden spoon, stir the flour and onion mixture into the yeast mixture. Stir for about 3 minutes then cover tightly with cling film and let stand about 90 minutes or until doubled and bubbly.
- For onion topping: Sweat remaining onion in canola oil with poppy seeds over low heat until translucent, set aside to cool.
- For the bialys: Preheat the oven to 500 F. Place an oven proof pan or baking tray in the bottom of the oven and your baking stone or heavy baking tray in the center.
- When the sponge is ready, add salt and 2 cups (approx 260 grams) bread flour and begin to knead the soft dough right in the bowl. Add as much flour as is needed to obtain a workable dough and knead until it’s soft and pliable, about ten minutes total.
- Cover the bowl tightly with cling film and allow to rise until doubled in bulk, about 90 minutes.
Divide the dough into 12 portions and shape each into a round about half an inch thick. Create a depression in the center and prick well with a fork. - Divide the onion mixture evenly between the breads and prick the centers again before baking.
Put ice cubes or cold water into the skillet or baking tray to create steam. Transfer the breads onto your baking stone or baking tray with a bit of cornmeal to prevent sticking. (I used a cookie sheet to help transfer the bialys onto a baking stone) - Bake ten minutes at 500 F, reduce temperature to 450 and bake a further 5 minutes or until golden brown. Cool on a wire rack
Ingredients
For the Sponge
- 1 cup milk
- 1/3 cup all-purpose flour
- 2 teaspoons sugar
- 1/2 cup lukewarm water
- 3 (1/4-ounce) packages active dry yeast
For the Dough
- 10 large egg yolks, room temperature
- 2 large eggs, room temperature
- 1 teaspoon salt
- 1 cup sugar
- 8 ounces (1 cup) unsalted butter, melted
- 2 teaspoons pure vanilla extract
- 1 tablespoon lemon zest, grated
- 6 cups all-purpose flour
- 1 cup raisins, light or dark, optional
- 1 large egg, room temperature
- 2 tablespoons milk, or water, room temperature
Instructions
Sponge
- Scald the milk and cool it to 110 F.
- Place 1/3 cup flour in a medium bowl and pour the cooled scalded milk over, beating until smooth. Set aside.
- In a measuring cup or small bowl, dissolve 2 teaspoons sugar in lukewarm water and stir in the yeast.
- Transfer the yeast mixture to the milk-flour paste, mixing well.
- Cover with plastic wrap and let rise until light and bubbly.
Dough
- In a large bowl or stand mixer, beat the egg yolks, whole eggs, and salt.
- Add 1 cup sugar and continue beating until light.
- Beat in the butter, vanilla, and lemon zest.
- Add the sponge to this mixture and mix well.
- Add 6 cups flour and knead 7 minutes by machine or 10 minutes by hand.
- Knead in the optional raisins.
- Cover with greased plastic wrap and let rise until doubled.
- Punch down dough, knead a few times, and let it rise again.
- Grease 3 babka cylinders or food-grade coffee tins and fill each pan 1/3 full.
- Cover with greased plastic wrap and let rise until tripled.
- Brush tops with 1 large egg beaten with 2 tablespoons of milk or water.
- Heat oven to 375 F.
- Bake babkas 10 minutes.
- Then lower temperature to 325 F and bake 30 minutes.
- Then lower temperature to 275 F and bake 15 to 20 minutes longer. Cover tops with aluminum foil, if they are browning too quickly.
- Remove from the oven and let stand in the pan for 10 minutes.
- Turn loaves out of the pan, running a knife around them, if necessary, and cool completely on a wire rack.
- If desired, the cooled loaves can be iced with a simple confectioners' sugar glaze, letting it drip down the sides for a decorative effect.


Ingredients
Dough
- 3 cups (360g) King Arthur Unbleached All-Purpose Flour
- 1 3/4 teaspoons (11g) table salt
- 1 teaspoon instant yeast
- 1 teaspoon granulated sugar
- 1 1/4 cups (284g) water, warm (90°F to 110°F)*
- 1 1/2 tablespoons (18g) olive oil
- 1/4 cup (35g) King Arthur Cinnamon Sweet Bits*
Pan and topping
- 3 tablespoons (36g) olive oil, divided
- 1/3 cup (71g) light brown sugar, packed
- 2 tablespoons (28g) butter, softened
- 1 tablespoon (5g) Vietnamese cinnamon
Glaze
- 3/4 cup (85g) confectioners' sugar, sifted if lumpy
- 1 1/2 tablespoons (21g) milk or heavy cream
- 1/2 teaspoon King Arthur Pure Vanilla Extract
- pinch of table salt
Instructions
- To make the dough: Weigh your flour; or measure it by gently spooning it into a cup, then sweeping off any excess. In a large bowl (a 3-quart bowl with a lid works great), whisk together the flour, salt, yeast, and sugar.
- Add the water and olive oil and stir — with a spatula, bowl scraper, dough whisk, or your hands — until the mixture is thoroughly combined and homogeneous; there should be no dry patches or lumps. Cover the bowl and set it aside for 15 minutes.
- Perform the first bowl fold: Use a wet hand to grab a section of dough from one side of the bowl, then lift it up and press it into the center. Repeat this motion, grabbing a new section of dough each time, until you’ve made a full circle around the bowl, about 8 to 12 times. Once you’ve circled the bowl, flip the dough over in the bowl so that the smooth side is up; the first bowl fold is now complete. Cover the bowl and let the dough rest for 15 minutes. Note: You’ll do this three more times over the next 45 minutes, strengthening the dough each time.
- Repeat the bowl fold for a second time. (Remember to use a wet hand to prevent the dough from sticking!) At this point, the dough should feel smoother and tighter. Cover the bowl and let the dough rest for 15 minutes.
- Sprinkle about half of the Cinnamon Sweet Bits (2 tablespoons or 18g) over the dough, then repeat the bowl fold for a third time, covering up the Cinnamon Sweet Bits as you fold. Cover the bowl and let the dough rest for 15 minutes.
- Sprinkle the remaining Cinnamon Sweet Bits over the dough, then repeat the bowl fold for a fourth and final time; the dough should feel relatively strong.
- Cover the bowl and let the dough rise at a warm room temperature (70°F to 75°F) for 1 hour; see this post, Where to put dough to rise, for tips. After 1 hour, the dough should have nearly doubled in size and will be very puffy; it may even have a few bubbles on the surface.
- To prepare the pan: Once the dough has risen, spray the bottom and sides of a 9" square Fabulous Focaccia Pan with nonstick spray. (See “tips,” below for details about this pan as well as alternate pan options.) Fully line the pan with parchment so that there’s some excess overhanging the edges. Lightly spray the parchment with nonstick spray, add 1 tablespoon (13g) of the olive oil, and tilt the pan to spread the oil evenly across the bottom.
- Use a bowl scraper or flexible spatula to gently transfer the risen dough to the center of the pan. Drizzle 1 tablespoon (13g) of the olive oil over the dough.
- Cover the pan and let the dough rise at a warm room temperature for 1 to 1 1/2 hours, until it’s marshmallowy and jiggly; the dough should nearly fill the corners of the pan and be very close to the top edge.
- While the dough rises, make the topping: In a small bowl, combine the brown sugar, butter, and cinnamon and mix until it forms a smooth, thick paste. Cover and set aside until the dough has risen.
- Toward the end of the rise, preheat the oven to 450°F with a rack in the lower third.
- Once the dough has risen, lightly coat your fingers in oil. Starting at one edge, press your fingertips into the dough until they reach the bottom of the pan, creating dimples. Repeat this process, working your way from one edge to the other, spacing the dimples about 1 1/2" apart. The goal is to thoroughly dimple the dough without deflating it — aim for decisive yet gentle motions. If there are any large untouched areas of the dough, add additional dimples using one finger.
- To top the dough: Use your hands to distribute the brown sugar mixture all over the dough, aiming to fill in many of the dimples. Dimple the dough once more, pushing the brown sugar mixture into the dough. Drizzle the remaining 1 tablespoon (13g) olive oil all over the surface of the dough.
- Bake the cinnamon roll focaccia on the lower rack for 15 to 20 minutes, until the topping is thick and bubbly and any exposed dough is deep golden brown. If the focaccia is browning too fast, tent it with foil after 15 minutes.
- Remove the focaccia from the oven. Using the parchment and a thin spatula for assistance, carefully transfer the focaccia to a wire rack to cool slightly.
- To make the glaze: In a small bowl, stir together the ingredients to make a smooth glaze; the consistency should resemble honey. Drizzle it all over the warm focaccia and allow it to set, 10 to 15 minutes.
- Cut into slices and serve the cinnamon roll focaccia slightly warm or at room temperature.
- Storage information: Focaccia is best enjoyed the day it's made. If storing leftovers, wrap the focaccia loosely in foil, keep it at room temperature, and reheat before serving.
C'est un peu long à faire mais c'est super bon.
Je ne suis pas sur que le glaçage soit nécessaire.
La prochaine fois je n'en mettrais pas.
Ingrédients
Gâteau
- 430g de fromage à la crème, tempéré
- 120g de cassonade
- 4 œufs
- 1 gousse de vanille
- 280g de crème 35%
- 20g de farine tout usage
- une pincée de sel
Poires
- 1 poire bien mûre, en dés
- 3 càs de cassonade
- le jus d'un citron
- la gousse de vanille utilisée
Instructions
- Préchauffer le four à 445°F.
- Au batteur, combiner le fromage à la crème, la cassonade, les œufs et l'intérieur de la gousse de vanille.
- Une fois le mélange bien lisse, y ajouter la crème 35%, le sel et la farine, puis mélanger jusqu'à ce que le mélange soit homogène.
- Graisser et parcheminer un moule de 8 pouces, puis y verser le mélange.
- Cuire au four environ 25 minutes, jusqu'à ce que la croûte soit bien dorée et foncée, mais pas brûlée !
- Retirer du four et laisser tempérer 15 minutes, avant de le transférer au réfrigérateur pour le refroidir complètement (un minimum de 2 heures de repos).
- Pendant ce temps : ajouter la gousse de vanille vide dans un petit chaudron avec le jus de citron et la cassonade. Porter à ébullition et y ajouter la poire coupée en dés.
- Mélanger pour bien enrober les morceaux de poires et retirer du feu. Laisser tempérer jusqu'au moment de servir sur le gâteau.
Ingrédients
Génoise au chocolat
- 200 g de sucre
- 6 œufs
- 180 g de farine
- 60 g de cacao en poudre non sucré
- 1 cuillère à café de levure chimique
- 1 pincée de sel
Garniture et montage
- 800 g de cerises dénoyautées en conserve (égouttées et réservant le jus)
- 500 ml de crème fouettée
- 100 g de sucre glace
- 1 cuillère à café d'extrait de vanille
- 100 g de copeaux de chocolat pour la décoration
- Cerises entières pour la décoration (facultatif)
Instructions
- Préchauffez le four à 180°C (350°F). Beurrez et farinez un moule à gâteau de 26 cm de diamètre.
- Dans un grand bol, battez les œufs et le sucre jusqu'à ce que le mélange soit léger et mousseux. Tamisez la farine, le cacao, la levure et le sel, puis incorporez-les délicatement au mélange d'œufs et de sucre.
- Versez la pâte dans le moule préparé et faites cuire au four pendant 30 minutes, ou jusqu'à ce qu'un cure-dent inséré au centre du gâteau en ressorte propre. Laissez le gâteau refroidir complètement avant de le démouler et de le couper en trois couches horizontales égales.
- Pendant que le gâteau refroidit, préparez la crème fouettée en battant la crème, le sucre glace et l'extrait de vanille jusqu'à ce qu'elle forme des pics fermes.
- Imbibez légèrement les couches de gâteau avec le jus de cerise réservé
- Placez la première couche de gâteau sur un plat de service, garnissez-la de crème fouettée et répartissez la moitié des cerises égouttées par-dessus. Répétez avec la deuxième couche de gâteau, la crème fouettée et les cerises restantes. Placez la dernière couche de gâteau sur le dessus et recouvrez le gâteau entier de crème fouettée sur les côtés et le dessus.
- Décorez le gâteau avec les copeaux de chocolat sur les côtés et le dessus du gâteau. Si vous le souhaitez, ajoutez quelques cerises entières pour garnir le dessus. Réfrigérez le gâteau pendant au moins 2 heures avant de le servir pour permettre aux saveurs de se mélanger.

Ingredients
- ¾ cup organic cane sugar
- ½ cup skim milk powder
- 1 2⁄3 cups whole milk
- 1 2⁄3 cups heavy cream
- 3 egg yolks
Instructions
- Prepare an ice bath (see note below) in your sink or in a large heatproof bowl.
- In a medium saucepan, combine the sugar, skim milk powder and milk. Stir with a hand mixer or whisk until smooth.
- Make sure the skim milk powder is wholly dissolved into the mixture and that no lumps remain (any remaining sugar granules will dissolve over the heat). Stir in the cream.
- Clip a candy thermometer to the saucepan and set the pan over medium heat.
- Cook, stirring often with a rubber spatula and scraping the bottom of the pan to prevent sticking and burning, until the mixture reaches 110 degrees, 5 to 10 minutes. Remove the pan from the heat.
- Place the egg yolks in a medium bowl. While whisking, slowly pour in ½ cup of the hot milk mixture to temper the egg yolks.
- Continue to whisk slowly until the mixture is an even color and consistency, then whisk the egg-yolk mixture back into the remaining milk mixture.
- Return the pan to the stovetop over medium heat and continue cooking the mixture, stirring often, until it reaches 165 degrees, 5 to 10 minutes more.
- Transfer the pan to the prepared ice bath and let cool for 15 to 20 minutes, stirring occasionally. Pour the ice cream base through a wire-mesh strainer into a storage container and place in the refrigerator for 1 to 2 hours, or until completely cool.
- Now you're ready to make ice cream. Transfer the cooled base to an ice cream maker and churn it according to the manufacturer's instructions. Or, if you want, you can keep it in the refrigerator for up to 3 days before churning.
- After churning, serve immediately or harden in your freezer for 8 to 12 hours for a more scoopable ice cream.
Note: The easiest place to create an ice bath is in your kitchen sink. Fill the sink a quarter of the way with cold water and add a few handfuls of ice. Then gently lower the ice cream base into the ice bath. Let cool for 15 to 20 minutes, stirring occasionally. Make sure your base has cooled completely before churning.
Pour changer de la base Ben & Jerry que j'affectionne particulièrement.
Ingrédients
- 500 g de marrons glacés (ou marrons au sirop)
- 5 marrons supplémentaires
- 25 cL de lait
- 15 cL de crème liquide type fleurette
- 1 cuillère à soupe de rhum (facultatif)
Instructions
- Utiliser des ingrédients bien froids.
- Mélanger le lait, la crème et le rhum. Couper grossièrement les 500 g de marrons et les ajouter au mélange.
- Mixer finement jusqu’à ce que ce soit parfaitement homogène.
- Mettre à turbiner.
- Pendant ce temps, couper les 5 marrons restant en cubes d’environ 1 cm de côté. Les ajouter à la glace en fin de turbinage.
Ingrédients
- 30 cL de lait entier
- 20 cL de crème
- 85 g de sucre
- 3 jaunes d’œufs
- 180 g de beurre de cacahuète (Dakatine ou équivalent)
Instructions
- Mettre le lait, la crème et le beurre de cacahuète dans une casserole.
- Faire chauffer lentement en remuant de temps en temps pour faire dissoudre le beurre de cacahuète.
- Couper le feu dès les premiers bouillons.
- Mettre le sucre et les jaunes d’œufs dans un saladier.
- Fouetter jusqu’à faire blanchir les jaunes d’œufs.
- Verser le contenu de la casserole sur les jaunes, tout en mélangeant pour homogénéiser.
- Remettre le tout dans la casserole et faire chauffer à feu moyen. Ne pas cesser de mélanger avec une cuillère en bois et stopper le feu dès que le mélange nappe la cuillère.
- Verser l’appareil dans le saladier et laisser refroidir quelques minutes.
- Réserver une nuit au réfrigérateur.
- Turbiner.