Pour importation à usage personnel
- Fruits confits en provenance de France
- Description SH : 200600
- Extension AMG : 212201
- Limite : 20kg
- Farine de seigle en provenance des États-Unis
- Description SH : 110290
- Extension AMG : 717800
- Limite : 20kg
NOTE il faut valider les exigences de documentation et d'enregistrements au moment de l'importation. Les lois peuvent changer.
Liens utiles pour préparer l'importation


Here is the Original Carbonara Recipe from the business card I got in 2022 at "Luciano - Cucina Italiana" in Rome.
Ingredients :
- 280g spaghetti
- 4 egg yolks
- 200g guanciale in 1cm cubes
- 30g grana padano, grated
- 20g pecorino romano, grated
Instructions :
- Cook pasta in boiling water like mentioned on package.
- Frying little guanciale cubes in order to make them crispy outside and soft inside.
- Whisk in a bowl the egg yolks, the grana padano, the pecorino and the melted fat obtained from frying guanciale.
- Let this mixture rest.
- Once pasta is cooked, mix? (mantecarla) the mixture, ground pepper, and the little cubes of guanciale in a bowl, add a little warm water, and mix to get it creamy.
- Plate the pasta, springkle pecorino cheese oon top, and grrind fresh pepper too.
- Serve at the right temperature, not too hot, not too cold, tepid.
Now, below are my personal notes on how to really make carbonara pasta like Luciano Monosilio.
EGGS
- 70g pasta per person seems a good amount since the ddish is very rich.
- Use only egg yolks (1 per person) if you want a richer, yelower colour, or use whole eggs if you want it a little more traditional.
PASTA
- Spaghettoni, thick spaghetti are prefered to spaghetti. They take longer to cook, it gives you more time to cook the sauce PLUS they are hardder to overcook. Worst you could do is cappelli, vermicelli. They would mush and soak up too much sauce anyways.
- Pasta pot should be wide more than tall, especially for cooking spaghetti/oni. Underseason the water ( a pinch is plenty). Water level should be 1/2 inch (1cm) over pasta. Stirring is mandatory.
- Undercook pasta by 2-3 minutes, this will compensate for the amount of time they spend in the bain marie afterwards.
MEAT
- Luciano cuts guanciale in cubes, not matchsticks. The card says 1cm cubes but it’s more than that. At least 1/2 inch / 1.5 cm if not 2, as they shrink a bit during frying. If you’ve ever cooked steak before, you know that obtaining perfect medium rare center is easier with a thicker piece. Overcook = dry. Cooked right = juicy.
- Don’t go high heat. Pork fat has a low smoking point. Also, the chunks are too big for this they would be burnt outside and raw inside. Go Medium high to sear first, and then low. Once they are crispy on the outside, get them off the heat. Room temperature is fine. Keep all that melted guanciale fat, we’re gonna need HALF OF IT, not all of it, for the sauce later on.
BAIN MARIE / DOUBLE BOILER METHOD
- Ingredients mix better if they are warm, and using a double boiler instead of just a frying pan, means it will be more gentle. We’ll have more control, and we’ll be able to stay below 65°C where eggs start cooking and cheese start creating lumps. Large heatproof bowl over simmering water, the bottom of the bowl can't touch water?
- Whisk hard to mimick the SABAYON technique. SABAYON is a foamy custardy dessert where eggs are whisked over a bain marie. This dish really is about the light/foamy/airy texture. Air bubbles enhance sensory properties.
- As you whisk : Drizzle pork fat in there. This is the same proccess as for HOLLANDAISE SAUCE. By gradually incorporating fat you create an foamy emulsion. Holanlldaise uses clarified butter but here it’s pork fat.
The rest you can most likely get it from my video. Practice. Practice and Hang in there. You got this !


The Death of Intellectual Curiosity
on the worst consequence of schools
Sven Schnieders
Jan 11, 2020
The questions we are trying to answer are as follows: why are some people curious and keep on learning throughout their lives and others do not? Why do most people stop learning after school? What happened to the quality of education in universities?
The only information most people consume is the news and other news-like content; they rarely read books. Even if they do, they read the thriller or romance novel which is currently number one on the NYT bestseller list. (I sometimes wonder how long it would take for one of those one-thriller-a-year people to notice when someone gifts them a book they have already read—preferably with a different cover—or if they would not notice at all.) There is nothing wrong with reading these kinds of books, but you do not learn anything new (besides who committed the murder).
Intellectual curiosity not only matters for the book choices of individuals, it is—more importantly—also essential for the progress of society. People who keep on learning every day are the ones who create new technologies by trial and error and make our lives better. This curiosity-driven tinkering creates wealth in a positive-sum manner and is one of the main factors behind the economic growth of our society. (“positive-sum” because everyone is better off after these new technologies have been created—a “win-win situation” where everyone gets wealthier.)
The following critique of the education system goes beyond merely pointing out that these institutions mostly do not deliver on their main promise of teaching valuable skills. I argue that these institutions also destroy the desire to learn. This destruction is, as we will see, a real catastrophe.
Professors Only Talk
Many people have heard of the “concept” of lifelong learning mostly from professors who are themselves not lifelong learners but think that it is a great idea. People who keep on learning throughout their lives do not talk in boring presentations about it, because for them it is not an abstract concept that has to be integrated into everyone’s life. They know that lifelong learning is not something that academics can persuade people to do, rather it is a natural consequence of intellectual curiosity. This is a key observation and changes the goal from “making people lifelong learners” to “making people intellectually curious.” Academics—not realizing this distinction—have been trying to persuade people into becoming lifelong learners by highlighting the importance of it; they should instead foster the natural curiosity and critical thinking of their students. This critical thinking would ironically relieve many of the same professors of their jobs—mostly those in the social “science” category.
So how do we make people intellectual curious? We do not need to, they already are. More accurately, they used to be. You see this curiosity is in children. They are learning machines asking questions all day, trying to figure out everything. Now a curious person might wonder: Why are there not many more intellectually curious adults? And that is exactly the right question. We will see later how schools and universities destroy this quality in most people. But first, we turn towards the discussion of learning and mental models.
Mental Models for a Better Life
We see the world not as it is but through our mental models, which help us to make sense of the world and with which we try to predict the future. When we learn and understand something new, we are making our mental models of the world less wrong. A superior model helps us better explain the world and more accurately predict the future. Here we will have to sidestep the epistemological discussion of how we know that some explanations are better than others since it would, unfortunately, go beyond the scope of this essay (I will probably discuss it in a future essay). But even without this discussion, we know that there are mental models and theories which predict the future more accurately. Also notice that we can only make those models “less wrong” and never perfect. This idea of falsification was popularized by Karl Popper and is the foundation of—all serious—modern science. The result of this epistemological viewpoint is that we need to be prepared for any of our mental models (theories) to be falsified at any given time because we can never be certain that something is true; there is no authority we can ask for the truth.
“Clear thinkers appeal to their own authority.” —Naval Ravikant
This might sound like a negative or pessimistic view, but it is not. A better way to look at it is that there is always room to improve our mental models of the world, and with them to improve our lives. In addition to that, once you have reasoned through an argumentation yourself an authority has no more power to change your mind than anyone else.
The Simplicity on the Other Side
Now we come back to the question from the start: Why do we not have more intellectually curious adults? The first reason is that people are intellectually lazy. This is not a novel observation but it explains part of the phenomenon. We need to keep in mind that when improving mental models, they get—at least at first—more complex. Things that seemed to be simple and certain become more nuanced and uncertain. For example, the view “We need to ban all guns!” might become more nuanced after seeing people all around the world getting suppressed by tyrannical governments with no way to defend themselves. Changes like this rarely happen because the former mental model is less complex and an easy “one fits all solution.” There is a strong bias for being consistent with your past choices and opinions, which makes changing them even more challenging. For political opinions, the social pressure for sticking with the opinions of your group can get extremely strong and people who nonetheless change their views are deterred for expressing them. Fortunately, this essay is more concerned with scientific mental models where the social pressure tends to play a smaller role.
An important counter-intuitive observation is that mental models do not keep increasing in complexity. Things get simpler after putting enough time and energy into understanding them. This is known as simplicity on the other side of complexity.
For any given subject or phenomenon, the y-axis (vertical) represents the complexity and the x-axis (horizontal) represents your degree of understanding. For any new subject, you start on the left with low complexity and low understanding. This means you have a lot of wrong assumptions and do not know how all the pieces fit together; you might think you know, but you are most likely wrong. As your understanding grows, the complexity increases as well. You learn that many of the assumptions you had were wrong or overly simplistic and that there is a lot more complexity to the interactions of all different variables than you taught. But after you understand more, things get simpler again. Everything “makes sense” and you know which factors matter so you can now focus on these few variables when analyzing the subject. Depending on the understanding you started with, the mental model “on the other side” is also simpler.
“For the simplicity on this side of complexity, I wouldn't give you a fig. But for the simplicity on the other side of complexity, for that I would give you anything I have.” —Oliver Wendell Holmes
The reason most people never experience this simplicity is that they confuse learning and understanding with what is happening in School and University; topics are taught in a way that only ever increases the complexity of mental models and just a small minority of people experience this other side of complexity.
Memorization is Not Understanding
The main reason for this ever-increasing complexity of mental models is that memorization is treated as learning. Everyone is only adding new facts to their mental models, seldom subtracting any or building new and deep connections. People forget everything they have “learned” (memorized) one week after the exam. Some students know that they do not possess any new knowledge or skills afterward—especially true in the social “sciences.”Students do not know what “real” learning feels like and that is a big problem; they do not know the difference between understanding and memorizing. If you have never seen someone confuse these two, this might sound impossible, but let me assure you that it is not. I have often had the experience of someone saying they understand an equation when they had merely memorized it—knowing how to use the formula is not the same as understanding it.
This confusion is also part of the reason why people today think they cannot understand all major theories any more. The mainstream view on this is that in ancient times it was indeed possible to understand everything that was understood, but now there are too many subjects and no one has enough time to study them all. This view is flawed. Knowledge is indeed getting broader because there are more and more individual subjects. But people forget that the depth of our explanations is increasing as well; one theory today can explain more than one theory in the past could. Michael Faraday and James Clerk Maxwell, for example, combined the fields of electricity and magnetism into electromagnetism. Understanding this single theory is easier than understanding two separate theories and also gives you more explanatory power. In this race between broader knowledge and deeper explanations (how much one explanation can explain), depth seems to be coming out on top. It is now easier to understand all major theories than it was in ancient times. However, this is impossible if you only memorize. You need to understand those theories. (For an in-depth epistemological discussion of this topic I recommend reading David Deutsch’s “The Beginning of Infinity”.)
Another problem is that especially in the social “sciences,” the exams are built on the principle of memorization. This means that people who are trying to understand something (if there is anything to understand at all) are at a disadvantage. Understanding takes more time and when only superficial facts are queried, it is unnecessary. Questioners often want to know the name of the author of a specific model and not how this model works. Knowing the name is close to useless in a time when the internet exists. This is one of many signs that universities are less about learning than about mindless work and credentials. These credentials are not an indicator of how much a person has learned, rather they show how hard a person is willing to work to satisfy some arbitrary criteria. Honest learning and understanding are not fostered, instead “hacking exams” is. Paul Graham wrote about this problem in “The lesson to Unlearn”: “But wasting your time is not the worst thing the educational system does to you. The worst thing it does is to train you that the way to win is by hacking bad tests.” His main point is that people get taught that the best way to succeed in life is by hacking tests. For example, people try to “cheat” at fundraising for their company by gaming some metric instead of building a great product. This is obviously a bad long-term strategy since you cannot fool reality—or even investors—forever.
Knowing how much mindless work people are willing to do is valuable knowledge for most employers, especially as the company size grows and work gets more and more mechanical. In big companies, individual contributions (value created) are hard to detect, which means more—hackable—metrics need to be used to assess employees. One of the results is that in tech companies today, people are still getting paid for the amount of time they put in, even though the output—the value they create—does not correlate much with this input. A great software engineer can in one hour create the same amount of value that a decent engineer creates in one day.
We Know Very Little
Another way schools and universities destroy curiosity is by presenting answers as absolute and certain. The world gets portrait overly simplified and the words “We don’t really know how X works.” are rarely used. Part of this simplification is necessary to teach certain subjects, but the problem is that students do not get taught that the real world is way more complex than these models and that a lot of things are only poorly understood—an especially big problem in social “sciences.”
Let’s take a look at evolution. Most people think that the problem of how life evolved on earth has been solved by Charles Darwin, but it is not that easy. Evolution through natural selection explains a big part of this question but not everything and even combined with sexual selection, some problems remain that cannot be satisfactorily explained with this theory. The "Cambrian Explosion” 500 million years ago remains one of the major challenges for traditional evolutionary theory to explain. In a relatively short time frame a lot of complex organisms appeared; something difficult to explain for the traditional theory. This led people like Stuart Kauffman to put forth some interesting theories (in his case self-organization) to explain this phenomenon. I am not trying to discredit the traditional evolutionary theory. I am merely pointing out how little we know and how much there is to learn about the world.
To someone suggesting that it is not possible to teach a subject while at the same time point out how little we know, I recommend reading “Six Easy Pieces” by Richard Feynman. This book is an excerpt of the popular “Feynman Lectures on Physics” and a great example of someone teaching a subject while fostering curiosity by pointing out how little we understand. The reason that not many more professors are doing this is twofold. First, most of them do not know the limits of their field and knowledge. Second, in some disciplines would be very little left to teach and those same professors would lose their jobs. This outcome is desirable since destroying curiosity and—in the case of social “science”—teaching half-truth (at best) and false “facts” (at worst) is not creating value for society.
The Death of the Individual
Schools and universities also take all the fun out of learning by forcing everyone to study a subject in a rigid and planned manner. This is an inevitable drawback of educating a lot of people in the same way—only limited space for individuality; as a result studying topics gets more difficult and boring. The solution is autodidacticism—learning things on your own. We live in an age where anyone with the desire to learn and access to the internet can learn anything for (almost) free. Previously the means for learning where scares, now it is only the desire.
Once you start studying on your own—out of pure curiosity—you will notice a big difference in the way you understand and retain new information. The relevance of any given information used to be determined by how important it was for passing the exam. Now you get to decide which information is worth keeping and which is not. This skill—detecting a signal in all the noise of information and discarding everything else—is one of the most important skills to acquire in our modern information age. Ideally, you use boredom as your natural content filter, allowing yourself to only study what you are naturally interested in.
Skin in the Game
So how did we get to this point? As with every system that does not improve over time, the answer is no skin in the game. Without a free market for universities–and more generally for education—where the consumers decide the value of a service, there will not be any improvement. Bad universities need to go bankrupt so that the education system as a whole can improve. The same for bad professors. This problem has been addressed by projects like “Lambda School” where students don’t pay upfront for their education, but afterward and only if they get a high paying job. This puts the university’s skin back into the game. If they don’t teach their students valuable skills (meaning valued by society and not by some bureaucrat), they go bankrupt.
The Internet to the Rescue
The internet—as always—has already helped to solve this problem by providing a free market for education and knowledge. This not only improves the quality of the information—after filtering yourself—but also lowers the cost. There is no longer a central authority to decide what knowledge is “true” and “important enough” to be taught. The same thing the internet did to media is now happening to education. The gatekeepers (Universities) get removed and the responsibility now lies with the individual. Many subjects that are currently being taught at university will probably not survive the test of the free market (and the test of time). Especially the ones that are more concerned with political indoctrination than with education (economics, gender studies, etc.) will have a hard time surviving because they provide no valuable knowledge—again, this means useful to society. We can use the Lindy effect to predict which subjects will survive. This effect says that for non-perishables things like ideas, books, technology, or music the expected lifetime increases with every day they survive. This means that music that has survived 100 years is excepted to survive another 100 years. Once that piece of music has survived 200 years it is expected to survive another 200 years. New things are likely to be replaced by other new things while old —time tested—things are anticipated to stay around for even longer. With this in mind, we can take a look at the subjects taught at universities and infer that Math, Physics, Philosophy, Biology,…, are probably still going to be around for a very long time, while new subjects will be replaced by other even newer ones. The internet allows the speed of iteration to increase significantly, providing people with knowledge and skills that are valuable in the present.
Overall this is a positive view of the future of education. People are already able to learn anything they want on their own with very little or no cost. The possibilities of educating yourself on the internet will only increase. To take advantage of this shift in education, the only thing you need is intellectual curiosity—to see learning as something you do for fun in your “free time.”
Protect your intellectual curiosity at all costs because it is one of your most important assets.


Ingrédients
- Eau-125 ml (½ tasse)
- Sucre-125 ml (½ tasse)
- Vinaigre de vin blanc-125 ml (½ tasse)
- Feuille de laurier-1
- Branche de romarin frais, coupée en 2 -1
- Piments biquinho-500 ml (2 tasses)
Instructions
- Dans une petite casserole, portez à ébullition l’eau, le sucre et le vinaigre. Déposez le romarin et le laurier. Ajoutez les piments et laissez mijoter doucement 5 minutes.
- Versez dans des pots préalablement stérilisés d’une capacité de 250 ml (1 tasse) chacun en laissant environ 1 cm (½ po) d’espace sur le dessus. Nettoyez bien le rebord des pots avant de refermer le couvercle sans trop serrer.
- Déposez une petite grille dans le fond d’une grande casserole remplie d’eau frémissante. Déposez délicatement les pots. Ils doivent être recouverts d’au moins 2,5 cm (1 po) d’eau. Laissez frémir doucement 10 minutes à mi-couvert. Retirez délicatement les pots de l’eau à l’aide d’une pince et laissez tiédir.
- Si désiré, il est possible de retirer la branche de romarin et la feuille de laurier pour ensuite réduire en purée lisse au mélangeur les piments avec le liquide. Vous obtiendrez donc une belle sauce épicée.
- Il est possible de ne pas procéder à l’étape 3 de la recette. Si vous omettez cette étape, il faudra alors conserver les pots au réfrigérateur.


Ingredients
- 8.8 oz (250g) mascarpone
- 1 ¼ cups (10.1 fl oz/300ml) full fat milk
- 2.8 oz (80g) sugar
- ½ teaspoon vanilla extract
- 1 teaspoon instant espresso powder
- 2 ½ tbsp (40ml) marsala
- 3 large egg yolks
- 3 savoiardi biscuits lady finger
- 1 stong brewed espresso
Instructions
- Whisk the egg yolks and sugar together in a large bowl until pale and thick. Put the mascarpone and milk in a saucepan, heat the milk mixture over a low medium heat until it comes to a boil. Remove from the heat, add the vanilla extract and let it sit for 1 minute.
- Very gradually add the milk to the egg mixture whilst continuously whisking. Once it all fully incorporated transfer the custard liquid back into the saucepan on a low heat. Add the espresso powder and whisk until dissolved.
- Stir the custard for 5-10 minutes until it has thickened enough to coat the back of a wooden spoon. Remove from the heat, add the marsala, stir then set aside to cool.
- Pour the ice cream into your ice cream machine.
- Dip each side if the savoiardi biscuits into the espresso for a second and place on a chopping board. Cut into small cubes, set aside.
- When the ice cream has thickened and almost ready (usually after around 10 minutes) add the savoiardi biscuits a little at a time. Once ready, transfer to a freezer proof tub and freeze until ready to serve.

Ingrédients
- des pelures de pommes
- des trognon de pommes
- 1 c.à s. de sucre (non raffiné, il est bien plus sain) pour 230 ml d’eau
- de l’eau de source (pour éviter le chlore)
- 1 bocal en verre d’1 L propre et stérile
- 1 torchon, 1 filtre à café ou 1 gaze stérile
Instructions
- Remplissez les ¾ du bocal en verre avec les pelures, trognons, morceaux non utilisés de pommes.
- Versez l’eau jusqu’à recouvrir les morceaux de pommes.
- Ajoutez le sucre et mélangez jusqu’à ce qu’il soit complètement dissout.
- Couvrez le bocal avec un torchon propre ou un filtre à café tenu avec un élastique.
- Placez le pot dans un endroit chaud et sombre pendant environ 2 semaines.
- Remuez le mélange tous les 3-4 jours et vérifiez que les morceaux soient bien immergés. Si de l’écume brunâtre/grisâtre se développe sur le dessus, retirez-la.
- Au bout de 2 semaines, filtrez le liquide. Les résidus de pommes doivent être enlevés (vous pouvez les mettre au composteur).
- Une fois filtré, entreposez votre bocal dans un endroit tiède et sombre. Laissez encore le liquide reposer 2 à 4 semaines, il va ainsi pouvoir affirmer son goût.
- Une fois que vous êtes satisfait du goût de votre vinaigre de cidre, fermez le bocal hermétiquement et conservez-le au réfrigérateur aussi longtemps que vous le souhaitez.


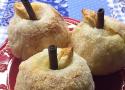
Ingredients
- 4 medium sized apples
- 4 tablespoons golden raisins and currants, mixed
- 1 tablespoon walnut pieces, chopped
- ¼ teaspoon cinnamon
- 3 tablespoon sugar, divided
- 4 tablespoons apple juice or rum
- 4 puff pastry squares (approx. 5 x 5 in.)
- 2 egg yolks
- 1 tablespoon water
Instructions
- Preheat the oven to 400F. Wash the apples, and peel and core them. Mix the raisins, walnuts, cinnamon and 1 tablespoon of sugar, and add the apple juice or rum. Set aside and soak for a couple of minutes, then fill each apple with the mixture. If you have boerenjongens, this is a good time to use them!
- Set each apple, top side down, on a square piece of puff pastry and wrap the apple, by pulling up each corner and tucking it slightly into the cored hole. Make sure all sides are covered and clinging to the apple.
- If you have some extra dough left and a couple of cinnamon sticks, you can make stems and leaves and wrap the apple with an additional decorative something or other, but it's not necessary. If you do use cinnamon sticks, make sure to wrap the top with a little aluminum foil, as they tend to burn easily.
- Make an egg wash with the yolks and the water, and brush on the dough. Sprinkle all four apples with the remaining sugar. Place each apple in a ramekin or small aluminum pie dish, smooth side up. Bake golden brown in 20-25 minutes.
Vraiment délicieux. Il faut porter attention à l'emballage de la pomme pour ne pas avoir d'épaisseurs de pâte qui ne seraient pas cuites.


Ingrédients
- 3 L de cerises à grappes
- 3 tasses (750 ml) d’eau
- 6½ tasses (1 625 ml) de sucre granulé
- 2 sachets (170 ml) de pectine liquide BERNARDIN
Instructions
- Laver et équeuter les fruits. Combiner les cerises et l’eau dans une casserole en acier inoxydable et porter à ébullition. Baisser le feu, couvrir et faire bouillir doucement 15 minutes, en remuant de temps à autre. Retirer du feu.
- Verser le mélange dans un sac à gelée humide ou dans un tamis recouvert de coton à fromage au-dessus d’un contenant profond et laisser égoutter pendant au 2 moins heures, ou toute la nuit. Pour accélérer le processus, on peut presser le sac, mais le liquide pourrait devenir trouble.
- Mettre 6 bocaux Mason propres de 250 ml sur le support d’une marmite à conserve; les couvrir d’eau et faire mijoter (180 °F/82 °C). Mettre les bagues de côté. Garder les bocaux au chaud jusqu’à leur utilisation.
- Il n'est pas conseillé de préchauffer les couvercles Bernardin®. Le composé de scellage de nos couvercles pour la mise en conserve à la maison performe mieux à température ambiante que lorsqu'il est préchauffé dans de l'eau chaude non bouillante (180 °F/82 °C). Il suffit de laver les couvercles à l'eau chaude savonneuse, de les sécher et de les mettre de côté jusqu’au moment de les utiliser. Le préchauffage peut réduire le vide obtenu lors de la mise en conserve au bain-marie et entraîner des problèmes de déformation lors de la mise en conserve sous pression.
- Mesurer 3 tasses (750 ml) de jusdans une grande casserole profonde en acier inoxydable. Incorporer tout le sucre. Pour réduire l’écume, ajouter 1/2 c. à thé (2 ml) de beurre ou de margarine. À feu vif, porter à ébullition assez forte pour qu’elle se maintienne quand on remue le mélange. Ajouter la pectine liquide, en vidant bien le sachet. Faire bouillir à gros bouillons 1 minute, en remuant constamment. Retirer du feu et écumer rapidement au besoin.
- Verser rapidement la gelée dans un bocal chaud jusqu’à 0,5 cm (1/4 po) du bord (espace libre). Retirer les bulles d’air à l’aide d’un ustensile non métallique et ajuster l’espace libre en ajoutant de la gelée au besoin. Essuyer le bord du bocal pour enlever tout résidu collant. Centrer un couvercle chaud sur le bocal. Visser la bande jusqu’au point de résistance, puis resserrer ensuite du bout des doigts. Remettre le bocal plein sur le support dans la marmite. Répéter pour le reste de la recette.
- Une fois la marmite pleine, s’assurer que les bocaux sont couverts d’au moins 2,5 cm (1 po) d’eau. Couvrir et faire bouillir à gros bouillons avant de commencer à minuter le traitement. Àune altitude de 305 m (1 000 pi) ou moins, traiter à la chaleur – faire bouillir les bocaux pleins pendant 10 minutes**.
- Le traitement terminé, éteindre le feu, enlever le couvercle et attendre 5 minutes avant de retirer les bocaux en les tenant bien droit. Les déposer debout sur une surface recouverte et les laisser refroidir 24 heures sans y toucher. NE PAS RESSERRER les bandes.
- Lorsque les bocaux auront refroidi, vérifier s’ils sont bien scellés. Les couvercles scellés sont courbés vers le bas et ne bougent pas quand on les presse. Retirer les bandes, essuyer et sécher les bandes et les bocaux. Ranger les bandes séparément ou les remettre sur les couvercles sans serrer. Étiqueter les bocaux et les entreposer dans un endroit frais et sombre. Pour une meilleure qualité, utiliser dans les 12 mois qui suivent.

Cp's for my tree. | The grid is 50x50, the middle 6 flaps ar… | Flickr
Cp's for my tree. | The grid is 50x50, the middle 6 flaps ar… | Flickr
Crane Bonsai Tree Folded by Me (Modified Steven De Clercq's Tree 1.0) : origami
IMG_20180412_104922 | 1 uncut square 50x50 cm dó paper. Desi… | Flickr
IMG_20180412_105531_20180412111129489 | 1 uncut square 50x50… | Flickr
My first own design! : origami
