Ingrédients
- 6 piments habanero
- 750g de mirabelles
- 20cl de vinaigre de cidre
- 20cl de jus de citron vert
- 6 gousses d'ail
- 2 oignons
- 1 CàS de graines de coriandre
- 1 CàS de graines de cumin
- Huile d'olive
Instructions
- Dénoyauter les mirabelles. Ecraser grossièrement les gousses d'ail et couper les oignons en quartiers. Epépiner les piments. Attention, mettez des gants !
- Faire torréfier les épices à sec quelques secondes jusqu’à ce qu’elles dégagent leur parfum et les broyer au mortier ou au moulin à épices.
- Faire revenir 10mn le piment dans de l'huile d'olive et la moitié du vinaigre avec l'ail et les oignons. Attention, ouvrir grand les fenêtres ou porter masque et lunettes, et ne pas se pencher sur la cocotte !
- Ajouter les mirabelles, le restant du vinaigre, les épices. Saler et ajouter un peu d'eau (vous pourrez en rajouter pour corriger la texture. Laisser mijoter pendant 30mn, puis laisser complètement refroidir.
- Mixer la préparation finement avec le jus de citron vert, et corriger la texture avec de l'eau ou du jus de citron en fonction de ce que vous désirez (plus ou moins visqueux).
- Embouteiller immédiatement. La sauce piquante se conserve à l’abri de la lumière une fois ouverte.

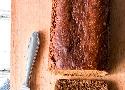
Ingredients
- 2 cups rye flour
- 1 cup all purpose flour
- ⅔ cup brown sugar
- 2 teaspoons baking soda
- 1 teaspoon baking powder
- 2 teaspoons ground cinnamon
- ½ teaspoon ground ginger
- ¼ teaspoon ground nutmeg
- ¼ teaspoon ground allspice
- ¼ teaspoon ground coriander
- ¼ teaspoon ground cloves
- ⅛ teaspoon ground anise
- ⅛ teaspoon ground black pepper
- ¼ teaspoon salt
- ½ cup honey
- ⅓ cup molasses NOT blackstrap!
- ¾ cup milk plus extra for brushing
Instructions
- Preheat the oven to 350°F (175°C). Line a 9x5 inch loaf pan with parchment paper.
- Add all dry ingredients to a large bowl and mix well.
- Place wet ingredients in a small saucepan and gently warm over medium heat.
- Add the warmed wet ingredients to the dry ingredients and mix using a rubber spatula until a sticky batter forms.
- Pour the batter into the prepared loaf pan and flatten the surface. Lightly brush the top with milk. Bake for 60 minutes or until a toothpick inserted comes out clean. Cool in the pan and serve warm or cold with butter.
Notes
- when you warm the wet ingredients, please really do just gently warm them until they're completely runny. Do not boil them.
- do not use blackstrap molasses, they are too bitter. Regular dark molasses like the ones used for gingerbread are the right kind.
- if you don't have all the individual spices the recipe calls for, use 2 teaspoons of ground cinnamon and 1.5 teaspoons of either pumpkin pie or apple pie spice mix.
- unlike American-style quick breads, this one is meant to be sliced into fairly thin slices. And since the bread is baked without any added fat... most definitely serve it slathered with butter ?

Oude Wijven Koek en néerlandais
Ingredients
- 3 cups all-purpose flour
- 1 cup sugar
- 1 cup brown sugar (packed)
- 1 teaspoon baking soda
- 2 teaspoon baking powder
- ½ teaspoon salt
- 2 teaspoon anise seeds
- 1 teaspoon cinnamon
- 1 egg
- 1 cup water
- 1 cup sour cream (or yogurt)
Instructions
- Preheat oven to 375 F degrees.
- Spray a cake pan or a Bundt pan with cooking spray.
- In the mixer of your bowl whisk together all the dry ingredients. Add egg, water and sour cream or yogurt and mix until well incorporated.
- Pour batter in prepared pan and bake for about 35 to 45 minutes or until a toothpick inserted in the middle of the cake comes out clean.

Ingredients
- 1½ pounds red jalapeños, stems snipped off, leaving green tops intact (see notes)
- 6 cloves garlic, peeled
- 4 tablespoons light brown sugar
- 1 tablespoon kosher salt
- ½ cup distilled white vinegar
Instructions
- Place jalapeños, garlic, sugar, and salt in bowl of a food processor fitting with steel blade. Pulse until chiles are very finely chopped, stopping to scrape sides of bowl as necessary. Transfer mixture to a clean jar, seal, and let sit at room temperature in a cool, dark place.
- Check jar each day for fermentation, when little bubbles start forming at bottom of jar, about 3-5 days. Open jars, stir, and reseal jars daily to let ferment until chiles are no longer rising in volume, an additional 2-3 days.
- Transfer chiles to jar of a blender, add in white vinegar, and purée until completely smooth, 1-3 minutes. Transfer to a mesh strainer set atop a medium saucepan. Strain mixture into saucepan, using a rubber spatula to push through as much pulp as possible, only seeded and larger pieces of chiles should remain in strainer.
- Bring mixture to a boil, reduce heat, and simmer until sauce thickens and clings to a spoon, 5 or 10 minutes. Transfer to an airtight container and store in refrigerator for up to 6 months.
Ingredients
Dough
- ½ Cup warm water
- 1 Tbsp./Packet Red Star Platinum Yeast (7g)
- 1 Cup milk
- ¼ Cup butter (57g)
- ½ Cup sugar
- ½ tsp. salt
- 1 large egg
- ½ tsp. cardamom
- 3 ¾ Cup unbleached bread flour
Drizzle
- ½ Cup powdered sugar
- ¼ tsp. vanilla
- 1-3 tsp. milk
Instructions
- Place warm water and yeast in EZ DOH bucket and stir to dissolve yeast.
- Heat milk, butter, sugar and salt together in a saucepan on low, until butter is melted. Let cool until just warm to the touch.
- Pour into EZ DOH bucket with yeast mixture.
- Stir in egg, ¾ Cup flour and cardamom.
- Cover and let rest for 20 minutes.
- Add remaining flour and EZ DOH-it for 2-3 minutes until the dough is smooth and soft and all ingredients are incorporated.
- Remove dough from bucket, spray bucket with cooking spray, “smooth” dough and replace in bucket.
- Cover and let rise until doubled.
- At this point, the dough can be removed from the bucket and divided into 2 equal portions for two medium-sized loaves.
- Divide each piece into 3 equal pieces.
- Roll each piece out to about 12”, or long enough to braid.
- Connect the ropes at the top by pressing together and then tucking under the dough.
- Continue to braid the dough, then press together at the base and tuck under.
- Place the two braided loaves on a greased baking sheet, cover and let rise until almost doubled.
- Bake at 350°F for 25-30 minutes or until golden.
- Remove from oven and brush with butter to soften crust.
- Cool on a wire rack.
- Mix drizzle ingredients and drizzle over the cooled loaf.
Ingrédients
- des pommes de terre
- huile d’olive
- sel, poivre
- muscade
Instructions
- Bien laver les pommes de terre pour conserver une peau bien propre qui pourra se déguster avec la chair pour ceux qui veulent…
- Découper chaque pomme de terre en lamelles sans les trancher complètement. L’astuce c’est d’utiliser des « butoirs » de chaque côté pour éviter de se retrouver avec une pomme de terre coupée en 2. Des cuillères en bois peuvent facilement faire l’affaire.
- Verser un bon filet d’huile d’olive et assaisonner généreusement de sel, poivre et ici de muscade râpée.
- Faire cuire à four préchauffé à 200° pendant 40 minutes, vérifier éventuellement la cuisson avant de sortir les pommes de terre du four et c’est prêt !

Faire ses cuirs de fruits maison.
Déshydrater c'est garder le produit "vivant". Comme il n'y a presque plus d'eau il se conserve, mais tous les nutriments sont préservés. Pour les fruits, c'est idéal : on ne cuit pas et toutes les saveurs sont concentrées.
Rien de plus simple à préparer. Faire un cuir, consiste à sécher une purée de fruits. Fraises, cerises, prunes ou framboises, vous pouvez transformer n'importe quel fruit en cuir et même faire des mélanges...
Utilisez des fruits bien mûrs.
Équeutez, lavez et ôtez sans hésiter les parties touchées.
Égouttez et passez au blender avec 10 à 20 % de sucre.
Placez un tapis silicone ou du papier sulfurisé au fond des plateaux de votre déshydrateur sans boucher complètement les passages d'air. (Il existe aussi des petits bacs souples très pratiques.)
Versez la purée de fruits jusqu'à obtenir une couche d'au moins 6mm d'épaisseur. La couche ne doit pas être trop fine si vous souhaitez avoir de la tenue.
Installez vos plateaux et programmez votre déshydrateur à moins de 45°C. si vous tenez à préserver tout le potentiel nutritionnel de vos fruits. Après 8 heures de séchage, vos cuirs sont formés et vous devriez pouvoir décoller la feuille de fruits. Si ce n'est pas encore le cas, rajoutez quelques heures au déshydrateur. Tout dépend de la quantité d'eau dans vos fruits...
Les cuirs "cuits"
Certains cuirs sont plus solides que d'autres. La pomme et la poire ont tendance à manquer de tenue mais vous pouvez remédier facilement à cet inconvénient en séchant une compote que vous aurez préalablement cuite à la casserole. Pour tous les fruits, vous pouvez aussi, obtenir des parfums plus soutenus, en programmant votre déshydrateur à 60°C. Laissez 6 heures avant de finir à 45°C.
Sucre et liants
Tout dépend du taux de sucre de vos fruits mais pour un cuir moyen, ajoutez entre 10 et 20 % du poids des fruits en sucre. Vous pouvez remplacer le sucre par du sirop d'agave ou mélanger avec du miel
Certains fruits mixés donnent des purées très liquides. Donnez de la consistances et du moelleux en ajoutant des bananes ou des oléagineux : purée d'amandes, de cajou ou de noisettes...
C'est prêt quand ?
La surface de votre cuir est devenue lice et soyeuse, vous pouvez le décoller facilement : c'est prêt ! Votre cuir doit rester souple, malléable et agréable en bouche. Si vous souhaitez le mettre en forme pour faire des cornets, des barquettes, ou n'importe quel type de présentation gourmande assez rigides, façonnez votre cuir et laissez durcir au déshydrateur une ou 2 heures de plus.
J'ai fait ça avec des mangues et du sirop d'agave. C'était excellent. Par contre, les temps annoncés ont été beaucoup plus long pour moi.

Ingredients
- 1 lbs chicken breast diced into bite-sized pieces
- 2 eggs beaten
- 1 cup panko bread crumbs
- 3 cups broccoli florets
- 3 green onions greens sliced thin
- salt
- fresh cracked black pepper
- toasted white sesame seeds optional, for topping
- crushed red pepper flakes optional, for topping
- olive oil
- spray oil
For Sauce
- 2 navel oranges zest one orange, juice both oranges
- ¼ cup honey
- ¼ cup soy sauce
- 1 tbsp freshly minced garlic
- 2 tsp fresh grated ginger or sub 1/2 tsp ground ginger
- 2 tbsp rice vinegar
- 2 tbsp cornstarch
- sriracha sauce optional: mild – 1 tsp; med – 2 tsp; hot – 3+ tsp
Instructions
- Begin preheating the oven to 425° F and spray a large rimmed baking sheet with oil.
- Season the chicken pieces with salt and fresh cracked black pepper and pour the panko out onto a wide plate. Working in batches, coat the chicken in the beaten egg then press into the panko to coat. Arrange on the prepared baking sheet as spaced out as possible.
- Spray the tops of the chicken pieces with oil. Place the chicken into the preheated oven and bake for 10 minutes. After 10 minutes, flip each piece and rotate the pan when you place it back into the oven. Bake for another 7-10 minutes until the chicken is crispy and cooked through.
- Meanwhile, on a separate baking sheet, toss the broccoli with a drizzle of oil, salt, and pepper. Roast in the oven for about 10 minutes, tossing halfway through, until crisp and charred in a few spots. OR, pan fry broccoli in a swirl of olive oil over medium heat for 2-3 minutes.
- While the chicken cooks, make the sauce. Combine the soy sauce and cornstarch in a small bowl and whisk until fully combined. Pour into a small saucepan, then add the rest of the ingredients for the sauce and mix well. Bring to a boil over high heat, then reduce heat and simmer until a thick sauce forms, about 5 minutes.
- Transfer the cooked chicken into a large mixing bowl, drizzle the sauce over the chicken and toss to coat (you may not want to use all of the sauce, so add it in steps until the chicken is coated to your liking). Add in the broccoli and toss to combine. Serve immediately topped with green onion, sesame seeds, and crushed red pepper. Great on a bed of white rice!
Ingredients
- 3 packets Biscoff cookies
For the Filling
- ¼ cup Biscoff Cookie butter
- 2.5 cups Heavy whipping cream chilled straight from the fridge
- 16 oz Mascarpone cheese straight from the fridge (454g)
- 1 teaspoon Pure Vanilla Extract
- ½ teaspoon Cinnamon
- 1.5 cups of sugar
- Pinch of salt
For Coffee mixture
- 1.5 cups water
- 3 tablespoons instant espresso or instant coffee, or just brew espresso and let it cool.
For Biscoff drizzle
- heavy cream
- coffee
- Biscoff Cookie butter
Instructions
- Using a handheld electric or a stand mixer, beat mascarpone, Biscoff cookie butter, cinnamon, vanilla, salt, and sugar on a low speed until combined. Use beater attachment for this process. This should take a minute.
- Now switch to a balloon whisk and add cold heavy cream to the same bowl. Start beating it on a low speed for 2 minutes then increase the speed to medium. Scrape the side and the base of the bowl a few times in between.
- Whip until stiff peaks. That means the cream should hold well on the whisk upside down. This process should take 8-10 minutes. Do not overwhip as it will split and turn into butter. Transfer it in the fridge until use.
- Whisk heavy cream with Biscoff cookie butter over low heat and add freshly brewed espresso or cold brew. Mix well until a smooth, velvety liquid.
- Line pan with Biscoff brand cookies.
- Pour cooled espresso or cold brew over cookies to absorb the liquid. (You can also simply dip each cookie first before laying it down, if you prefer!)
- Pipe your eggless Tiramisu filling over the first layer of coffee soaked cookies. Use spatula to flatten this layer evenly.
- Add a layer of the cookie butter/coffee drizzle.
- Repeat a second layer of cookies. This time, ONLY dip each cookie into espresso or cold brew before laying it down. Do not pour liquid in for this layer.
- Repeat a second layer of the tiramisu filling. Make sure it's nice and level!
- Drizzle coffee/ cookie butter mixture over the top layer in any pattern you wish! Now, it's time for finishing touches!
- Sprinkle crushed Biscoff cookie crumbles and anything else edible that you want, within reason, of course!
- Keep this dish refrigerated at all times! Only remove from refrigeration when you are just about to serve!
NOTE You can add 3 tablespoons of your preferred alcohol like coffee liqueur, chocolate liqueur, Marsala, or rum to the coffee mixture before dipping the cookies.
C'est très bon. Mais je changerais quand même quelques petites choses pour que ça soit plus à mon goût :
- mettre plus de biscuits, soit doubler les épaisseurs, soit multiplier les couches de biscuits.
- mettre moins de café dans le « drizzle », je suis parti du café et j'ai ajouté les autres ingrédients. Je pense que ça serait mieux de faire l'inverse.
- utiliser de l'expresso plutôt que du café instantanné. Je suis pas mal sur que le goût sera meilleur.

Ingrédients
- 1 litre d’eau bouillante
- 3 cuillères à café de thé vert de Chine
- 12 morceaux de sucre N°4 (soit 12 x 6g ou 72g de sucre en poudre)
- 1 petite botte de menthe fraîche
Instructions
- Couper les tiges de menthe et essayer d’avoir le maximum de feuilles. Les rincer à l’eau froide.
- Verser les cuillères à soupe de thé de Chine dans la théière.
- Verser de l’eau bouillante dedans.
- « Laver » le thé : l’eau introduite dans la théière sert à rincer les feuilles. Donc il faut se débarrasser de l’eau mise juste avant, mais pas des feuilles de thé de Chine.
- Mettre les feuilles de menthe dans la théière.
- Mettre les morceaux de sucre et verser l’eau bouillante.
- Laisser infuser et mettre à chauffer à feu doux.
- « Remuer » le thé en faisant couler la préparation dans un verre et en la remettant dedans, plusieurs fois de suite.
- Servir et déguster.
Ingredients
- 1 tsp dry active or ¾ tsp instant yeast
- 1 tsp sugar
- ½ cup warm water
- 2 ½ cups all-purpose flour
- 1 cup whole wheat flour
- Salt to taste
- 1 tbsp olive oil
- More water for kneading dough
- ¼ cup black and white sesame seeds
Instructions
- I always proof my yeast. You can skip this step if you choose and add the yeast directly to the flour. To proof the yeast, mix it with the sugar and warm water. Set aside for 5 to 10 minutes till frothy.
- Put the flours, salt, olive oil and proofed yeast in the bowl of your kneading machine. You may knead the dough by hand too. Knead the dough, adding as much more water as is required to form a dough that is soft and smooth. You want a dough that is somewhat slack, not sticky but should be easy enough to shape. We’re not looking for the slackness of a sourdough.
- Shape the dough into a ball and place in an oiled bowl, turning it well to coat all over with oil. Cover loosely and allow it to rise till double in volume. This should take about an hour and half depending on ambient temperature.
- Gently knead to deflate the dough. Divide the dough into two pieces – 1/3rd and 2/3rd approximately in size. Shape the larger portion into a nice, smooth and tight ball. Using your fingers, flatten the smaller portion into a flat circle that is big enough to wrap around the larger ball of dough. Do not make this circle too thin or too thick.
- Spread the sesame seeds uniformly on a flat plate. Lightly brush the surface of the circle of dough with some oil. This is to keep separation between the dough while scoring. Take the larger ball of dough. Dampen the top and sides of it with a little water. Then roll it in sesame seeds so they uniformly and closely coat the surface.
- Now gently place this ball, sesame seed surface facing down, in the center of the circle of dough. Bring up the sides of the circle together and seal well so the dough has enclosed the ball completely.
- Place the dough ball on a lightly greased parchment covered baking tray with the seam sides down. Cover loosely and let it rise for 30 to 45 minutes till puffy. Do not let it over proof.
- Lightly dust the surface of the dough with flour. Using a piece of string/ twine, mark the surface into six or eight equally spaced spokes, like in a wheel. Using a blade or lame, score firmly and smoothly along each marked spoke, from the center down to the sides. Cut deep enough to reach the sesame seed layer but not beyond. Make sure the scoring cuts are neat and separated. The oil and sesame seeds will ensure that layers separate on baking.
- You should now be able to see the sesame seed layer through the cuts. Bake the bread at 210C (410F) for about 30 to 40 minutes till the “leaves/ petals” have separated and opened up, the bread is a beautiful brown and sounds hollow when tapped.
- Let it cool completely. The outer layers should be crisp while the bread itself will be soft. Serve any way you prefer.
Je n'ai pas encore goûté, mais je ne suis pas fan de la recette. Pas de mesure de sel ni d'eau, ça ne facilite pas la mise en place. Par contre, il est beau pour une première. Il me reste à pratiquer pour avoir quelque chose qui a de l'allure.
Thanks! It was taught Grandmother to grandkids for generations..here is the recipe written out. Enjoy! (From a Facebook post to my family..so its written as it's for beginners, so you can ignore the basics part of it )
5 Pounds flour a bag of All Purpose is just fine. Have a bit extra on hand (perhaps up to three cups more) if the dough needs to be 'tightened up' later A "three packet" of dry active yeast it comes with three small packets attached, you'll use all three at once. 6 Cups of water at 100-110 degrees F don't go hotter or you'll kill the yeast Four Tablespoons salt (fine ground like Kosher is best) 1.5 Cups Canola Oil
NO milk, no sugar.. Keep it to those 5 ingredients.
Other things you'll need • Very large bowl-- it's going to hold five loaves of bread's worth of dough.. I vastly prefer metal • Cutting board-- extra flour for "dusting" if needed • Non Serrated chef's knife • Four to five pans, metal nonstick pie tins are great, you can use loaf pans as well-- it's up to you • More Oil- about a half cup- for the pans to keep the bread from sticking • Plastic wrap and non stick spray • A very light blanket.
To make
Start with 2 cups of the tepid water Add all of the yeast Whisk it as you are adding the yeast, set aside for three minutes to let the yeast "Bloom"
Pour the flour in a very large bowl, add the salt Add the first two cups of tepid water with the yeast in it.. It'll small "yeasty" and that's good
Add another two coups of tepid water to the bowl and begin to mix (that's 4 cups of water to this point)
Knead dough by hand, use your hands for all of this. You'll learn the feel of it after a few attempts.
The dough will be, at this point, really sticky. Work the water and flour together. Work to turn the dough over now and then as you'll see the flour will try to stay on the bottom of the bowl for a while so keep rotating it and kneading.
The dough will eventually start to come together, of the two remaining cups of tepid water put one in.. At this time add the 1.5 cups of oil. The bread will immediately begin to feel "squishy" (that's a technical term you know…) and it'll actually start to smell like bread. If it's too firm add the water by one quarter cup increments, you might not need to add that last cup of water. Usually I use part of it but rarely all of it. If the dough is still really, really sticky then add some of the extra flour-- half a cup at a time.
What you are going for is a dough ball that feels fairly smooth, it should still be warm from the water you added. If it's too stiff add more water, and if it's too sticky and loose add a bit of flour as described above.
You should be ab le to pull the whole dough ball up out of the bowl without it sticking too much.
Once the doughball has come together put it back in the bowl, first putting about a tablespoon of oil in the bottom to prevent sticking.. Move the bowl around to let the oil run in different directions to cover the bottom.
Once the doughball is in the bowl, cover it with plastic wrap but you must spray it first with the nonstick spray, the plastic and the top of the doughball.
Now, put the dough in a warm humid place if you can find it until the doughball doubles in size. A great trick is to boil a few cups of water in the microwave and when it's done put the bowl in the microwave, it'll be humid and warm-- obviously do not turn it on for any reason..
In about 45 minutes.. (depending on weather conditions, ingredients etc..)
After the dough rises to twice it's size, take the plastic off and kneed the bread. Mostly using a slow motion "punching" movement. Turn the dough a few times during the process. You should hear the bubbles pop a few times, it'll sound like quiet squeaking. As the bubbles work out of the bread it'll get smaller and a bit more dense. Once again cover it back up with the plastic after spraying and put it in the warm and humid environment you used previously.
After about 30 to 40 minutes…
Take the bread out, kneed it again. Now take the pans you have, ensure they have a think coating of oil on the bottom and cut fifth of the bread out and roll it into a ball a bit larger than a Baseball. If yo u wish to use the cutting board to roll it out by all means do, I simply hold the loaf size dough ball and fold it a few times each time folding it towards what will become the bottom, to create a seam on one side and a smooth side. Place them seam side down in the middle of the pans. Put one cut in the middle of each loaf cutting about half way down to the bottom.. This will control how the dough opens up.
Allow the loaves to rise for about 20 more minutes and put into a 350 degree oven for about 25 minutes, you may need to rotate where they are in the oven for even baking. Frequently I'll add a few minutes to the end to take them out of their pans and flip them over so the bottom of the bread can brown as well.
When the bread is golden brown, remove from the oven and if you can put them on a cooling rack. You can eat them just about immediately, they are fantastic with butter, great to go with soup, or just toast.
Ingredients
- 6 Cups Bread Flour
- 4 Teaspoons Baking Powder
- 3 Teaspoons Salt
- ⅔ Cup Oil, plus 2 tablespoons
- 2¼ Cups Boiling Water
Instructions
- In a mixing bowl of a standing mixer, add the flour, salt, baking powder and oil.
- Using a dough hook, turn the mixer onto low speed, never high and mix until the mixture comes together and looks like moon sand or barely wet sand. You can squeeze it in your hand and it holds together.
- Add the boiling water, about 1/2 cup at a time with the mixer on low speed. Run, adding water as you go until the dough comes together. Allow the mixer to run for another 2-4 minutes until the dough is satiny.
- Very lightly flour the work surface and pinch off balls of dough smaller than the palm of your hand.
- Holding the ball in your palm, use your other hand to pinch the dough into the center over and over as you form a rounded side against your hand and flat side where you are pinching.
- Place all of the dough in your bowl and cover with a warm, damp paper towel or place a lid on the bowl. Allow to rest for 10-15 minutes.
- Heat a griddle to medium heat.
- Lightly flour the work surface and roll out the dough balls one at a time with a rolling pin.
- Cook the tortilla on the hot pan until bubbles grow large, flip over and cook again until light browning shows.
- Remove from heat and serve

Ingredients
Tangzhong
- 50gm (1/3 cup) bread flour
- 250ml (1cup water, could be replaced by milk, or 50/50 water and milk)
Bread
- 350gm (2½ cups) bread flour
- 55gm (3 Tbsp+2 tsp) caster sugar
- 5gm (1 tsp) salt
- 56gm egg (equals to 1 large egg)
- 7gm (1Tbsp +1 tsp) milk powder (to increase fragrance, optional)
- 125ml (½ cup) milk
- 120gm tangzhong (use half of the tangzhong you make from above)
- 5 to 6gm (2 tsp) instant yeast
- 30gm (3 Tbsp) butter (cut into small pieces, softened at room temperature)
Fillings
- bacon, to taste
- cheese, to taste
Instructions
Tangzhong
- Mix flour in water well without any lumps. Cook over medium-low heat, stirring consistently with a wooden spoon, whisk or spatula to prevent burning and sticking while you cook along the way.
- The mixture becomes thicker and thicker. Once you notice some “lines” appear in the mixture for every stir you make with the spoon. It’s done. You get the tangzhong. (Some people might like to use a thermometer to check the temperature. After a few trials, I found this simple method works every time.) Remove from heat.
- Transfer into a clean bowl. Cover with a cling wrap sticking onto the surface of tangzhong to prevent from drying up. Let cool. The tangzhong can be used straight away once it cools down to room temperature. Just measure out the amount you need. The leftover tangzhong can be stored in fridge up to a few days as long as it doesn't turn grey. If so, you need to discard and cook some more. (Note: The chilled tangzhong should return to room temperature before adding into other ingredients. )
Bread
- Combine all dry ingredients: flour, salt, sugar and instant yeast in a bowl. Make a well in the center. Whisk and combine all wet ingredients: milk, egg and tangzhong, then add into the well of the dry ingredients. Knead until you get a dough shape and gluten has developed, then knead in the butter. Mind you, it’d be quite messy at this stage (That's why I used a bread maker). Keep kneading until the dough is smooth, not sticky and elastic. To test if the dough is ready, you might stretch the dough. If it forms a thin “membrane”, it’s done. The time of kneading all depends on how hard and fast you knead. (Note: I use bread maker to do this hardest part and messy job for me. I added the wet ingredients into my bread maker first, then followed by the dry ingredients. The yeast is the last to add.)
- Knead the dough into a ball shape. Place in a greased bowl and cover with a wet towel or cling wrap. Let it proof till it's doubled in size, about 40 minutes (Note: the time will vary and depends on the weather. The best temperature for proofing is 28C. I still used my bread maker in this stage. And my bread maker has a heater.)
- Transfer to a clean floured surface. Deflate and divide the dough into four equal portions. Knead into ball shapes. Cover with cling wrap, let rest for 15 minutes.
- Roll out each portion of the dough with a rolling pin into an oval shape. Sprinkle bacon and cheese evenly as much as you like. Roll from the upper, shorter end down to the bottom (as picture shown). Flatten the dough with your rolling pin. Then roll once again. The seals face down.
- Arrange the rolled-up dough in a greased or non-stick loaf tin (as picture shown). Leave it for the 2nd round of proofing, about 40 minutes, or until the dough rises up to 3/4 of the height of the tin inside.
- Brush whisked egg on surface. Bake in a pre-heated 180C (356F) oven for 35 to 40 minutes. Remove from the oven and tin. Transfer onto a wire rack and let cool completely. Slice to serve or place in an airtight plastic bag or container once it's thoroughly cooled.
Ingredients
- ¾ cup raisins, tossed in 1 Tbsp. flour
- 3 cups unbleached flour
- 1 cup brewed coffee, warm (not hot)
- 1 Tbsp./Packet Red Star Platinum yeast (7g)
- 3 Tbsp. canola oil
- 1 egg, lightly beaten
- 1-½ tsp. salt
- 3 Tbsp. sugar
- 1 tsp. cinnamon
- ¼ tsp. ground allspice
- ¼ tsp. ground cloves
Instructions
- Toss raisins with 1 tablespoon flour; set aside.
- Combine coffee and yeast in EZ DOH bucket and stir.
- Rest for 1-2 minutes.
- Add 1 cup of flour, then remaining ingredients.
- EZ DOH-it for 2-3 minutes, until dough is smooth.
- Remove dough from bucket, spray bucket with cooking spray and return dough to bucket.
- Cover and let rise until doubled.
- Preheat oven to 375.
- Roll dough out into rectangle, then roll up and tuck in ends.
- Place in 8 ½ x 4” loaf pan.
- Cover and let rise until doubled.
- Bake 30-35 minutes, until golden on top and loaf sounds hollow when tapped.
- Remove from pan and let cool on rack.
- Drizzle with confectioners icing, if desired.
C'est bon mais ce n'est pas mon préféré. Par contre, ça a fait fureur à la maison. Je sens que je vais devoir en refaire :).

Ingrédients
- 2 rouleaux de pâte feuilletée(ou brisée si vous préférez)
- 6 œufs
- 300g viande de porc haché
- 200g viande de veau haché
- 1échalote
- 50g chapelure
- 1 cuillère à soupe de Cognac
- ½ cuillère à café de noix de muscade
- ½ bouquet de persil
- Sel
- Poivre
Instructions
- Écalez 4 œufs durs (10 minutes de cuisson). Hachez une échalote. Lavez et ciselez le persil.
- Dans un saladier, mélangez les 2 viandes, 1 œuf battu en omelette, le persil, l’échalote, la chapelure, le cognac et la muscade. Salez, poivrez.
- Déroulez 1 des rouleaux de pâte feuilletée. Déposez-le dans un moule spécial "pâté en croûte" (recouvert de papier sulfurisé). Étalez la moitié du hachis de viande sur l’abaisse de pâte. Formez des creux à intervalles réguliers. Déposez dans la farce les 4 œufs durs en les enfonçant légèrement. Recouvrez avec le hachis de viande restant.
- Séparez le blanc du jaune du dernier œuf. Badigeonnez le bord de la pâte avec le jaune dilué dans un peu d’eau. Refermez le tout avec le second rouleau de pâte feuilletée en soudant les bords et dorez à l'oeuf.
- Avec la pointe d’un couteau, faites 3 cheminées (avec des petits cartons roulés) dans la pâte feuilletée pour laisser s’échapper la vapeur pendant la cuisson. Enfournez 20 min à 180 °C (th. 6) et 30 min à 150 °C (th. 5).
Ingredients
- 1 ¾ teaspoons instant yeast
- 3 ¼ cups all-purpose flour
- 3 tablespoons sugar
- 1 teaspoon salt
- 6 oz sharp cheddar cheese, shredded (170 gr)
- 3 large jalapeños (seeds and ribs removed), finely chopped
- 1 cup water water (100-110°F / 38-43°C)
- 2 tablespoons canola oil
- 2 large eggs, at room temperature (divided)
Instructions
- Add the yeast, flour, sugar, salt, cheese and jalapenos to the bowl of a stand mixer fitted with the dough hook. Beat briefly on low speed to combine. In a measuring cup, whisk the water, oil and 1 of the eggs together until combined. With the mixer on low, slowly add the wet ingredients and continue mixing until the dough comes together (you may need to scrape down the bowl once or twice). The dough should clear the sides of the bowl and cling to the bottom - you may need to add a little flour or water to achieve the right consistency (every time I've made this recipe I've needed to add 2-4 tablespoons of flour). Knead the dough on low speed for about 5 minutes, or until smooth and elastic.
- Spray a large bowl with nonstick cooking spray. Shape the dough into a ball and place in the bowl. Cover with plastic wrap and let the dough rise for 75-90 minutes, or until doubled in size.
- Preheat oven to 350 F. Line a baking sheet with parchment paper.
- Transfer the dough to your work surface and divide in half. Divide each of the two pieces into 4 or 5 equal pieces, depending on whether you want oversized or more traditional rolls. Shape each piece of dough into a ball and place on the prepared baking sheet, then flatten slightly with the palm of your hand. Space the rolls about 1/2 to 1-inch apart - you want the edges to bake together in the oven.
- Cover the pan with a damp towel, and allow the rolls to rise for 35 minutes. Meanwhile, whisk the remaining egg with 1 tablespoon of water to make egg wash. Brush the rolls with the egg wash. Bake for about 25 minutes, or until the tops of the rolls are deep golden brown.
- Transfer the pan to a wire rack and let the rolls cool for at least 15 minutes. Store in a resealable plastic bag at room temperature, or wrap tightly and freeze.
Ingrédients
- 1 litre de café fort
- 2 litres de lait
- 200 grammes de cacao sucré
- 1 pincée de cannelle moulue
Instructions
- Mettre tous les ingrédients dans un contenant.
- Mettre le contenant au réfrigérateur pendant 1 nuit.
- Mélanger.
- Servir.
Malgré la recette, le résultat ne ressemble pas du tout à ce que j'ai bu sur place. Probablement des ingrédients trop différents. Ma réalisation ne goûtait pas le café mais plutôt le cacao.
Il va falloir y retourner pour étudier leur façon de faire :)
Ingrédients
- 2 tasses de riz lavé
- 1 litre de lait entier
- 1 boîte de lait concentré
- 1 tasse de lait en poudre
- 2 bâtons de cannelle
- 6 clous de girofle
- 1 cuillère à soupe de beurre (facultatif)
- 1 ½ tasse de sucre
- 1 pincée de sel
- Cannelle en poudre au goût
Instructions
- Passer le riz à l'eau claire, le filtrer et le placer dans une casserole.
- Cuire le riz avec 2 ½ tasses d'eau et une pincée de sel
- Lorsque le liquide a réduit, ajouter le lait entier, les clous de girofle et la cannelle entière.
- La cuisson dure environ 20 à 30 minutes. Il est important de remuer avec une palette en bois de temps en temps pour éviter qu'il ne colle au fond de la casserole.
- Lorsque la préparation est presque prête, ajouter la tasse de sucre, 1 cuillère à soupe de beurre et le lait concentré.
- Remuez bien et laissez cuire encore cinq minutes.
- Enfin, ajouter la tasse de lait en poudre, remuer pendant quelques minutes et éteindre.
- Une fois la préparation terminée, servez-la et décorez-la de cannelle en poudre.

Ingredients
- 2 lemons, zest and juice
- 100g caster sugar
- 50g butter
- 2 eggs, beaten
Instructions
- Put the lemon zest, juice, sugar and butter in a heatproof bowl over a pan of simmering water.
- Stir occasionally until the butter has melted.
- Then, using a small whisk or fork, stir in the beaten egg.
- Keep gently whisking the mixture over the heat for around 10 mins until thickened like custard.
- Pour the cooked curd through a sieve into a clean jug to remove the zest, then pour into sterilized jars.
- Keeps in the fridge for up to 2 weeks.
Très citronné, très bon. À refaire !