
Ingredients
- 1 tapa de dulce, piloncillo o panela - about 12 ounces (340g)
- 5 ounces of ginger (142g)
- 2 liters of water
- 5 limes, juiced
Instructions
- Place 2 liters of water and your tapa de dulce in a large saucepan or stockpot.
- Boil on medium heat until the tapa de dulce is dissolved, stirring occasionally.
- While the tapa de dulce is dissolving, peel and chop your ginger.
- Juice the limes.
- Once the tapa de dulce has melted, add the ginger and lime juice. Simmer for 5-10 minutes.
- Strain the juice into a large container and add the other 2 liters of water.
- Place in the fridge until cold. Serve ice cold.
C'est super facile à faire. Essayer avec moins de gingembre et moins d'eau (diminuer d'un quart).

Ingrédients
- 1 bloc de 450-454 g de tofu extra-ferme, épongé dans un linge sec
- 15 ml (1 c. à soupe) de vinaigre de cidre de pommes ou de jus de citron
- 15 ml (1 c. à soupe) de sauce soya ou tamari
- 15 ml (1 c. à soupe) de sirop d’érable
- 30 g (½ tasse) de levure alimentaire en flocons
- 15 ml (1 c. à soupe) d’huile végétale pour la cuisson
Préparation
- Préchauffer le four à 375°F (190°C).
- Dans un bol, défaire le tofu avec les doigts en morceaux de la grosseur d’une bouchée (les morceaux n’ont pas besoin d’être parfaitement uniformes!).
- Ajouter le vinaigre de cidre, la sauce soya et le sirop d’érable. Bien mélanger.
- Ajouter la levure alimentaire. Bien mélanger pour enrober les morceaux.
- Sur une plaque couverte de papier parchemin ou d’un tapis de cuisson anti-adhésif, déposer les bouchées de tofu.
- Arroser d’un peu d’huile si on le souhaite (facultatif).
- Cuire 25 minutes, ou jusqu’à ce que les morceaux soient bien dorés.
Note : il est possible de faire cuire ça à la poêle.
Ingredients
- ¾ cup sugar
- 2 large eggs
- 1 tablespoon cornstarch
- 2 cups half and half
- 1 cup heavy cream
- 1 teaspoon vanilla
- 1 ½ cups salted pretzels broken into bite sized pieces
- ½ – ¾ cup stout caramel sauce from this site
Instructions
- In a large bowl, combine the sugar, eggs and cornstarch and beat with a hand mixer until thick and pale yellow, about 3-5 minutes. Set aside.
- In a medium saucepan, heat the half and half to just barely a simmer. In a slow steady stream, add the hot half and half to the egg mixture, beating constantly at a medium speed. When mixture is combined, pour it back into the pan and heat over medium heat, stirring constantly until mixture thickens.
- Place a fine mesh sieve over a large bowl and pour the custard through the sieve to remove any large egg particles. Scrape the outside of the sieve to capture as much of the custard as possible. Cool for 10 minutes, then stir in the heavy cream and vanilla. Chill for at least 2 hours or overnight.
- Follow the manufacturer’s instructions for your ice cream maker to churn the ice cream. In the last few minutes before the ice cream is ready, add the pretzel pieces and churn until fully combined.
- Spoon about 1/4 of the ice cream into a freezer-safe container. Drizzle several tablespoons of stout caramel over the ice cream. Continue layering in this fashion Ice cream:stout caramel and finish with ice cream on top. Cover with plastic wrap and freeze for several hours or overnight.
- Serve with extra pretzels and caramel sauce if desired.
Ingredients
- 1 12-ounce stout beer such as Guinness
- ¾ cup light brown sugar
- 1 teaspoon vanilla extract
- 2 tablespoons unsalted butter
- 1 cup heavy cream
- ¼ teaspoon salt
Instructions
- Pour the stout into a medium saucepan and heat to boiling. Reduce heat to a rapid simmer and cook until the stout is reduced by half.
- Stir in the brown sugar and vanilla. Heat to boiling, reduce heat to a rapid simmer and let the mixture cook 8-10 minutes without stirring until sauce turns a deep amber and bubbles start to grow and expand. Mixture will be hot like lava, so be careful.
- Remove from heat and add the butter, cream and salt and stir carefully until fully combined. Transfer to a resealable glass storage jar and let the mixture cool to room temperature. Keep in the refrigerator for up to two weeks.
Ingredients
- 1 cup all-purpose flour
- ¼ cup unsweetened cocoa powder
- ½ teaspoon salt
- 3 ½ ounces semisweet chocolate, coarsely chopped
- ½ cup (1 stick) unsalted butter
- ½ cup stout or other dark beer, or cold coffee
- 4 large eggs, at room temperature
- 1 cup granulated sugar
- 1 cup packed light brown sugar
- 2 teaspoons pure vanilla extract
- 1 cup semi-sweet chocolate chips
Instructions
- Place a rack in the center of the oven and preheat oven to 350 degrees F. Butter and flour a 9 x 13-inch baking pan. Set aside.
- In a medium bowl, sift together flour, cocoa powder, and salt.
- Melt the chocolate in a heatproof bowl over a pot of boiling water. In a small pan over medium heat, melt the butter until it just turns golden brown, about 5 minutes. Pour the brown butter into the chocolate and stir until combined. Remove the bowl from the heat and stir in the stout (or coffee).
- In a separate medium bowl, whisk together eggs, vanilla and sugars until thick, about 2 minutes. Add the chocolate mixture and whisk to combine. Add the wet ingredients to the dry ingredients and stir until all of the ingredients are well combined. Fold in the chocolate chips.
- Pour into the prepared pan and bake for 35 to 40 minutes or until the edges are firm and the center is set. Remove from the oven and allow to cool completely in the pan before slicing.
- Slice into 12 large or 24 small brownies.
- To store, cover the pan in plastic wrap and keep on the counter for up to one week.
Cette recette est énorme. J'en ai donné aux voisins tellement ça en fait.
Je ne suis pas un grand fan du résultat. Je vais conserver celle que j'utilise déjà depuis des années qui donne (à mon goût) un meilleur résultat.
Ingredients
Soaker Ingredients
- 204 g raisins
- 61 g candied orange peel
- 92 g candied lemon peel
- 82 g slivered almonds
- 34 g rum
Sponge Ingredients
- 120 grams flour
- 80 grams water
- 0.1 gram instant yeast (a small pinch)
Final Dough Ingredients
- 348 grams flour
- 53 grams milk
- 18.6 grams (2 Tablespoons) osmotolerant yeast or 25.3 grams (2 Tablespoons + 2 teaspoons) instant yeast
- 8 grams (1-⅓ teaspoons) salt
- 8 grams (2-⅓ teaspoons) diastatic malt powder (omit if you don’t have it)
- 51 grams sugar
- 53 grams egg (about one large egg)
- 5 grams grated lemon zest (one average lemon)
- 5 grams grated orange zest (one small orange)
- ⅓ teaspoon of each of these ground spices: cinnamon, cardamom, cloves, allspice, nutmeg
- 273 grams unsalted butter, at room temperature (should be pliable)
- all of the sponge
- all of the soaker
- about 180 grams of marzipan, divided into four pieces
Finishing Ingredients
- clarified butter
- fine granulated sugar
- powdered (confectioner’s) sugar
Instructions
- Combine the soaker ingredients in a medium bowl. Cover and leave at room temperature for about 12 hours.
- Meanwhile, combine the sponge ingredients in another medium bowl. Cover and ferment at room temperature for 12 hours.
- In the bowl of a stand mixer, combine all of the final dough ingredients except the soaker and the marzipan. Mix in slow speed until all the ingredients are incorporated, about 4 or 5 minutes.
- Continue mixing in medium speed until the gluten reaches full development. The dough should come together around the hook and should no longer stick to the sides and bottom of the bowl. This could take about 20 minutes or more, but will depend on your mixer.
- Add the soaked fruits and mix on slow speed just until they are evenly distributed through the dough.
- Transfer the dough to a lightly buttered container. Cover and ferment for 30 minutes at room temperature.
- Turn the dough onto the counter. Divide into four pieces of about 375 grams each. Preshape the dough into balls and let them rest, covered, for 30 minutes.
- Shape the loaves as shown above and place them on parchment-lined baking sheets (two per sheet). Slip them into a large plastic bag with a bowl of warm water. Proof for about 90 minutes, replenishing the water when it cools.
- Meanwhile, preheat the oven to 375F on convection setting or 400F on regular bake setting. You will also need steam during the initial phase of baking, so prepare for this now.
- Bake for 10 minutes, open the oven door briefly to allow any remaining steam to escape, and bake for another 15-20 minutes. If you do not have convection, you may need to rotate the position of the baking sheets halfway through the bake to ensure even browning.
- While the loaves are still warm, brush them with clarified butter. Dredge them in fine granulated sugar, brushing off the excess.
- When cool, sift powdered sugar over the loaves. You can leave the stollen out overnight to let the loaves dry and the sugar crust up a bit.
- To store, wrap tightly in foil; it will keep for several days.
- To serve, slice thinly.
C'est vraiment super bon. J'en referai.
Apparement, on peut le préparer plusieurs semaines à l'avance pour laisser les saveurs s'équilibrer.
Idéal pour faire un cadeau de Noël fait-maison.
Ingrédients
pour la pâte fermentée
- 300g de farine T55 ou T65
- ½ cc de levure sèche instantanée
- ¾ cc de sel fin
- 180 à 200ml d'eau tempérée
pour la pâte finale
- 600g de farine T65
- 2 cc de levure sèche instantanée
- 2 cc de sel fin
- 280 à 300ml d'eau tiède
- 15g de miel
- 40g d'huile végétale neutre
- 1 œuf
- graines de sésame, pavot, nigelle au choix
Instructions
Préparation de la pâte fermentée (la veille)
- Dans un grand saladier, mélanger la farine avec la levure puis le sel et ajouter l'eau. Mélanger avec une cuillère en bois pour former une pâte grossière hétérogène. Ajuster avec de la farine (si la pâte parait trop collante) ou de l'eau (s'il reste de la farine non amalgamée) puis transvaser sur un plan de travail légèrement fariné dès formation d'une boule.
- Pétrir la pâte pendant 5 à 10 min ou le temps qu'elle devienne lisse, souple et élastique (la pâte doit être légèrement collante au toucher - effet scotch).
- Mettre la pâte dans un saladier légèrement huilé et la tourner dans tous les sens pour que sa surface aussi soit recouverte d'une fine pellicule d'huile. Couvrir avec du film alimentaire et laisser lever environ 1h (la pâte doit avoir atteint 1 fois 1/2 son volume initial).
- Travailler brièvement la pâte sur le plan de travail ou directement dans le saladier pour la dégazer puis couvrir à nouveau et placer au réfrigérateur pour la nuit.
Note : la pâte fermentée peut être conservée 3 jours au réfrigérateur ou congelée 3 mois bien fermée dans un sac congélation. Vous pouvez également utiliser la pâte fermentée le jour même après l'avoir laissé pousser 2h au lieu d'1 mais elle aura moins d'arômes.
Préparation de la pâte finale
- Environ 1h avant de préparer le pain, sortir la pâte fermentée du réfrigérateur, la diviser en une dizaine de morceaux et laisser revenir à température ambiante pendant 1 h bien couverts avec un torchon ou du film alimentaire.
- Dans un grand saladier, mélanger la farine et la levure sèche puis ajouter le sel, mélanger et creuser un puits. Verser l'eau tiède, ajouter les morceaux de pâte fermentée et les écraser grossièrement du bout des doigts pour les délayer un peu. Ajouter le miel, l'huile et l'oeuf grossièrement battu.
Mélanger avec une cuillère en bois en partant du centre et en élargissant le mouvement pour faire tomber et incorporer la farine des bords. Continuer à mélanger jusqu'à formation d'une "boule" de pâte hétérogène (ajouter éventuellement un peu d'eau s'il reste de la farine non incorporée). - Transférer la pâte sur un plan de travail légèrement fariné et la travailler énergiquement au départ pour favoriser la formation du réseau glutineux puis dès que la pâte commence à s'homogénéiser et à s'assouplir, la pétrir pendant une dizaine de minutes ou le temps nécessaire pour qu'elle passe le windowpane test et qu'elle soit légèrement collante au toucher.
- Placer la pâte en boule dans un saladier huilé en la retournant pour la recouvrir sur toute sa surface. 1. Couvrir avec du film alimentaire et laisser reposer pendant 2h (la pâte doit doubler de volume).
Note : le temps de repos ici doit impérativement être de 2h: si la pâte double de volume avant ce temps, il faut la re-pétrir gentiment pour la dégazer un peu puis la remettre à pousser le temps nécessaire pour qu'elle double de volume - Transvaser la pâte sur un plan de travail très légèrement fariné si besoin est et la replier 2 ou 3 fois sur elle-même. Diviser en 12 morceaux de même poids (environ 120g) et les bouler sans serrer (la pâte devant être étirée et façonnée par la suite). Couvrir avec du film alimentaire légèrement huilé et laisser en détente pendant 10 min.
- Préparer 2 plaques de cuisson en les garnissant avec du papier sulfurisé légèrement huilé et saupoudré de semoule de maïs (ou de blé).
Façonnage des petits pains Kaiser
- Il existe plusieurs façons de donner leur forme particulière à ces pains: la plus rapide et bien sûr celle utilisée par les professionnels consiste à utiliser un tampon-empreinte spécial (le même que celle utilisée pour les michette italiennes) disponible sur internet; la seconde plus sophistiquée mais qui demande de la patience et de la dextérité consiste en une série de replis de la pâte pour former des "pétales" et la troisième de loin la plus ludique, la plus utilisée parmi les amateurs et qui donne à mon avis les plus beaux résultats est celle du nœud comme indiqué ci-dessous.
- Façonner chaque pâton en boudin d'environ 30 cm (en suivant le procédé détaillé ici). Faire un simple nœud sans serrer (a) puis faire une boucle avec l'extrémité droite d'abord en la faisant passer par-dessus le nœud (b) et ressortir par le centre. Procéder de même avec l'extrémité gauche qui doit faire une boucle par-dessus le nœud (c) et ressortir par le centre mais cette fois par derrière (d).
- Déposer les petits pains au fur et à mesure sur les plaques de cuisson en les retournant (face nouée dessous), huiler légèrement la surface et couvrir avec du film alimentaire sans serrer.
Laisser reposer pendant 45 min puis retourner très délicatement face nouée dessus, couvrir avec le film alimentaire légèrement huilé et laisser à nouveau reposer pendant 40 min environ (les pains doivent avoir doublé de volume).
Note : il faut être particulièrement délicat dans la manipulation pour éviter de dégazer les pains. Vous pouvez utiliser une large spatule huilée glissée sous le pain à la place de vos mains. Personnellement, je préfère me servir du papier sulfurisé sur lequel sont posés les pains: je le soulève légèrement du côté du pain à retourner pour aider celui-ci à se décoller et je le réceptionne retourné dans mon autre main (légèrement huilée également) puis je le remets délicatement à sa place. - Préchauffer le four th. 7-8 (220°C) en plaçant un récipient métallique rempli d'eau chaude à même la sole ou sur le rack le plus bas du four pour créer une atmosphère humide indispensable à la formation de la croûte craquante caractéristique du kaiser.
- Vaporiser les pains avec de l'eau (ou les badigeonner au pinceau toujours délicatement et sans excès d'eau) et les saupoudrer avec les graines choisies si vous les utilisez.
Enfourner et laisser cuire pendant 5 min puis baisser le thermostat à 6-7 (200°C) et prolonger la cuisson environ 15-20 min en retournant les plaques après 10 min pour une cuisson régulière. Les petits pains Kaiser doivent avoir une couleur dorée caramel et sonner creux lorsque leur fond est tapoté. - Transférer les pains sur une grille et laisser refroidir. Et voilà: les pains sont prêts pour le sandwich!

Ingrédients
Marinade
- ¾ tasse de sirop d’érable (de préférence foncé pour son goût robuste)
- 2 c. à thé de poudre de chili
- 2 c. à thé de paprika fumé
- 1 c. à thé de moutarde de Dijon
- 1 c. à thé de poudre d’oignon
- ½ c. à thé de poivre noir moulu
- 1 c. à soupe de sel
- ¼ c. à thé de piment de Cayenne moulu
- 6 c. à soupe de ketchup
- 1 c. à soupe de vinaigre d’érable (ou de vinaigre de cidre)
- 1 c. à soupe de miso
Viande
- 2 longes de petites côtes levées de dos de porc
Instructions
- Préchauffer le four à 160 °C (325 °F).
- Bien mélanger tous les ingrédients de la marinade.
- Badigeonner les côtes levées de la marinade.
- Mettre les côtes levées sur une plaque à pâtisserie ou dans un plat allant au four et ajouter environ 1 cm (⅜ po) d’eau au fond (juste pour créer un effet humidifiant).
- Bien recouvrir de papier aluminium et cuire 2 heures. Servir aussitôt.
Ingrédients
- 8 tasses(2 L) de raisins Concord, Muscadine ou Scuppernong, sans la tige
- ½ tasse (125 ml) d’eau
- 6 tasses (1,5 L) de sucre granulé
Instructions
- Laver et égoutter les raisins. À l’aide des doigts, pincer les raisins un à un, en séparant la peau et la pulpe; les déposer dans deux casseroles séparées. Ajouter 1/2 tasse (125 ml) d'eau dans la casserole contenant la pulpe. Porter la pulpe de raisin à ébullition à feu moyen et laisser bouillir pendant environ 10 minutes, en remuant à l'occasion. Passer la pulpe dans un tamis fin et jeter les pépins; réserver.
- Hacher grossièrement la peau et remettre dans la casserole; ajouter juste assez d'eau pour couvrir la peau, puis, à feu moyen, faire chauffer et bouillir doucement sans recouvrir jusqu'à ce que le liquide s'évapore soit environ 10 minutes. Ajouter la peau à la pulpe.
- Placer 6 bocaux Mason propres de 250 ml sur le support d’une marmite remplie d’eau bouillante. Couvrir d’eau et faire mijoter (180°F/82°C). Mettre les bandes de côté. Garder les bocaux au chaud jusqu’à leur utilisation.
- Combiner la peau et la pulpe dans une grande casserole profonde en acier inoxydable. Ajouter tout le sucre. Porter lentement le mélange à ébullition, en remuant, jusqu'à ce que le sucre soit dissous. Augmenter le feu; faire bouillir vigoureusement pour que le mélange atteigne le point de gélification (220°F/104°C), environ 25 minutes. Pendant que le mélange s'épaissit, remuer fréquemment pour éviter de trop faire cuire ou de faire coller au fond.
On m'a offert un pot de cette confiture. « WOW », c'est excellent. C'est ma nouvelle confiture préférée !
Ingredients
- 2½ cups macaroni (cooked)
- 4 tbsp butter
- 4 tbsp flour
- 1-1½ lbs of cheese (shredded)
- 2 cups warm milk
Instructions
- Preheat oven to 375°F.
- Melt butter in a skillet, add flour.
- Stir together, cooking about 1 minute.
- Add milk.
- Cook together until thick (10-15 min).
- Make sure the roux and milk are mixed together well.
- Add ¾ of the cheese to the roux.
- Melt.
- Put cooked macaroni in a casserole dish.
- Pour the roux and cheese into the macaroni.
- Mix well.
- Put rest of cheese on top.
- Cook in the oven for 20 min.
Source : la grand-mère d'un utilisateur de Imgur
Ingredients
- ⅔ cup (4 ounces) chopped milk chocolate or milk chocolate chips
- ½ cup tahini
- ⅛ teaspoon kosher salt
- ½ teaspoon vanilla extract
Instructions
- Melt the chocolate in a double boiler or by microwaving in 30-second increments, stirring after each, until melted and smooth.
- Stir in the tahini, salt, and vanilla.
- It will thicken as it cools.
Source : « Molly on the range » de Molly Yeh
Note : C'est excellent et surtout très facile à faire.
- Essuyer les tomates.
- Les passer dans le Tomato squeezer, afin de séparer la pulpe et le jus des graines et de la peau.
- Mettre la pulpe à bouillir. Je fais bouillir dehors, sur un réchaud au gaz propane. Pour ne pas transformer la maison en sauna.
- Entretemps, laver les pots au lave-vaisselle, à la température la plus chaude possible.
- Allumer le four à 250°F. Enfourner les pots propres. Les faire chauffer pendant 30 minutes. Éteindre le four. La sauce est prête lorsqu'il y a beaucoup de pulpe dans le fond, une pulpe un peu grumeleuse. C'est le temps de mettre en pot.
- Elena recommande de sortir du four 3 pots à la fois. Tout d'abord, Elena jette quelques feuilles de basilic dans le fond de son pot. On l'entend crépiter, selon elle. On remplit les pots jusqu'à la ligne renflée qui précède le goulot.
- On essuie le bord du pot avec application pour éviter que la rondelle de métal n'adhère pas au verre. (Si la rondelle n'adhère pas, vous n'entendrez pas POP. Si vous n'entendez pas POP, c'est que le vacuum n'est pas fait. Pas de vacuum, pas de conserve!) On dépose dessus la rondelle de métal. On visse délicatement la bague qui a pour mission de maintenir la rondelle de métal en place. On n'exerce pas toute sa force lorsqu'on visse.
- Ensuite, Elena dépose ses pots dans une boîte. Elle couvre la boîte au moyen de la couverture la plus chaude dont elle dispose dans la maison. Elle laisse la couverture sur les pots durant 24 heures. Elena fait remarquer qu'après 24 heures, les pots sont encore très chauds. C'est durant cette période que les pots poperont (le fameux POP). Les pots ont popé lorsque le centre de la rondelle est légèrement creusé vers le bas. Si on touche le pot et qu'on a l'étrange impression que nos doigts font du trampolin, le vacuum ne s'est pas fait. Il faut recommencer le processus.
Note Tarzile dépose ses pots dans une marmite pleine d'eau bouillante. L'ébullition s'arrête. Lorsqu'elle reprend, Tarzile compte 25 minutes. Lorsque le temps est écoulé, Tarzile sort ses pots de l'eau. Elle les dépose sur le sol de céramique de sa cuisine - son Chéri craignant que les pots très chauds ne brûlent le plancher de bois de la salle à dîner mais çà reste à voir - et ferme les fenêtres afin que les courants d'air ne fassent pas exploser les pots de tomates, maculant ainsi les murs de sa cuisine qui, à ce moment précis des opérations, a l'air d'un cirque échevelé. - Elena n'ajoute que du sel et du basilic à ses tomates. Pas d'ail, ni acide citrique. Elena estime que les tomates millésime 2005 sont acides.
Note Tarzile suit plutôt les enseignements de son ami Vincent le canneux et ajoute du jus de citron. Sans que son Chéri ne le sache, comme de raison.

Ingredients
For the dough
- 2 and ½ cups (313g) all-purpose flour (spoon & leveled)
- 1 teaspoon cornstarch*
- 1 teaspoon baking soda
- ½ teaspoon salt
- ¾ cup (1.5 sticks; 170g) unsalted butter, softened to room temperature
- 1 cup + 2 Tablespoons (225g) granulated sugar
- 1 large egg, at room temperature
- ¼ cup (60ml) fresh or bottled lemon juice, at room temperature* — environ 1 citron
- 1 Tablespoon lemon zest* (packed Tablespoon, it’s a lot of zest!) — environ 2 citrons
- 1 teaspoon vanilla extract
For Rolling
- 3 Tablespoons (35g) granulated sugar (optional, see step 6)
- 1 cup (120g) confectioners’ sugar
Instructions
- Whisk the flour, cornstarch, baking soda, and salt together in a medium bowl. Set aside.
- In a large bowl using a hand mixer or a stand mixer fitted with a paddle attachment, beat the butter and granulated sugar together on medium-high speed until creamed, about 1 minute. Add the egg, lemon juice, lemon zest, and vanilla extract and beat on high speed until combined, about 1 minute. Mixture will appear curdled and that’s ok. Scrape down the sides and up the bottom of the bowl. Add the flour mixture and beat on low speed until combined. Dough is thick, creamy, and sticky.
- Cover dough tightly and chill in the refrigerator for at least 3 hours and up to 3 days. Chilling is mandatory for this sticky cookie dough.
- Remove cookie dough from the refrigerator. If the cookie dough chilled longer than 3 hours, let it sit at room temperature for about 10 minutes. This makes the chilled cookie dough easier to scoop and roll.
- Preheat oven to 350°F (177°C). Line baking sheets with parchment paper or silicone baking mats. Set aside.
- Roll in sugar: Scoop and roll balls of dough, about 1 Tablespoon of dough each, into balls. (Each dough ball should weigh about 20g.) Some readers have had trouble with the confectioners’ sugar melting/absorbing into the cookie dough balls, so to prevent that, you can roll the balls in the granulated sugar first. And then roll each ball very generously in the confectioners’ sugar. If you want lots of confectioners’ sugar to show on the baked cookies, roll 2-3x in sugar! Place 3 inches apart on the baking sheets.
- Bake the cookies for 12–13 minutes or until the edges appear set and the centers still look soft. Tip: If they aren’t really spreading by minute 9, remove them from the oven and lightly bang the baking sheet on the counter 2–3x. This helps initiate that spread. Return to the oven to continue baking.
- Cool cookies for 5 minutes on the baking sheet, and then transfer to a cooling rack to cool completely. The cookies will slightly deflate as they cool.
- Cookies stay fresh covered at room temperature for up to 1 week.
Un mélange des recettes suivantes :
- Faire de la pâte d’amande maison {recette facile sans oeufs} | Royal Chill - blog cuisine, voyage et photographie
- Recette de Pâte d'amande maison sans oeuf
Ingrédients
- 200 g de poudre d'amandes
- 200 g de sucre à glacer
- 35 g d'eau
- 5 g d'essence d'amande amère
Instructions
- Mélanger au robot la poudre d'amande et le sucre à glacer
- Ajouter l'eau et l'essence d'amande amère au mélange
- Mélanger au robot pour obtenir une pâte qui se décole des bords
- Finir en pétrissant à la main pour homogénéiser le mélange
Ingredients
For the crust:
- 2 packets active dry yeast
- 1 and ½ cups water, very warm (about 110 degrees)
- 2 tablespoons sugar
- 3 and ½ cups all-purpose flour, plus more if needed
- 2 teaspoons kosher salt
- ¼ cup olive oil
- Extra olive oil for greasing pan
- Grated Locatelli for sprinkling
For the sauce;
- 6 Roma tomatoes, cut in half
- 3 tablespoons olive oil
- 15 ounces tomato puree
- 2 tablespoons tomato paste
- 3 cloves garlic, finely minced
- 1 tablespoons sugar
- 1 tablespoon balsamic vinegar
- 1 teaspoon dried basil
- ¼ teaspoon dried oregano
- Salt and pepper to taste
Instructions
For the Crust:
- In the bowl of a standing mixer fitted with a dough hook, combine the yeast with the warm water. Stir to dissolve and let stand until it looks foamy, about 5 minutes. Stir in sugar, salt, and olive oil. Turn the mixer on low, and slowly add the flour to the bowl. When the dough starts to come together, increase the speed to medium. Stop the machine periodically to scrape the dough off the hook. Mix until the dough is smooth, glossy, and elastic - about 10 minutes. Form the dough into a ball and place in a well oiled bowl. Cover with plastic wrap and let rise in a warm place until doubled in size, about an hour
- When you're ready to bake! Preheat oven to 500 degrees (F). Line a large baking sheet with parchment paper and coat with olive oil. Place the dough on the baking sheet, and using your fingertips, press dough out toward edges of pan until it's a large rectangle. Using a fork or small pointed knife, poke the top of the dough, popping any large bubbles. Cover pan with plastic and let dough rest for another 30 minutes.
- Place baking sheet on your baking stone (or just the oven wrack) and lower oven temperature to 425 degrees. Bake for 15 minutes. Remove pie from oven, top with tomato sauce, rotate pan, and bake for another 10 minutes. Let cool for 5 minutes before removing the tomato pie from the pan and placing on a cooling rack to finish cooling. Top with some grated cheese and serve warm or cold. I love it both ways!
For the Sauce:
- Preheat oven to 350 degrees (F). Slice the tomatoes in half, sprinkle with salt and pepper, drizzle with olive oil, and roast in oven for 45 minutes
- While your tomatoes are roasting, combine the rest of your ingredients in a large saucepan and simmer for about 30 minutes (or until your tomatoes are done roasting. Once your tomatoes are out of the oven, give them a quick whirl in the blender, pulsing until it's a chunky consistency. Add roasted tomatoes to saucepan and continue to simmer until most of the water has evaporated and the sauce is very thick. Set aside until needed for pie.

Here is the Original Carbonara Recipe from the business card I got in 2022 at "Luciano - Cucina Italiana" in Rome.
Ingredients :
- 280g spaghetti
- 4 egg yolks
- 200g guanciale in 1cm cubes
- 30g grana padano, grated
- 20g pecorino romano, grated
Instructions :
- Cook pasta in boiling water like mentioned on package.
- Frying little guanciale cubes in order to make them crispy outside and soft inside.
- Whisk in a bowl the egg yolks, the grana padano, the pecorino and the melted fat obtained from frying guanciale.
- Let this mixture rest.
- Once pasta is cooked, mix? (mantecarla) the mixture, ground pepper, and the little cubes of guanciale in a bowl, add a little warm water, and mix to get it creamy.
- Plate the pasta, springkle pecorino cheese oon top, and grrind fresh pepper too.
- Serve at the right temperature, not too hot, not too cold, tepid.
Now, below are my personal notes on how to really make carbonara pasta like Luciano Monosilio.
EGGS
- 70g pasta per person seems a good amount since the ddish is very rich.
- Use only egg yolks (1 per person) if you want a richer, yelower colour, or use whole eggs if you want it a little more traditional.
PASTA
- Spaghettoni, thick spaghetti are prefered to spaghetti. They take longer to cook, it gives you more time to cook the sauce PLUS they are hardder to overcook. Worst you could do is cappelli, vermicelli. They would mush and soak up too much sauce anyways.
- Pasta pot should be wide more than tall, especially for cooking spaghetti/oni. Underseason the water ( a pinch is plenty). Water level should be 1/2 inch (1cm) over pasta. Stirring is mandatory.
- Undercook pasta by 2-3 minutes, this will compensate for the amount of time they spend in the bain marie afterwards.
MEAT
- Luciano cuts guanciale in cubes, not matchsticks. The card says 1cm cubes but it’s more than that. At least 1/2 inch / 1.5 cm if not 2, as they shrink a bit during frying. If you’ve ever cooked steak before, you know that obtaining perfect medium rare center is easier with a thicker piece. Overcook = dry. Cooked right = juicy.
- Don’t go high heat. Pork fat has a low smoking point. Also, the chunks are too big for this they would be burnt outside and raw inside. Go Medium high to sear first, and then low. Once they are crispy on the outside, get them off the heat. Room temperature is fine. Keep all that melted guanciale fat, we’re gonna need HALF OF IT, not all of it, for the sauce later on.
BAIN MARIE / DOUBLE BOILER METHOD
- Ingredients mix better if they are warm, and using a double boiler instead of just a frying pan, means it will be more gentle. We’ll have more control, and we’ll be able to stay below 65°C where eggs start cooking and cheese start creating lumps. Large heatproof bowl over simmering water, the bottom of the bowl can't touch water?
- Whisk hard to mimick the SABAYON technique. SABAYON is a foamy custardy dessert where eggs are whisked over a bain marie. This dish really is about the light/foamy/airy texture. Air bubbles enhance sensory properties.
- As you whisk : Drizzle pork fat in there. This is the same proccess as for HOLLANDAISE SAUCE. By gradually incorporating fat you create an foamy emulsion. Holanlldaise uses clarified butter but here it’s pork fat.
The rest you can most likely get it from my video. Practice. Practice and Hang in there. You got this !

Ingrédients
- Eau-125 ml (½ tasse)
- Sucre-125 ml (½ tasse)
- Vinaigre de vin blanc-125 ml (½ tasse)
- Feuille de laurier-1
- Branche de romarin frais, coupée en 2 -1
- Piments biquinho-500 ml (2 tasses)
Instructions
- Dans une petite casserole, portez à ébullition l’eau, le sucre et le vinaigre. Déposez le romarin et le laurier. Ajoutez les piments et laissez mijoter doucement 5 minutes.
- Versez dans des pots préalablement stérilisés d’une capacité de 250 ml (1 tasse) chacun en laissant environ 1 cm (½ po) d’espace sur le dessus. Nettoyez bien le rebord des pots avant de refermer le couvercle sans trop serrer.
- Déposez une petite grille dans le fond d’une grande casserole remplie d’eau frémissante. Déposez délicatement les pots. Ils doivent être recouverts d’au moins 2,5 cm (1 po) d’eau. Laissez frémir doucement 10 minutes à mi-couvert. Retirez délicatement les pots de l’eau à l’aide d’une pince et laissez tiédir.
- Si désiré, il est possible de retirer la branche de romarin et la feuille de laurier pour ensuite réduire en purée lisse au mélangeur les piments avec le liquide. Vous obtiendrez donc une belle sauce épicée.
- Il est possible de ne pas procéder à l’étape 3 de la recette. Si vous omettez cette étape, il faudra alors conserver les pots au réfrigérateur.

Ingredients
- 8.8 oz (250g) mascarpone
- 1 ¼ cups (10.1 fl oz/300ml) full fat milk
- 2.8 oz (80g) sugar
- ½ teaspoon vanilla extract
- 1 teaspoon instant espresso powder
- 2 ½ tbsp (40ml) marsala
- 3 large egg yolks
- 3 savoiardi biscuits lady finger
- 1 stong brewed espresso
Instructions
- Whisk the egg yolks and sugar together in a large bowl until pale and thick. Put the mascarpone and milk in a saucepan, heat the milk mixture over a low medium heat until it comes to a boil. Remove from the heat, add the vanilla extract and let it sit for 1 minute.
- Very gradually add the milk to the egg mixture whilst continuously whisking. Once it all fully incorporated transfer the custard liquid back into the saucepan on a low heat. Add the espresso powder and whisk until dissolved.
- Stir the custard for 5-10 minutes until it has thickened enough to coat the back of a wooden spoon. Remove from the heat, add the marsala, stir then set aside to cool.
- Pour the ice cream into your ice cream machine.
- Dip each side if the savoiardi biscuits into the espresso for a second and place on a chopping board. Cut into small cubes, set aside.
- When the ice cream has thickened and almost ready (usually after around 10 minutes) add the savoiardi biscuits a little at a time. Once ready, transfer to a freezer proof tub and freeze until ready to serve.
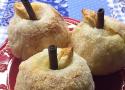
Ingredients
- 4 medium sized apples
- 4 tablespoons golden raisins and currants, mixed
- 1 tablespoon walnut pieces, chopped
- ¼ teaspoon cinnamon
- 3 tablespoon sugar, divided
- 4 tablespoons apple juice or rum
- 4 puff pastry squares (approx. 5 x 5 in.)
- 2 egg yolks
- 1 tablespoon water
Instructions
- Preheat the oven to 400F. Wash the apples, and peel and core them. Mix the raisins, walnuts, cinnamon and 1 tablespoon of sugar, and add the apple juice or rum. Set aside and soak for a couple of minutes, then fill each apple with the mixture. If you have boerenjongens, this is a good time to use them!
- Set each apple, top side down, on a square piece of puff pastry and wrap the apple, by pulling up each corner and tucking it slightly into the cored hole. Make sure all sides are covered and clinging to the apple.
- If you have some extra dough left and a couple of cinnamon sticks, you can make stems and leaves and wrap the apple with an additional decorative something or other, but it's not necessary. If you do use cinnamon sticks, make sure to wrap the top with a little aluminum foil, as they tend to burn easily.
- Make an egg wash with the yolks and the water, and brush on the dough. Sprinkle all four apples with the remaining sugar. Place each apple in a ramekin or small aluminum pie dish, smooth side up. Bake golden brown in 20-25 minutes.
Vraiment délicieux. Il faut porter attention à l'emballage de la pomme pour ne pas avoir d'épaisseurs de pâte qui ne seraient pas cuites.