1812 shaares
512 results
tagged
cuisine
Ingrédients
Gâteau
- 430g de fromage à la crème, tempéré
- 120g de cassonade
- 4 œufs
- 1 gousse de vanille
- 280g de crème 35%
- 20g de farine tout usage
- une pincée de sel
Poires
- 1 poire bien mûre, en dés
- 3 càs de cassonade
- le jus d'un citron
- la gousse de vanille utilisée
Instructions
- Préchauffer le four à 445°F.
- Au batteur, combiner le fromage à la crème, la cassonade, les œufs et l'intérieur de la gousse de vanille.
- Une fois le mélange bien lisse, y ajouter la crème 35%, le sel et la farine, puis mélanger jusqu'à ce que le mélange soit homogène.
- Graisser et parcheminer un moule de 8 pouces, puis y verser le mélange.
- Cuire au four environ 25 minutes, jusqu'à ce que la croûte soit bien dorée et foncée, mais pas brûlée !
- Retirer du four et laisser tempérer 15 minutes, avant de le transférer au réfrigérateur pour le refroidir complètement (un minimum de 2 heures de repos).
- Pendant ce temps : ajouter la gousse de vanille vide dans un petit chaudron avec le jus de citron et la cassonade. Porter à ébullition et y ajouter la poire coupée en dés.
- Mélanger pour bien enrober les morceaux de poires et retirer du feu. Laisser tempérer jusqu'au moment de servir sur le gâteau.

Ingrédients
Génoise au chocolat
- 200 g de sucre
- 6 œufs
- 180 g de farine
- 60 g de cacao en poudre non sucré
- 1 cuillère à café de levure chimique
- 1 pincée de sel
Garniture et montage
- 800 g de cerises dénoyautées en conserve (égouttées et réservant le jus)
- 500 ml de crème fouettée
- 100 g de sucre glace
- 1 cuillère à café d'extrait de vanille
- 100 g de copeaux de chocolat pour la décoration
- Cerises entières pour la décoration (facultatif)
Instructions
- Préchauffez le four à 180°C (350°F). Beurrez et farinez un moule à gâteau de 26 cm de diamètre.
- Dans un grand bol, battez les œufs et le sucre jusqu'à ce que le mélange soit léger et mousseux. Tamisez la farine, le cacao, la levure et le sel, puis incorporez-les délicatement au mélange d'œufs et de sucre.
- Versez la pâte dans le moule préparé et faites cuire au four pendant 30 minutes, ou jusqu'à ce qu'un cure-dent inséré au centre du gâteau en ressorte propre. Laissez le gâteau refroidir complètement avant de le démouler et de le couper en trois couches horizontales égales.
- Pendant que le gâteau refroidit, préparez la crème fouettée en battant la crème, le sucre glace et l'extrait de vanille jusqu'à ce qu'elle forme des pics fermes.
- Imbibez légèrement les couches de gâteau avec le jus de cerise réservé
- Placez la première couche de gâteau sur un plat de service, garnissez-la de crème fouettée et répartissez la moitié des cerises égouttées par-dessus. Répétez avec la deuxième couche de gâteau, la crème fouettée et les cerises restantes. Placez la dernière couche de gâteau sur le dessus et recouvrez le gâteau entier de crème fouettée sur les côtés et le dessus.
- Décorez le gâteau avec les copeaux de chocolat sur les côtés et le dessus du gâteau. Si vous le souhaitez, ajoutez quelques cerises entières pour garnir le dessus. Réfrigérez le gâteau pendant au moins 2 heures avant de le servir pour permettre aux saveurs de se mélanger.
Ingredients
- ¾ cup organic cane sugar
- ½ cup skim milk powder
- 1 2⁄3 cups whole milk
- 1 2⁄3 cups heavy cream
- 3 egg yolks
Instructions
- Prepare an ice bath (see note below) in your sink or in a large heatproof bowl.
- In a medium saucepan, combine the sugar, skim milk powder and milk. Stir with a hand mixer or whisk until smooth.
- Make sure the skim milk powder is wholly dissolved into the mixture and that no lumps remain (any remaining sugar granules will dissolve over the heat). Stir in the cream.
- Clip a candy thermometer to the saucepan and set the pan over medium heat.
- Cook, stirring often with a rubber spatula and scraping the bottom of the pan to prevent sticking and burning, until the mixture reaches 110 degrees, 5 to 10 minutes. Remove the pan from the heat.
- Place the egg yolks in a medium bowl. While whisking, slowly pour in ½ cup of the hot milk mixture to temper the egg yolks.
- Continue to whisk slowly until the mixture is an even color and consistency, then whisk the egg-yolk mixture back into the remaining milk mixture.
- Return the pan to the stovetop over medium heat and continue cooking the mixture, stirring often, until it reaches 165 degrees, 5 to 10 minutes more.
- Transfer the pan to the prepared ice bath and let cool for 15 to 20 minutes, stirring occasionally. Pour the ice cream base through a wire-mesh strainer into a storage container and place in the refrigerator for 1 to 2 hours, or until completely cool.
- Now you're ready to make ice cream. Transfer the cooled base to an ice cream maker and churn it according to the manufacturer's instructions. Or, if you want, you can keep it in the refrigerator for up to 3 days before churning.
- After churning, serve immediately or harden in your freezer for 8 to 12 hours for a more scoopable ice cream.
Note: The easiest place to create an ice bath is in your kitchen sink. Fill the sink a quarter of the way with cold water and add a few handfuls of ice. Then gently lower the ice cream base into the ice bath. Let cool for 15 to 20 minutes, stirring occasionally. Make sure your base has cooled completely before churning.
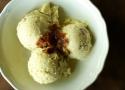
Pour changer de la base Ben & Jerry que j'affectionne particulièrement.
Ingrédients
- 500 g de marrons glacés (ou marrons au sirop)
- 5 marrons supplémentaires
- 25 cL de lait
- 15 cL de crème liquide type fleurette
- 1 cuillère à soupe de rhum (facultatif)
Instructions
- Utiliser des ingrédients bien froids.
- Mélanger le lait, la crème et le rhum. Couper grossièrement les 500 g de marrons et les ajouter au mélange.
- Mixer finement jusqu’à ce que ce soit parfaitement homogène.
- Mettre à turbiner.
- Pendant ce temps, couper les 5 marrons restant en cubes d’environ 1 cm de côté. Les ajouter à la glace en fin de turbinage.
Ingrédients
- 30 cL de lait entier
- 20 cL de crème
- 85 g de sucre
- 3 jaunes d’œufs
- 180 g de beurre de cacahuète (Dakatine ou équivalent)
Instructions
- Mettre le lait, la crème et le beurre de cacahuète dans une casserole.
- Faire chauffer lentement en remuant de temps en temps pour faire dissoudre le beurre de cacahuète.
- Couper le feu dès les premiers bouillons.
- Mettre le sucre et les jaunes d’œufs dans un saladier.
- Fouetter jusqu’à faire blanchir les jaunes d’œufs.
- Verser le contenu de la casserole sur les jaunes, tout en mélangeant pour homogénéiser.
- Remettre le tout dans la casserole et faire chauffer à feu moyen. Ne pas cesser de mélanger avec une cuillère en bois et stopper le feu dès que le mélange nappe la cuillère.
- Verser l’appareil dans le saladier et laisser refroidir quelques minutes.
- Réserver une nuit au réfrigérateur.
- Turbiner.
Ingrédients
- 35 cL de lait
- 15 cL de crème liquide (fleurette)
- 90 g de sucre
- 120 g de raisins secs
- 4 jaunes d’oeufs
- 1 gousse de vanille
- 2 cuillères (30 mL) à soupe de rhum (pour la glace)
- Du rhum en quantité suffisante (pour les raisins)
Instructions
- Dans une casserole, faire chauffer à la limite de l’ébullition le lait et la crème.
- Couper une gousse de vanille en deux et la raclée avec la pointe d’un couteau pour récupérer un maximum de grains de vanille. Mettre le tout (gousse et grains) dans la casserole. Laisser infuser une dizaine de minutes.
- Pendant ce temps, fouetter les jaunes d’oeuf avec le sucre dans un saladier jusqu’à blanchiment du mélange.
- Tout en filtrant, verser le lait sur les jaunes d’oeufs. Mélanger.
- Rincer la casserole et y remettre la préparation. Faire épaissir sur feu moyen tout en remuant. La préparation doit napper la cuillère. En fin de cuisson, ajouter les 2 cuillères à soupe de rhum et mélanger.
- Mettre les raisins dans un bol. Recouvrir de rhum.
- Laisser les deux préparations reposer une nuit au réfrigérateur.
- Mettre la préparation à turbiner.
- Pendant ce temps ,égoutter soigneusement les raisins réhydratés au rhum et les ajouter en fin de turbinage.

Ingrédients
- Fleurs d’hibiscus séchées : 50g
- Lait entier : 500ml
- Crème liquide : 250ml
- Sucre : 150g
- Jaunes d’œufs : 4
- Vanille : 1 gousse ou 1 cuillère à café d’extrait de vanille.
Instructions
- Infusion des fleurs d’hibiscus : Portez le lait à ébullition dans une casserole. Ajoutez les fleurs d’hibiscus séchées, couvrez et laissez infuser hors du feu pendant environ 20 minutes. Filtrez le mélange pour retirer les fleurs d’hibiscus et récupérez le lait infusé. Vous remarquerez que le lait aura pris une jolie teinte rose.
- Préparation de la crème anglaise : Dans un bol, fouettez les jaunes d’œufs avec le sucre jusqu’à ce que le mélange blanchisse. Remettez le lait infusé à chauffer doucement. Incorporez progressivement ce lait chaud au mélange d’œufs et de sucre, en remuant constamment pour éviter que les œufs ne cuisent. Versez ce mélange dans la casserole et faites cuire à feu doux en remuant constamment avec une spatule en bois jusqu’à ce que la crème nappe la spatule. Ne laissez pas bouillir.
- Incorporation de la crème et de la vanille : Une fois la crème anglaise épaissie, retirez-la du feu et ajoutez la crème liquide ainsi que les graines de la gousse de vanille ou l’extrait de vanille. Mélangez bien et laissez refroidir complètement. Pour accélérer le processus, vous pouvez placer le mélange au réfrigérateur.
- Turbiner la glace : Une fois le mélange bien froid, versez-le dans une sorbetière et laissez turbiner selon les instructions de l’appareil, généralement 20 à 30 minutes. La glace doit être onctueuse et bien prise. Si vous n’avez pas de sorbetière, vous pouvez verser le mélange dans un récipient adapté et le placer au congélateur en remuant toutes les 30 minutes pendant environ 3 heures pour éviter la formation de cristaux.
- Conservation et service : Transférez la glace dans un récipient hermétique et laissez-la prendre au congélateur pendant au moins 2 heures avant de servir. Servez la glace aux fleurs d’hibiscus séchées dans des coupes ou des cornets, décorée éventuellement de quelques fleurs séchées d’hibiscus pour une touche esthétique supplémentaire.

Ingredients
- 300ml Double cream
- 300ml Whole milk
- 6 Large free range egg yolk(s)
- 110g Silver Spoon Caster Sugar
- 1 Orange (zest of)
- 2 tbsp Orange juice (freshly squeezed)
- 2 tbsp Cointreau
Instructions
- Heat the cream, milk and orange zest in a large pan until just boiling.
- Take off the heat and leave to infuse for 10-15 minutes.
- Whisk the egg yolks and sugar until pale and thick. Whisk the cream mixture into the eggs, then pour back into the pan and return to the heat.
- Add the orange juice and Cointreau and cook until the custard has thickened, stirring continuously. Taking care not to boil.
- Leave to cool, then chill in the fridge for 4 hours or overnight.
- Churn in an ice cream maker OR place in the freezer, stirring every hour until frozen.
Ingredients
- 1 cup whole milk
- 2 cups heavy cream
- 1/2 cup sugar (100g)
- a pinch of salt
- 1 cup whole bean coffee (80g)
- 4 large egg yolks
- 4 Tbs maple syrup (the real stuff, not that Aunt Jemima shit)
- 4 strips of candied bacon, coarsely chopped
Instructions
- In a medium saucepan over medium heat, mix together the milk, 1 cup of cream, the sugar, salt and coffee. Stir until sugar is dissolved. Cover with a lid and remove from heat. Let steep for 1 hour.
- When the coffee mix has finished steeping, put it back on medium heat until warmed again. Strain the coffee beans and discard. Slowly add the heated coffee-cream into the egg yolks, whisking constantly. Return it all to the pan and cook, stirring constantly and scraping the bottom of the pan, until thick enough to coat the back of a spoon, about 12 minutes.
- Strain the custard and stir over an ice bath until cool. Refrigerate until well chilled, or up to three days. When chilled, whisk in the maple syrup.
- Churn the custard according to your ice cream maker’s instructions. At the end of churning, toss in the candied bacon bits.
- Store, covered in plastic wrap, in an airtight container, for up to 1 month.

Ingrédients
- 750 g de farine
- 43 cl (+/- 10) de lait frais
- 30 g de levure fraîche
- 100 g sucre
- 100 g de beurre
- 1 gros œuf fermier (60 g)
- 1 zeste de citron bio râpé
- 50 g raisins secs
- 25 g de rhum brun (facultatif)
- 12 g de sel
- 1 jaune d’œuf pour dorer
Instructions
- Si vous optez pour la version avec raisins secs au rhum, faire macérer les raisins quelques heures ou même la veille dans du rhum brun. En principe les raisins devraient complétement absorber l’alcool, qui lui, va complétement disparaître lors de la cuisson et ne laisser que les parfums.
- Dans le bol du pétrin, verser le lait tempéré à 20°C, ajouter la levure et la faire fondre.
- Verser la farine par-dessus ainsi que l’œuf et le sucre. Il est très important de ne pas mettre la levure en contact direct avec le sel, au risque de la détruire.
- Démarrer le pétrissage en 1ère vitesse pendant 2 à 3 minutes, jusqu’à ce que la pâte de forme puis ajouter le sel à ce stade
- Démarrer la 2ème vitesse et pétrir la pâte pendant 5 minutes jusqu’à ce que la pâte se décolle des bords du récipient. Cette opération permet de rendre la pâte élastique et de lui incorporer l’air nécessaire au développement de la levure.
- Puis est venu le moment d’ajouter le beurre. Le beurre doit être froid mais pas glacé, à température ambiante est le mieux, mais surtout pas liquide. L’ajouter par petites portions et continuer le pétrissage pendant 4 à 5 minutes ou jusqu’à ce que la pâte se décolle des bords du récipient et devienne lisse, souple et élastique.
- Si vous avez opté pour les raisins secs, au rhum ou pas rhum, c’est maintenant qui faudra les mettre et continuer le pétrissage pour encore 1 à 2 minutes.
- Lorsque le pétrissage est terminé, faire une belle boule avec cette pâte puis la réserver dans un grand bol, à couvert, pour le pointage à température ambiante, ceci pour 60 à 90 minutes, ce qui permet à la levure de commencer son action.
- Une fois la pâte bien développée, lui donner un rabat (la plier en 4) et la remettre dans le bol puis déposer le au réfrigérateur pendant une heure environ.
- Le temps étant écoulé, déposer la pâte sur le plan de travail et la diviser en deux parts, les bouler très légèrement et les laisser se détendre sous un torchon pendant 10 minutes.
- Reprendre les pâtons et les façonner en long, de la grandeur des moules, ici 25 cm.
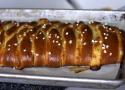
- Les déposer dans les moules beurrés et farinés ou comme ici, recouvert d’un papier sulfurisé et les faire pousser dans un endroit chaud (28°C), recouverts d’une feuille plastique, pour une bonne heure de pointage. Il faut un développement maximal pour ce genre de gâteau.
- Préchauffer le four à 180°C, dorer les brioches avec de l’œuf battu, puis avec une paire de ciseau, les entailler profondément 5 à 6 fois afin d’obtenir les pointes caractéristiques des taillaules.
- Enfourner pour 30 à 35 minutes tout en surveillant régulièrement la cuisson et sitôt cuites, les démouler et les refroidir sur une grille.

Ingredients
- ½ cup (1 stick) unsalted butter, cut into 8 equal pieces
- 1 cup (125 g) all-purpose flour
- ½ cup (63 g) buckwheat flour
- ½ tsp. baking powder
- ½ tsp. baking soda
- 1¼ tsp. Diamond Crystal or ¾ tsp. Morton kosher salt, plus more
- 6oz. bittersweet chocolate (65–75% cacao) bars or wafers (disks, pistoles, fèves)
- ⅔ cup (133 g; packed) light brown sugar
- ½ cup (100 g) granulated sugar
- 1 large egg
- 2 large egg yolks
- 1 tsp. vanilla extract
Instructions
- Heat ½ cup (1 stick) butter in a small saucepan over the lowest heat possible until melted (you don’t want it to sputter or brown), about 5 minutes.
- Meanwhile, whisk 1 cup (125 grams) all-purpose flour, ½ cup (63 grams) buckwheat flour, ½ tsp. baking powder, ½ tsp. baking soda, and 1¼ tsp. Diamond Crystal or ¾ tsp. Morton kosher salt in a medium bowl.
- Coarsely chop 6 oz. bittersweet chocolate. Set aside a handful of chocolate in a small bowl.
- Scrape butter into a large bowl and add ⅔ cup (133 grams) light brown sugar and ½ cup (100 grams) granulated sugar. Whisk vigorously until butter has been absorbed into the sugar and no big lumps remain, about 30 seconds.
- Add 1 large egg, then 2 large egg yolks, one at a time, whisking until fully combined after each addition. Whisk in 1 tsp. vanilla extract. At this point, your mixture should look much lighter in color and be smooth, almost creamy.
- Add dry ingredients and use a rubber spatula or wooden spoon to stir until just incorporated and almost no dry streaks remain. Add chopped chocolate (but not the chocolate you reserved in the small bowl) to batter. Gently mix just to distribute. Cover bowl with an airtight bowl cover, a kitchen towel, or plastic wrap and chill 2 hours. (If you’re crunched for time, 1 hour will do, but cookies will be best after 2.)
- Place racks in upper and lower thirds of oven; preheat to 375°. Using a tablespoon measuring spoon, scoop out scant 2-Tbsp. portions of dough (or, if you have a scoop, this is a leveled-off #30 or a heaping #40)) until you have 10 portions divided between 2 parchment-lined baking sheets (you want five per sheet—these will spread a bit!). Roll portions into balls and gently press a piece or 2 of reserved chocolate into each one. It’s okay to cram the chocolate on there—some pieces can even be vertical. Cover and chill any remaining dough.
- Bake cookies, rotating baking sheets top to bottom and front to back halfway through, until edges are golden brown and centers are puffed, 8–10 minutes. (Pull at 8 if you like your cookies softer and want to guarantee they’re still soft the next day!)
- Working one at a time, pull baking sheets out of the oven and tap lightly on the stove to deflate cookies. Sprinkle with Diamond Crystal kosher salt (if you’re using Morton, skip it: the crystals are too large). Let cookies cool on baking sheets 5 minutes, then transfer to a wire rack and let cool completely. Let baking sheets cool (to do this fast, run them under cold water), then turn parchment paper over. Repeat process with remaining dough, dividing evenly between baking sheets, to make 6–8 more cookies.
Ingrédients
- 300 g de farine de blé
- 50 g de farine de riz
- 1 sachet de levure boulangère sèche
- 20 cl de lait
- 70 g de sucre
- 3 cuillères à soupe d’huile neutre (pépins de raisin par exemple)
- de la pâte à tartiner chocolat noisette (ici gianduja)
Instructions
- Faites tiédir le lait avec le sucre jusqu’à dissolution.
- Quand le lait est tiède/chaud (non bouillant – 30/35°C – trempez votre petit doigt dedans, vous ne devez pas trop ressentir la chaleur), ajoutez-y l’huile (neutre en saveur et en couleur, pas comme ce que j’ai fait donc) et la levure de boulanger.
- Mélangez.
- Dans un grand saladier, mélangez les deux farines puis versez-y le lait tiède tout doucement en mélangeant délicatement avec les doigts.
- Travaillez la pâte jusqu’à obtenir une boule, enrobez-la de farine (pour éviter qu’elle ne colle au plat et favoriser son extraction plus tard) et laissez-la monter deux heures dans son saladier, recouvert d’un linge propre, dans un endroit chaud et à l’abri des courants d’air (enfermée dans votre four éteint par exemple)
- Une fois que la pâte à brioche a bien levée, étalez-la sur un plan de travail, préalablement fariné, à l’aide d’un rouleau à pâtisserie. Ni trop épaisse, ni trop fine.
- Munissez-vous d’un emporte pièce rond de 8 cm de diamètre (environ… ou un verre, ou un petit bol) et découpez des cercles jusqu’à épuisement de la pâte.
- Déposez une petite boule de gianduja au centre de l’un des rond de pâte, et repliez-la autour de la boule vers le haut petit à petit jusqu’à avoir fait le tour.
- Faites une sorte de « tourbillon » au moment de fermer la brioche pour solidifier la « soudure » (humidifiez un peu la pâte au besoin).
- Posez votre banh bao sur un carré de papier cuisson et procédez à la réalisation des autres jusqu’à épuisement de la pâte.
- Enfin, posez-les dans votre panier de cuiseur-vapeur, sans trop les coller et laissez-les cuire 10 à 15 minutes. Une fois cuit vos banh bao ont un peu gonflé et sont bien blancs.
- Servez rapidement après cuisson.
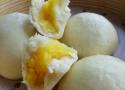
Ingrédients
Farce à la crème-œuf
- 1 œuf
- 30 g de beurre mou
- 35 g de sucre glace
- 20 g de custard powder
- 18 g de fécule de maïs
- 45 g de lait entier
Pâte
- 150 g de farine T 45
- 1,5 g de levure boulangère sèche
- 80 à 85 g d'eau tiède
- 10 g de sucre
- 1 pincée de sel
- 1 c. à café d'huile végétale
Instructions
Pâte
- Mélangez l'eau et la levure, laissez mousser pendant 5 à 10 min.
- Mélangez tous les ingrédients à sec, versez le mélange levure-eau petit à petit.
- Pétrissez pendant 5 min pour avoir une boule lisse et homogène.
- Ajoutez l'huile, pétrissez de nouveau.
- Laissez pousser dans un endroit doux (en couvrant d'un linge humide) et pas trop sec pendant 1 heure.
Farce
- À préparer de préférence la veille et conserver au frais.
- Battez l'oeuf.
- Mélangez le beurre mou avec du sucre, ajoutez l’œuf en plusieurs fois, mélangez bien entre chaque ajout d’œuf.
- Tamisez la fécule et la custard powder, ajoutez dans la préparation précédente, mélangez bien.
- Ajoutez du lait.
- Faites cuire ce mélange au micro-onde pendant 1 min 15, sortez toutes les 20 secondes pour bien mélanger.
- Passez au tamis pour avoir une texture plus fine (pas obligatoire).
- Réservez la farce au frais.
Pliage et cuisson
- Sortez la pâte, dégazez, formez en forme de boudin.
- Divisez en 6 morceaux équivalents.
- Abaissez chaque morceau en petite galette, le bord doit être plus fin que le centre.
- Mettez une belle c. à café de farce au centre de la galette, pliez pour avoir la forme d'un baozi.
- Placez les petits pains dans la panier vapeur, côté plis vers le bas.
- Laissez pousser pendant 30 à 40 min.
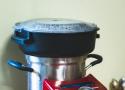
- Mettez le panier sur une casserole ou un wok pré-rempli d'eau froide.
- Faites cuire à la vapeur pendant 12 min à partir d'ébullition (départ d'eau froide).

Ingrédients
- 5 coings (env. 1kg700)
- 1kg500 de sucre cristallisé
- anis étoilé (3 ou 4)
- clous de girofle (5 ou 6)
- cannelle (1 cuillère à café)
- cardamome (1 cuillère à café)
- eau.
Instructions
- Laver et frotter les coings avec une petite brosse pour enlever la "peluche".
- Couper chaque fruit en quatre (sans les éplucher), enlever les trognons en les conservant, tailler chaque morceaux de coings en lamelles.
- Dans une casserole, mettre les trognons, recouvrir d'eau et faire bouillir à petit feu pendant 30 min; égoutter, jeter les trognons et garder "l'eau de coing".
- Peser les tranches de coing; mettre dans un faitout: pour 1kg500 de fruits, ajouter 1kg500 de sucre cristallisé, 60cl d'eau de coing et les épices; laisser macérer 3h pour que le sucre soit bien dissous en remuant de temps en temps.
- Porter à ébullition et laisser cuire à petit feu pendant 30 min en remuant de temps en temps. Laisser refroidir et reposer 24h.
- Le lendemain, porter de nouveau à ébullition et faire cuire encore 30 min en remuant; le mélange doit épaissir.
- Mettre en pot et fermer hermétiquement.

Ingredients
Topping
- ¼ cup (60 g) salted butter, melted
- ½ cup (100 g) brown sugar, light or dark (I usually use light) tightly packed
- 10 pineapple slices, patted dry (a 20oz can is typically enough)
- maraschino cherries
Vanilla Cake
- ½ cup (115 g) unsalted butter, softened to room temperature
- ¾ cup (150 g) granulated sugar
- 2 large eggs, room temperature preferred
- 1 teaspoon vanilla extract
- 1 ½ cups (195 g) all-purpose flour
- 1 ½ teaspoons baking powder
- ¼ teaspoon salt
- ½ cup (120 ml) whole milk, room temperature preferred
Instructions
- Preheat oven to 350F (175C)
- Pour melted butter into 9.5-10" pie plate or deep cake pan, make sure it entirely covers the bottom of the pan and use a spoon or spatula to grease the sides of the pan.
- Sprinkle brown sugar evenly over butter mixture. Arrange pineapple slices over the bottom of the pan, slice leftover slices in half and arrange up the sides of the pan, as seen in photo.
- Place cherries in center of pineapple rings and as desired in empty spaces. Set aside.
- To prepare vanilla cake, beat butter and sugar in medium-sized bowl until creamy and well-combined.
- Add eggs, beating one at a time until combined.
- Stir in vanilla extract.
- In a separate bowl, whisk together flour, baking powder, and salt.
- Alternate adding flour and milk to the wet ingredients, starting and ending with flour and mixing until just combined after each addition (I prefer to do this part by hand with a spatula to be sure not to overmix).
- Pour batter evenly over prepared cake pan over the pineapple/cherry layer.
- Bake on 350F (175C) for 30 minutes. At the 30 minute mark, loosely cover with foil and continue to bake (still on 350F/175C) for another 15 minutes, until a toothpick inserted in the center comes out mostly clean with few crumbs (total cook time for cake will be 45 minutes).
- Allow to cool for 10-15 minutes and then carefully invert cake onto serving platter (careful, it will still be very hot!).
- Allow to cool before cutting and enjoying, but don’t wait too long as this cake tastes wonderful (best!) warm from the oven!
Ingredients
- 400g bread flour (14 ounces; about 2 1/2 cups), plus more for dusting
- 10 g kosher salt (0.35 ounces; about 2 teaspoons), plus more for sprinkling
- 4 g instant yeast (0.15 ounces; about 1 teaspoon), such as SAF Instant Yeast
- 275 g water (9.5 ounces; about 1 cup plus 3 tablespoons)
- 8 g extra-virgin olive oil (0.25 ounces; about 2 teaspoons), plus more to coat pans and for drizzling
- 1 1/2 cups pizza sauce, such as our New York–style pizza sauce
- 12 ounces grated full-fat, low moisture (dry) mozzarella cheese (see note)
- Toppings as desired
- Small handful torn fresh basil leaves (optional)
- 2 ounces grated Parmesan or Pecorino Romano cheese (optional)
Instructions
- Combine flour, salt, yeast, water, and oil in a large bowl. Mix with hands or a wooden spoon until no dry flour remains. (The bowl should be at least 4 to 6 times the volume of the dough to account for rising.)
- Cover bowl tightly with plastic wrap, making sure that the edges are well sealed, then let rest at cool room temperature (no warmer than 75°F or 24°C) for at least 8 hours and up to 24. Dough should rise dramatically and fill bowl. In a hot kitchen, the dough may overproof near the end of that range.
- Sprinkle top of dough lightly with flour, then transfer it to a well-floured work surface. Divide dough into 2 pieces and form each into a ball by holding it with well-floured hands and tucking the dough underneath itself, rotating it until it forms a tight ball.
- Pour 1 to 2 tablespoons oil in the bottom of two 10-inch cast iron skillets or round cake pans (see note). Place 1 ball of dough in each pan and turn to coat evenly with oil. Using a flat palm, press dough around the pan, flattening it slightly and spreading oil around the entire bottom and edges of the pan. Cover tightly with plastic wrap and let dough sit at room temperature for 2 hours (at room temperatures above 75°F or 24°C, the dough may require less time to rise; at temperatures below 65°F or 18°C, it may require more time). After the first hour, adjust an oven rack to the middle position and preheat oven to 550°F (290°C).
- After 2 hours, dough should be mostly filling the pan up to the edges. Use your fingertips to press it around until it fills in every corner, popping any large bubbles that appear. Lift up one edge of the dough to let any air bubbles underneath escape, then repeat, moving around the dough until there are no air bubbles left underneath and the dough is evenly spread around the pan.
- Top each round of dough with 3/4 cup sauce, spreading sauce to the very edge with the back of a spoon. Sprinkle evenly with mozzarella cheese, all the way to the edges. Season with salt. Add other toppings as desired. Drizzle with olive oil and scatter a few basil leaves over the top of each pizza, if desired.
- Transfer pan to oven and bake until top is golden brown and bubbly and bottom is golden brown and crisp when you lift it with a thin spatula, 12 to 15 minutes. Immediately sprinkle with grated Parmesan or Pecorino Romano cheese, if using. Using a thin spatula, loosen pizza and peek underneath. If bottom is not as crisp as desired, place pan over a burner and cook on medium heat, moving the pan around to cook evenly until it is crisp, 1 to 3 minutes. Remove the pizzas and transfer to a cutting board. Cut each pizza into 6 slices and serve immediately.

Ingrédients
- 580g de farine T65 + 1 CS bombée de gluten
- 170g de lait
- 170g d'eau
- 1 oeuf
- 3 CS d'huile d'olive
- 1 sachet de levure sèche de boulanger (8g) délayée dans une CS d'eau tiède
- 1 CC sel
- 1 CS miel
- 1 rizhome de curcuma fraîchement râpé
- des petites graines au choix, légèrement torréfiées (poêlées pendant 15 mn feu moyen, ou four à 170° 10 mn): sésame, courge, tournesol, lin
Instructions
- Déposez les éléments liquides dans la cuve du robot en terminant par la levure délayée préalablement dans 1 CS d'eau tiède.
- Versez les solides par dessus, ajoutez le curcuma, en le râpant à l'aide d'une microplane par exemple.
- Pétrissez au crochet pour obtenir une pâte à la robe jaune homogène, pas trop longuement, 5 minutes suffisent pour obtenir une masse souple un peu collante.
- Couvrez d'un film à même la pâte (elle ne doit pas croûter!), et laissez pousser dans un endroit tiède, sans courants d'air. Une poussée lente, à l'extérieur est préférable à une accélération de la chaleur dans un four, il y a moins de risques de développer une acidité excessive. Si vous avez cependant une forte odeur de levure malgré "une poussée extérieure", ajoutez à votre pâte du jus de citron et un demi zeste...ou bien changez de levure, pour une de meilleure qualité.
- Lorsque la pâte a poussé, appuyez dessus fortement pour chasser l'air. Farinez légèrement un plan de travail (on ne doit pas trop intégrer de farine à présent aux buns!) déposez la pâte, coupez-là en dix morceaux égaux, façonnez-les en boules, en marquant une soudure qui sera le "dessous", si ça colle tant pis, ne refarinez surtout pas vos mains, vos buns doivent rester légers !
- Déposez vos pâtons sur une plaque à biscuits de cuisson (perso je les mets sur deux plaques vierges, ni feuille de cuisson, ni badigeon d'huile qui "croûterait" le dessous des pains, ils doivent rester parfaitement moelleux) antiadhérentes par contre...et ce, de manière espacée et en quinquonce. Recouvrez d'un film alimentaire, pour ne pas faire croûter le dessus des pains. Laissez sur un plan de travail, dans un endroit tiède.
- Préchauffez votre four T 200° sans rien à l'intérieur, surtout pas la grille qui va recevoir vos buns, vous cuiriez le dessous des petits pains beaucoup trop rapidement !
- Dans un bol, délayez 1CS d'eau avec 1 CC de miel, une fois bien diluée, imbibez un petit chiffon propre du liquide. Lorsque les pains ont doublé de volume, enlevez le film et "mouillez" le dessus des buns, parsemez enfin avec vos graines favorites.
- Déposez votre plaque à buns sur une grille parfaitement froide, ajoutez un ramequin d'eau bouillante au milieu des pains, ceci afin qu'il y ait une ambiance légèrement humide dans le four et enfournez pour dix minutes ! Pas plus. C'est près !
- Attendre qu'ils soient totalement refroidis avant de les congeler ou dégustez avec vos garnitures préférées.
- Si on le désire on peut au bout de 30 minutes, couper les pains en deux et les toaster légèrement côté mie.

Ingredients
Dough
- 455 grams (3 1/2 C) unbleached all purpose flour
- 2 1/4 tsp instant yeast
- 1 tsp sugar
- 1 1/4 tsp salt
- 1/2 cup water
- 1/4 cup milk
- 1/4 cup vegetable oil
- 2 large eggs
- 2 large egg yolks
Filling and Topping
- 1 tbsp butter
- 1 tbsp olive oil
- 1 large red onion, halved and thinly sliced
- 6 large shallots, thinly sliced
- 1 tsp sugar
- 1 tbsp herbes de Provence, plus more for sprinkling (mine is from The Spice House)
- 6 ounces grated Gruyere cheese, plus another ounce for sprinkling
- 1 tbsp Dijon mustard
- 1 egg, beaten with 1 T water
Instructions
- Whisk the dry ingredients of the bread in the bowl of a stand mixer.
- Whisk the water, milk, eggs, and egg whites together in a bowl and add to the dry ingredients.
- Mix with the dough hook for about 10 minutes on medium low speed.
- Place the dough into an oiled bowl, cover, and allow to rise until doubled, about an hour.
- While the dough is rising, prepare the onion filling. In a 12 inch skillet, melt the butter and olive oil.
- Add the onions, shallots, and sugar, and cook for about 5 minutes on medium heat. Add the herbs and continue to cook, stirring regularly, for about 20 minutes more, until caramelized.
- When the dough has doubled, place it on a piece of baking sheet sized piece of parchment paper.
- Roll it out to a 12 inch by 11 inch rectangle.
- Spread the mustard lengthwise in the middle of the dough into a 3 inch line.
- Spread the onion mixture over the mustard.
- Sprinkle the 6 ounces of cheese over the onion mixture.
- Using a sharp knife, make diagonal 1 inch cuts on both sides of the stripe of onion and cheese mixture.
- Lift the parchment with the loaf onto a baking sheet.
- Fold the ends over the filling, and then fold the strips over the filling, alternating from both sides, so that the top of the dough looks like a braid.
- Preheat the oven to 350 degrees F.
- Cover the loaf loosely with oiled plastic wrap and let it rise until doubled, about 30 to 40 minutes.
- Brush the top of the loaf with the egg wash.
- Sprinkle the center of the braid with about an ounce of grated Gruyere.
- Sprinkle the top of the cheese lightly with herbes de Provence.
- Bake the loaf for about 45 minutes, until nicely browned and the center registers about 190 degrees F.
- Cool on a wire rack. Serve warm, or cool completely and wrap in foil to serve later.
Ingredients
Sponge
- 6 tablespoons (3 ounces) warm water
- 1 teaspoon sugar
- 1 1/2 teaspoons instant yeast
- 1/4 cup (1 ounce) unbleached all-purpose flour
Dough
- Sponge (above)
- 6 tablespoons (3 ounces) sour cream or yogurt
- 1/4 cup (4 tablespoons or 2 ounces) unsalted butter, softened
- 2 large eggs, 1 beaten for dough, 1 beaten with 1 teaspoon water for brushing bread
- 1/4 cup (1 3/4 ounces) sugar
- 1 teaspoon salt
- 1 teaspoon vanilla extract
- 2 1/2 cups (10 5/8 ounces) unbleached all-purpose flour
- Pearl sugar* or sparkling white sugar for sprinkling
Lemon cream cheese filling
- 1/3 cup (2 1/2 ounces) cream cheese, softened
- 2 tablespoons (5/8 ounces) sugar
- 2 tablespoons (1 ounce) sour cream
- 1 teaspoon fresh lemon juice
- 2 tablespoons (1/2 ounce) unbleached all-purpose flour
- 1/4 cup (2 ounces) homemade (recipe below) or prepared lemon curd
Instructions
Sponge
- In a small bowl, combine the sponge ingredients.
- Stir well to combine, loosely cover with plastic wrap, and set aside to proof for 10 to 15 minutes.
Dough in a stand mixer
- Combine the sponge, sour cream, butter, egg, sugar, salt and vanilla in the bowl of a stand mixer.
- Add flour and mix with the paddle attachment until the dough is a rough, shaggy mass.
- Switch to the dough hook and knead on until a soft, smooth dough forms, about 5 to 6 minutes.
- Place the kneaded dough in a lightly greased bowl, cover with plastic wrap, and allow to rise for 60 to 90 minutes, until quite puffy and nearly doubled.
Dough by hand
- Whisk together sour cream, butter, egg, sugar, salt and vanilla in a large, wide bowl.
- Stir in sponge.
- Add the flour and mix with a wooden spoon as best as you can; you may need to get your hands in there to form it into a shaggy ball.
- Turn ball of dough and any incorporated scraps onto a counter and knead until a smooth, soft dough forms, about 5 to 10 minutes.
- Place the kneaded dough in a lightly greased bowl, cover with plastic wrap, and allow to rise for 60 to 90 minutes, until quite puffy and nearly doubled.
Filling
- Combine all the filling ingredients (except the lemon curd) in a small bowl, mixing until smooth and lump-free.
- Reserve the filling and lemon curd until ready to fill the braids.
Bread
- Gently deflate the dough and roll it out on a very well floured counter to a 10″ x 15″ rectangle.
- Transfer rectangle to a large piece of parchment paper, please; I did not and it led to all sorts of trouble.
- With the side of your hand, lightly press two lines down the dough lengthwise, dividing it into three equal columns.
- Spread the cream cheese filling down the center section, leaving the top and bottom two inches free of filling.
- Spread the lemon curd over the cream cheese filling.
- To form the mock braid, cut crosswise strips one inch apart down the length of the outer columns of you dough (the parts without filling).
- Make sure you have an equal amount of 1-inch strips down the right and left sides.
- Be careful not to cut your parchment paper; if you have a bench scraper, this is a great time to use it.
- Remove the four corner segments.
- To “braid”, begin by folding top flap down and bottom flap up over the filling.
- Lift the top dough strip and gently bring it diagonally across the filling.
- Repeat on the right side, and continue down the entire braid, alternating strips until you are out.
- You can tuck the last couple that hand off decoratively under the end of the braid.
- Carefully transfer the dough and the parchment paper to a baking sheet.
- Cover loosely with plastic and set it aside to rise for 45 to 50 minutes, until quite puffy.
- Preheat the oven to 375°F.
- Brush the loaves with egg wash, and sprinkle with pearl or coarse sparkling sugar.
- Bake for 25 to 30 minutes, or until the loaves are golden brown and your apartment smells like a doughnut factory.
- Remove from the oven and cool for 15 to 20 minutes before serving.