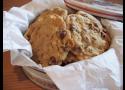
Une bonne recette de cookies.
Avec des boules de pâte de 3.5oz, il a fallu allonger le temps de cuisson à 35 minutes.
Ingrédients
- 114 g (soit 1 stick) de beurre mou
- 220g (soit 420 mL, soit 1 3/4 cup) farine
- 1 gros œuf
- 200g (soit 240 mL, soit 1 cup) de sucre roux (light brown sugar) bien tassé
- 3 cuillères à soupe de sucre
- ½ cuillère à café de bicarbonate de soude
- ½ cuillère à café de levure chimique
- ½ cuillère à café de sel
- 2 cuillères à café d'extrait de vanille
- 1½ cuillère à café d'expresso en poudre (j'utilise celui de la marque Nescafé)
- 360 mL (soit 1½ cup) de pépites de chocolat
Préparation
- Préchauffer le four à 140° C (soit 300° F). Dans un bol, battre le beurre mou et les sucres jusqu'à ce que le mélange soit homogène, 30 secondes environ avec un bateur électrique. Ajouter l'œuf et l'extrait de vanille et battre 30 secondes supplémentaires.
- Tamiser la farine, la levure et le bicarbonate au-dessus d'une deuxième bol et l'ajouter au mélange beurre/sucre. Battre lentement jusqu'à ce que la farine soit à peine incorporée (20 secondes environ). Ajouter l'expresso en poudre et les pépites de chocolat et les incorporer à la spatule. La pâte obtenue est molle et appétissante, n'hésitez pas en gouter une cuillèrée, c'est delicieux.
- Recouvrir une grande plaque de cuisson de papier sulfurisé. À l'aide d'une cuillère à glace ou, à défaut, d'une cuillère à soupe, déposez des petits morceaux de pâte sur la plaque en laissant 2 à 3 cm d'espace entre deux tas. Aplatir les tas à l'aide d'une cuillère à soupe et enfourner jusqu'à ce que les bords des cookies commencent à dorer, 20 minutes dit la recette mais 25 à dit mon four.
- Laisser refroidir sur une grille et déguster tiède, avec un grand verre de lait.

Une belle recette qui donne de superbes pains.
J'aime bien la technique du Tangzhong, ça donne une belle texture à la mie.
À refaire !
Ingredients for the tangzhong
- 20 g (2tbsp) strong white bread flour
- 100 ml water
Ingredients for the dough
- 350 g (scant 3 cups) strong white bread flour
- 7 g (2 tsp) fast action yeast
- 1 tsp salt
- 50 g (1/4 cup) caster sugar
- 1 tbsp milk powder (optional)
- 125 ml (1/2 cup) full fat milk
- 1 large egg
- 50 g (scant 1/4 cup) softened butter
Ingredients for the glaze
- 1 egg, beaten with a splash of milk
- sesame seeds
Instructions
- To make the tangzhong, place the flour in a small saucepan and gradually whisk in the water. Place over a medium heat and cook, whisking constantly until it has thickened to a wallpaper paste-like consistency. Remove from the heat, scrape into a bowl and cover with clingfilm directly on the surface, set aside to cool.
- Place the flour, yeast, salt, sugar and milk powder in the bowl of a stand mixer fitted with the dough hook, lightly stir together and make a well in the centre. Add the egg, milk and tangzhong to the well and mix on a low speed until it comes together into a dough.
- Add the butter and mix on a high speed until the dough is very stretchy and comes away from the sides of the bowl, this can take about 15 minutes, even in a stand mixer.
- Transfer the dough to a lightly greased bowl, cover with clingfilm and either place somewhere warm to rise until doubled in size, about 1-2 hours, or in the fridge overnight.
- Line a baking sheet with baking parchment. Divide the risen dough into 8 equal pieces and shape each piece into a ball on a lightly floured surface. Spread the balls out well spaced apart on the baking sheet and loosely cover with oiled clingfilm. Leave to rise for about 1 hour until puffy.
- Meanwhile, preheat the oven to 200C/400F/gas mark 6. Brush the risen buns with the beaten egg and sprinkle with sesame seeds. Bake for about 20 minutes until deep golden, the internal temperature should reach 94C.
- Transfer the buns to a wire rack to cool before serving, store in an airtight container.

Un très bon pain. Tellement bon que je n'ai pas eu le temps de le prendre en photo avant qu'il soit fini.
À refaire loin du monde pour avoir le temps de le photographier :)
Ingredients for the dough
- 343g / 2¾ Cups Plain Flour
- 1tsp Salt
- ¼tsp Onion Powder
- 2¼tsp Instant Yeast
- 6tbsp Unsalted Butter
- 59ml / ¼ Cup Water
- 79ml / ⅓ Cup Milk
- 2 Large Eggs
Ingredients for the garlic butter
- 113g / ½ Cup Unsalted Butter
- 1 Garlic Bulb
- Parsley
- ¼tsp Cayenne Pepper (optional)
Instructions
- Mix together ¾ of the flour with salt, sugar, onion powder and yeast. In a saucepan melt the butter, milk and water and leave to cool slightly before pouring into the dry mixture. Kneed the dough for 3 minutes before adding in the eggs. Once combined, add in the remaining flour and kneed for another 3 minutes. Flour your work surface and bring the dough together. Place in an oiled bowl and proof for one hour.
- Peel the garlic and add to a food processor along with the parsley and wiz until everything is finely chopped. Melt the butter and and mix together with the garlic and parsley. For an extra kick, add in a 1/4tsp of Cayenne Pepper.
- Sprinkle the base of a baking dish with breadcrumbs and brush some of the garlic butter around the edges. Place the dough balls in the baking dish and cover with cling film. Leave to sit for 30 minutes to proof before brushing the remaining garlic butter on top. Cover with foil and bake at 176 degrees C for 30 minutes.

Ça a l'air décadent. C'est tentant mais je ne sais pas si c'est raisonable d'en faire...
Ingredients for the Shortbread
- 1 cup (136 grams) all purpose flour
- ¼ cup (21 grams) unsweetened cocoa powder
- 1 stick (113 grams) unsalted butter, cut into pieces and at room temperature
- ⅓ cup (67 grams) granulated sugar
- ¼ teaspoon fine sea salt
Ingredients for the Caramel
- 1 cup (200 grams) granulated sugar
- 2 tablespoons water
- 1 tablespoon light corn syrup
- ½ cup (120 ml) heavy cream, at room temperature
- 2 tablespoons (28 grams) unsalted butter, softened and cut into 3 pieces
- ¼ teaspoon fleur de sel or ⅛ teaspoon fine sea salt
- 2 ounces (57 grams) bittersweet chocolate, finely chopped
Ingredients for the Pecan Topping
- ½ cup ( 60 grams) pecans, toasted and coarsely chopped
Instructions
- Preheat the oven to 350 degrees F. Butter an 8 inch by 8 inch pan generously. I lined mine with foil, which I buttered, to make a sling to lift the bars out of the pan.
- In a small bowl, whisk together the flour and cocoa powder.
- Using a stand or hand mixer, mix the butter, sugar, and salt for about 2 minutes, until smooth.
- All all of the dry ingredients to the butter/sugar mixture, and mix on low until fully incorporated and the dough comes together. This took a few minutes.
- Scrape the bowl with a spatula and quickly squeeze the dough with your hands to bring it together.
- Press the dough evenly into the pan. Bake for about 21 minutes. Cool completely in the pan on a wire rack.
- To make the caramel, add the sugar, water, and corn syrup to a 3 quart saucepan and bring to a boil over medium high heat. Cook the mixture without stirring until it becomes a light to medium amber color. As you begin to see color developing, swirl the pan a couple of times and watch fairly closely so that it doesn't get overly dark.
- Lower the heat. Stand back and add the cream, butter, and salt. Turn off the heat, stir in the chocolate, and pour the mixture over the shortbread in the pan. Sprinkle with the pecans.
- Allow the bars to cool at room temperature. Unmold the cookie from the pan and place it on a cutting board. Using a chef's knife, cut the bars into as many pieces as you like. I cut mine into 15 bars.
- The bars can be stored in an airtight container in a refrigerator for up to 5 days. Remove from the refrigerator about 10 minutes before serving.
C'est très bon. C'est très riche. À faire avec parcimonie.

Ça faisait longtemps que je voulais essayer ce pain là. L'attente a été récompensée, c'est vraiment très bon.
Je le referais probablement mais je ferais plus de boules. J'en avais fait 32, mais je pense que ce n'est pas assez.
Yields 1 loaf
Ingredients
- 2 teaspoons active dry yeast
- 1 ⅓ cups barely warm water
- 2 tablespoons extra-virgin olive oil
- 2 teaspoons salt
- 3 ½ cups all purpose (or bread) flour
- ¼ cup butter, melted
- 1 tablespoon dried parsley flakes
- 2 cloves garlic, minced
- ¼ cup freshly grated Parmesan cheese
Instructions
- In a large mixing bowl, stir together the yeast and water. Let sit 5 minutes until yeast is foamy. Mix in the olive oil, salt, and flour. If you have a stand mixer, attach the dough hook and knead the dough for 5-6 minutes, or until elastic. If you are doing this by hand, knead the dough on a lightly floured surface until dough is elastic, 7-10 minutes. Transfer dough to a lightly oiled bowl and cover with a clean kitchen towel. Allow to rise for 1 1/2 to 2 hours, or until dough is doubled in size.
- In a small bowl, combine melted butter, parsley flakes, and minced garlic. Set aside.
- Punch down the dough. Tear off small pieces of dough (roughly the size of the bowl of a medium spoon), coat in the butter mixture, and place in the bottom of a bundt pan. Repeat this process until you have one layer of dough balls. Sprinkle on 1/3 of the Parmesan cheese. Continue layering the dough balls and cheese until you have 3 layers. Cover the pan with a clean towel and allow to sit until dough has doubled in size, 20-30 minutes.
- Preheat oven to 350 degrees F (175 degrees C).
- Bake for 25 to 30 minutes, or until bread is golden brown. Serve hot with a side of marinara or tomato sauce.

Ingredients
- 10 tablespoons (140 grams) unsalted butter
- 1 1/4 cups (250 grams) granulated sugar
- 3/4 cup plus 2 tablespoons (65 grams, may vary by brands) unsweetened cocoa powder (natural or Dutch-process)
- 1/4 teaspoon salt (or a heaping 1/4 teaspoon flaky salt, as I used)
- 1/2 teaspoon pure vanilla extract
- 2 large eggs, cold
- 1/2 cup (65 grams) all-purpose flour
- 2/3 cup (75 grams) walnut or pecan pieces (optional)
Instructions
- Position a rack in the lower third of the oven and preheat the oven to 325°F.
- Line the bottom and sides of an 8×8-inch square baking pan with parchment paper or foil, leaving an overhang on two opposite sides.
- Combine the butter, sugar, cocoa, and salt in a medium heatproof bowl and (Medrich’s method) set the bowl in a wide skillet of barely simmering water. Stir from time to time until the butter is melted and the mixture is smooth and hot enough that you want to remove your finger fairly quickly after dipping it in to test. Or (Deb’s method) you can melt the butter with the cocoa in a microwave too.
- Both methods: Set the bowl aside briefly until the mixture is only warm, not hot. It looks fairly gritty at this point, but don’t fret — it smooths out once the eggs and flour are added.
- Stir in the vanilla with a wooden spoon. Add the eggs one at a time, stirring vigorously after each one. When the batter looks thick, shiny, and well blended, add the flour and stir until you cannot see it any longer, then beat vigorously for 40 strokes with the wooden spoon or a rubber spatula. Stir in the nuts, if using. Spread evenly in the lined pan.
- Bake until a toothpick plunged into the center emerges slightly moist with batter, 20 to 25 minutes is Medrich’s suggestion but it took me at least 10 minutes longer to get them set. Let cool completely on a rack. (I go further and throw mine in the fridge or freezer for a while; it’s the only way I can get them to cut with clean lines.)
- Lift up the ends of the parchment or foil liner, and transfer the brownies to a cutting board. Cut into 16 or 25 squares.
C'est vraiment un très bon brownie. Ça se mange trop vite malheureusement :)

Drooling...
Testé et approuvé. C'est tellement addictif quand on aime le chocolat et le beurre de cacahuètes (ce qui est mon cas).
J'ai un peu modifié la recette pour utiliser ce que j'avais à la maison. Biscuits Oreo au lieu de biscuit Graham et beurre salé.
Le pain est vraiment aérien. C'est un régal avec un peu de beurre et de miel.
À refaire !
Il faut le consommer rapidement car il sèche vite. À mon avis, il est parfait pour faire des croques-monsieur
Ingredients
- 500g Strong white flour (known in the US as bread flour and 1.1lb for my American cousins. You could use 1lb and drop the water to around 250ml)
- 4 heaped teaspoons dry milk powder (I use Tesco Value skimmed milk powder)
- 1.5 teaspoons salt
- 2 teaspoons sugar
- 2 teaspoons baking yeast
- 300ml luke-warm water
Instructions
- Grab a mixing jug and fill with 300ml warm water (luke warm)
- Measure out the 2 teaspoons of yeast into a mixing jug and give it a stir.
- Pop a very small pinch of sugar in with the mixture and 1 last stir around.
- Cover with a clean tea towel or similar. While we're waiting for the yeast mixture, proceed to the next step.
- After around 10 minutes, the mixture should have a frothy head on it like a good beer (like pic 2). It's ready to use.
- Grab a mixing bowl, pop it on some scales and add the dry ingredients.
- Pop the bowl on the stand, attach the dough hook and just give the ingredients a quick 'dry' stir.
- While the mixer is still running on a low setting, grab your yeast mixture and slowly pour all of it in.
- Mix on the low setting for around 6-7 minutes until it's become elastic and dough like. Whilst it's mixing, lightly grease a 2nd mixing bowl. (Make sure your bowl is big enough for the dough to expand into as it'll double in size.
- Take the dough out and place onto a lightly floured surface. I always like to hand knead for the last 30 seconds/minute to ensure the consistency is right. With this load, I didn't use hardly any flour whilst hand kneading. Knead it into a ball and place into the greased bowl. Cover with a clean tea-towel or clingfilm/food wrap and leave somewhere warm for an hour or until doubled in size.
- Tip the mixture out onto the lightly floured surface and gently knead it again (doesn't need much - around 30 seconds to a minute). Try to knead it into the shape of the loaf you're making. I'm using a greased 2lb loaf tin, so I've kneaded the shape into an oval.
- Place the dough into the greased loaf tin. TOP TIP (dust the top with flour to stop the top sticking when rising. Loosely cover ( I used kitchen towel this time) and leave for around 40 mins.
- Check the progress of the loaf after 40 minutes. It should be almost there. Switch on and preheat your oven to:175 degrees C (fan oven), 190 non-fan or 375 degrees F. Come back in 15-20 mins.
- Now it's time to pop it in the oven. It should take around 30-35 minutes. The top should be a golden brown and quite solid at this point. A sure-fire way to check it's cooked through is once you've taken it out of the loaf tin, flick the middle of the bottom of the loaf. The sound should be hollow.

Facile à faire et très goûteux. Pour conserver une couleur neutre, il vaut mieux utiliser du sucre blanc.
La pâte est très bonne ! Elle sort croustillante du four et elle ramolli peu à peu.
La garniture est vraiment très savoureuse !
J'ai utilisé de la levure de boulanger à la place de la levure deshydratée. J'ai utilisé du pesto à la place du basilic. Miam !
Très bonne recette. La pâte est très aérienne. Les lardons fumés et le cumin parfument agréablement le pain.
À refaire !
Un genre de pain d'épices individuel. C'est très bon.
Le sucre donne un léger croquant !
Très bonne recette. Elle est très facile à faire.
Par contre, il faut faire attention à la durée mentionnée dans la recette. Elle ne nécessite pas 4h40 mais plutôt 4 jours plus 1 nuit plus 4h40. Ne vous laissez pas avoir comme je l'ai été.
La recette a disparu du site. Je l'ai retrouvée sur archive.org
Ingredients
- 10 lemons
- 1 (750-ml) bottle vodka
- 3 ½ cups water
- 2 ½ cups sugar
Instructions
- Using a vegetable peeler, remove the peel from the lemons in long strips (reserve the lemons for another use). Using a small sharp knife, trim away the white pith from the lemon peels; discard the pith. Place the lemon peels in a 2-quart pitcher. Pour the vodka over the peels and cover with plastic wrap. Steep the lemon peels in the vodka for 4 days at room temperature.
- Stir the water and sugar in a large saucepan over medium heat until the sugar dissolves, about 5 minutes. Cool completely. Pour the sugar syrup over the vodka mixture. Cover and let stand at room temperature overnight. Strain the limoncello through a mesh strainer. Discard the peels. Transfer the limoncello to bottles. Seal the bottles and refrigerate until cold, at least 4 hours and up to 1 month.

J'avais essayé cette recette il y a quelques temps et je n'avais pas été enchanté, car les goûts de la sauce piquante et du whisky étaient inexistant.
Hier, je lui ai donné une deuxième chance en doublant les quantités de café instantané, de sauce Sriracha et de whisky. J'ai utilisé du Talisker pour son goût tourbé (et aussi parce que je n'avais que celui là sous la main ^^).
C'était nettement plus intéressant. À refaire!
Ingredients
- 1 cup butter unsalted butter, plus extra for pan
- 2 cups unsweetened or semi sweet chocolate, chips or finely chopped
- 2 cups sugar
- 4 large eggs
- 1 tbsp instant coffee
- 1 shot of whisky
- 1 tsp sriracha or ½ tsp cayenne pepper
- 1½ tsp salt
- 2 cups all-purpose flour
Instructions
- Heat oven to 350°F.
- Gather your tools and ingredients.
- Butter your baking pan.
- Brown the butter in a medium sauce pan. Take it off the heat.
- Add your instant coffee and chopped chocolate to the pot and stir until it has melted and the coffee has dissolved.
- Add your sugar, mix to melt into the mix a bit.
- Add a few dashes of alcohol of your choice and a squeeze of sriracha.
- Test the chocolate with your finger. It it needs more salt or booze or spice, add it now. If its not very warm anymore, you can add your eggs.
- Sprinkle your flour and salt over top of the mix, and fold it in just until it's evenly blended.
- Don't over mix, but make sure you are scraping the bottom and sides as you stir.
- Pour the mix into the baking dish. Swirl the batter with the tip of your knife.
- Bake at 350 for 20-30 minutes until a knife inserted into the middle comes out clean.
- Let cool and cut.

À refaire!
Attention à faire cuire suffisamment longtemps dans un moule large.
Il n'est pas nécessaire de pré-couper le pepperoni avant de le mettre sur la pâte.
Excellent pain. Le gout du fromage et de l'ail est bien équilibré. À refaire!
À refaire !
C'est une réussite. J'ai malheureusement lu la recette trop rapidement.
Du coup, j'ai oublié la sauce piquante et j'ai mis les épices dans la moutarde au lieu de les mettre sur le fromage.
Mais je crois que ça ne change pas grand chose.

J'ai fait plusieurs fois cette recette. Les instructions sont claires et le visuel aide à voir les textures à obtenir.
Pour aller plus loin voila une page qui recense les problèmes et leurs solutions lors de la réalisation de macarons
Quelques trucs et astuces pour la conception
Et pour finir, la référence francophone du macaron

Ingrédients
- 500 g de farine
- 20 g de levure fraîche de boulanger
- 20 cl de crème fraîche (j'ai utilisé de la Fleurette)
- 100 g de sucre
- 2 œufs (100 g)
- 90 g de lait
- 1/2 cc de sel
- La pulpe d'une demi gousse de vanille
Instructions
- Dans le bol du robot verser tout les ingrédients en émiettant la levure fraîche.
- Pétrir la pâte 10 à 15 minutes, la fariner et la laisser doubler de volume sous un linge.
- Fariner le plan de travail, déposer le pâton dessus et le détailler en 20 boules de 45 à 50 g.
- Les bouler en serrant bien pour leur donner de la force et les placer dans un moule graissé.
- Laisser à nouveau doubler de volume.
- Préchauffer le four à 150°C et enfourner la Buchty pour 20 à 25 minutes, elle doit être à peine dorée.
- Recouvrir de sucre glace et déguster !
Très bon.
J'ai remplacé une partie de la farine blanche par de la farine complète à patisserie et la vanille par de l'extrait de vanille.